
There is a known issue when creating new partitions within Windows 7 where you see “Windows 7 Setup Unable to Create New System Partition.” Learn how to circumvent it here.
As good as Windows 7 may be, it isn’t yet perfect. Many users have encountered problems during install or when trying to partition a drive within Windows. This article will discuss methods of working around this so you can partition your hard drives without any problems.
When setting up Windows 7 for the first time, there is a dialog box that instructs you to choose a partition to install Windows 7. Sometimes this box doesn’t contain any drives, even though you may have many installed. The first move here would be to turn off your PC and disconnect all but your DVD and the hard drive you are installing Windows onto.
Occasionally the Windows setup program has trouble with RAID drives, or multiple hard drives. Unplugging extraneous hardware is something I would advocate whenever installing a new Windows operating system. It seems to speed things up considerably, and prevents issues like these.
The next opportunity Windows has to produce this error is while you are attempting to partition from within Windows 7. For some reason, known only to Microsoft, Windows files aren’t installed in nice tidy lines or clusters on a hard drive. They can appear all over the place. Even if you defrag your drive first, sometimes Windows won’t allow you to partition a drive because there are system files in the way.
To circumvent this problem I suggest using a third party program GParted . I use GParted as it’s Linux based (GNOME) and very reliable. Simply download the file which is an ISO image, burn it using your favorite burning tool, and choose the “burn ISO image” option. Once completed, restart your PC with the disk in the drive and boot from it.
The GParted application will load automatically and show you a screen of your existing disks and partitions. To create a new partition it may be necessary to shrink an existing one. Highlight the hard disk you want and select “Resize/Move.” Drag the slider so it shows the size of the partition you want and click on the “Resize/Move” button. Once this operation is completed, highlight the free space and click “New.” Size the new partition and choose the file system, preferably NTFS, then click “Add.” After the program completes, you should have a resized partition, and have added a new one.
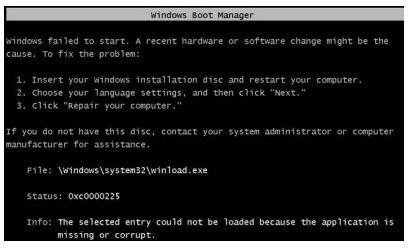
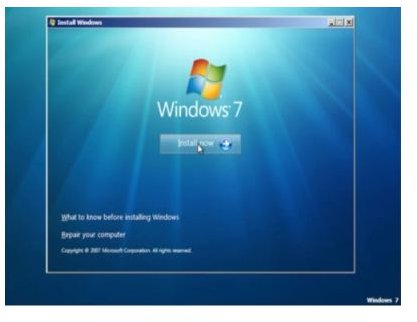
The GParted disk will allow you to move, resize, and generally manage partitions. The only problem is that you may have to repair your Windows 7 installation afterwards. Remember that Windows doesn’t put the files in a nice orderly fashion? There is a chance that the GParted program may move or damage files in the process of creating a partition if you are using your primary hard disk where Windows lives. If this happens then Windows won’t boot properly and you will have to boot again from the Windows 7 setup disk and choose to repair. This option is available on the second install screen, when you see the “Install now” option, look to the bottom of the window and select “Repair your computer.” The error screen you might see is image number 2. The repair option is image 3.
This all sounds like a lot of work, but it is a fairly simple process once you get into it. As with any fiddling you do with Windows, make sure you have a backup of all your important data before trying it, and create a restore point, just in case.
Reference
Author’s experience
Images by original author


