The “Unmountable Boot Volume” error brings with it that dreaded blue screen of death. It is often the result of an upgrade to Windows XP, and can cause an irreversible loss of data if the problem is not resolved. This Windows tutorial shows you how to fix it using the Windows XP Recovery Console.
It Starts with the Blue Screen
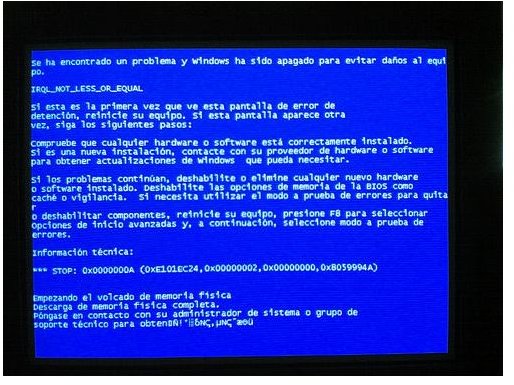
A computer crash and the dreaded Blue Screen of Death can be one of the most devastating experiences ever, and often follows the “Unmountable Boot Volume” error - one of the most fatal to befall a PC. When you receive this error message, it indicates that your Windows operating system can’t boot from your hard drive. You may receive this error after an upgrade to Windows XP .
What Causes the “Unmountable Boot Volume” Error?
There are three possible reasons for this error:
-
Very often, the “Unmountable Boot Volume” Error and the dreaded blue screen of death is the result of a corrupted BOOT.INI file, which is found in your boot drive. You can save your system (and precious data) using the Windows XP Recovery Console, which you can access using the Windows XP installation disk that came with your PC. This tutorial outlines this recovery process in the next section.
-
If your PC uses a UDMA hard disk controller, using a standard 40-wire connector cable may cause the “Unmountable Boot Volume” error. For those of you who feel comfortable looking inside your PC case, check this possibility. In this case, replace this with an 80-wire UDMA cable, and then reboot your computer.
Advertisement -
If you are computer savvy, double check to see whether your BIOS is configured to force faster UDMA modes (Ultra Direct Memory Access). If this is the case, re-start your computer to enter your BIOS (during start up, a message on your screen will instruct you to press “Del,” F2 or F12 or other key to enter your BIOS.) In your BIOS, load the “Fail-Safe default settings.” Re-start your computer.
Read the next page for a tutorial on how to fix the error using the recovery console which should have come with your Windows XP Installation Disk. Don’t worry if you don’t have it anymore, you still have options…
Picture Credit:
https://www.flickr.com/photos/edans/22208000/
Use the Windows XP Recovery Console
-
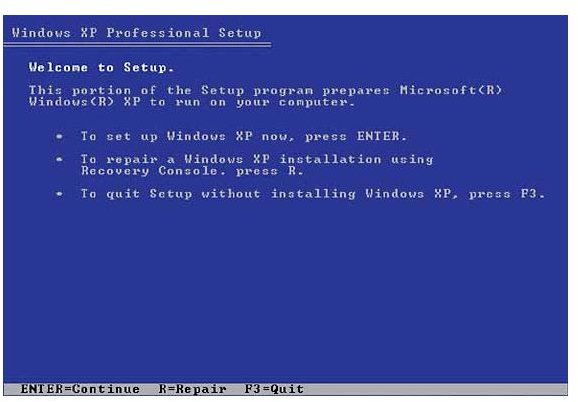
Shut down your computer. Insert the Windows XP installation disk into CD or DVD-ROM drive and restart up your computer.
-
As soon as you get to the “Welcome to Setup” screen, press the R key on your keyboard. This will take you into recovery mode and present you with a DOS prompt.
Advertisement -
Enter your administrator password if prompted, or leave it blank if you haven’t defined one yet.
-
Select the Windows XP installation that you want to repair. Typically, this will be listed as “1: C:\Windows.” If you have more than one operating system installed, just select the number for the corresponding installation
-
Type in: chkdsk /p at the prompt, and press Enter. This launches a Windows utility that scans for errors on the hard drive.
Advertisement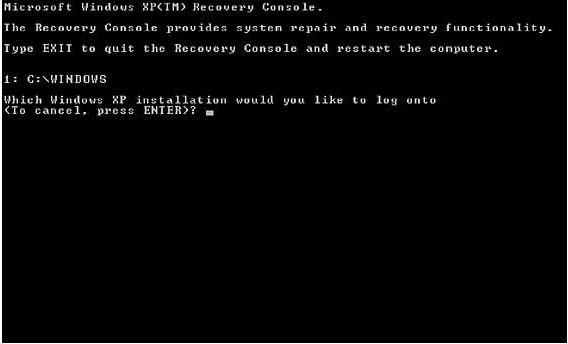
-
Wait for the process to complete, and then type: fixboot at the command prompt. Press Enter, which initiates the repair of corrupted boot files.
Advertisement -
Type: Y for yes when prompted to select Yes or No to “write a new boot sector to the partition C.” *Type in: EXIT to quit from the Recovery Console. Press Enter. This will reboot your computer into Windows.
-
If this does not work, repeat all the steps above, except that you will type in: chkdsk /r in Step #3 above (instead of “chkdsk /p”). This process will take significantly longer, but can repair your corrupted files.
Advertisement -
If this still does not work, you may have to face the possibility of starting over with a fresh install of Windows XP – and the loss of your data….
TIPS
-
If you don’t have your Windows installation disk, you can download the Windows XP Setup boot disk from Microsoft and create one on a CD. Or just borrow one from a friend or colleague.
Advertisement -
If your PC can’t use a bootable CD-ROM or if you just prefer to use floppy disks, you can download the Windows XP Setup boot disk from Microsoft to floppy disks. You will need 6 floppy disks altogether.
Setup boot disk for Windows XP Home Edition


