Getting sick of Windows XP update notifications or want to avoid some future updates causing chaos on your perfectly configured Windows installation? Canceling Windows updates can be done simply and efficiently and it is even possible to disable notifications completely.
Priority Enhancements
A standard installation of Windows XP has Windows Updates active and checking for updates by default. The reason for this is to enable Windows to manage the downloading and installing of useful enhancements to the operating systems, from driver updates and Java frameworks to Service Packs and Windows Genuine Advantage.
Offline PCs - those with no connection to the World Wide Web - will not receive any Windows Updates, although it isn’t unheard of for notifications to display.
The majority of Windows XP machines, however, will by default periodically poll for updates and, based on how the Windows Updates are configured, will download and install the enhancements based on priority.
This can cause considerable problems for many users- for instance you might want to cancel the update that is currently downloading.
As such there are two ways to cancel Windows Updates. You can cancel the update that is downloading or has downloaded and is waiting for installation, or you can prevent future updates from automatically downloading at all.
Cancel a Downloading Update
In order to prevent an update from installing, you need to wait for the file to complete downloading. Once this has been done it is a relatively simple task to remove the download file, thereby preventing Windows Update from trying to install the download. Follow these steps to cancel a Windows Update.
1. To begin, Go to Start → Run.
2. At the insertion point enter services.msc and click OK.
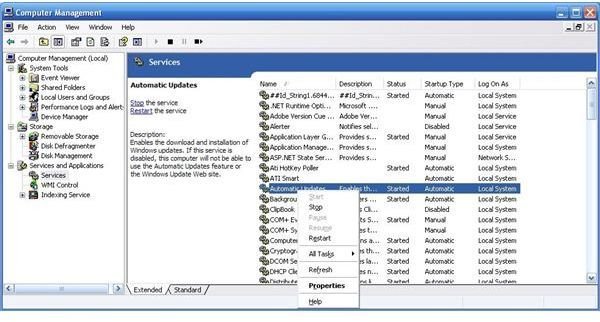
3. (Alternatively ignore 1 and 2 by right-clicking My Computer, selecting Manage and expanding Services and Applications to find Services).
4. In the main pane, right click on Automatic Updates and select Stop.
5. After the service is stopped, press Go to Start → Run.
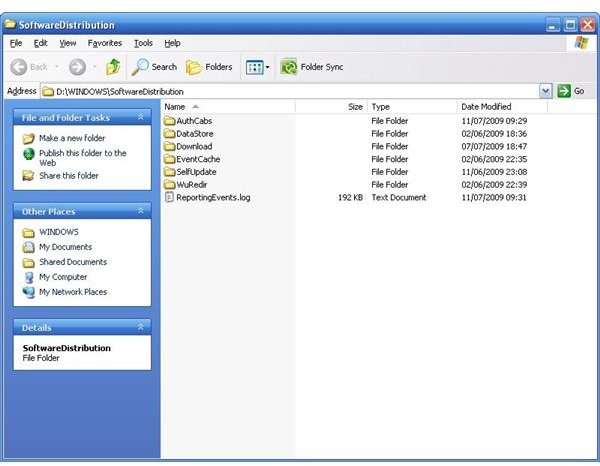
6. This time enter %windir%\SoftwareDistribution and click OK.
7. An Explorer window will open, and you will see a list of folders - open the one called Download.
8. Delete the contents of the Download folder.
9. Close the window, then go back to Start → Run.
10. Again enter services.msc and click OK (or repeat 3.)
11. In the main pane, right click on Automatic Updates and select Start.
Now you have removed the downloaded updates, and Windows will no longer detect them. However they will more than likely be downloaded again at a later point.
Turn off Automatic Updates.
To prevent Windows Automatic Updates from automatically downloading and updating, you need to reconfigure Automatic Updates.
This can be done by going to Start → Run and typing sysdm.cpl - alternatively, right-click My Computer, select Properties and go to the Automatic Updates tab.
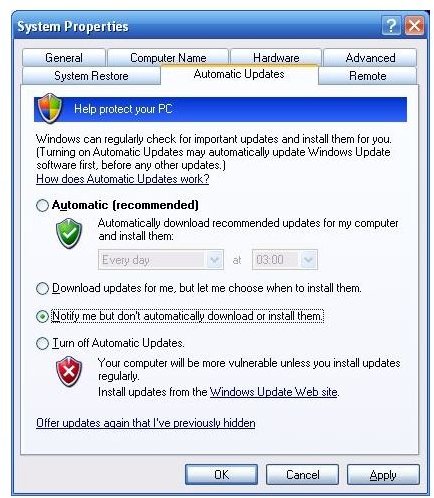
There are four options that can be chosen:
1. Automatic - this is the default setting for Windows, and can be set to check daily or weekly at a specific time.
2. The second option downloads the updates but gives you a choice of when to install them.
3. Next is a choice to receive notification but leaves control of downloading and installation in your hands. This is the best option, allowing the downloading of the most important, required updates, and one that allows you to monitor what updates are available.
4. Finally, you can switch off Automatic Updates.
By following these steps you can take control of Windows Automatic Updates, cancel them if necessary, and ensure that future updates are kept totally in your control.
There are a couple of things to bear in mind, however.
1. You will need to be logged into your Windows Administrator account in order to successfully disable Automatic Updates and delete the previously downloaded updates.
2. Choosing to disable Automatic Updates completely isn’t recommended as you are pretty much opening yourself up to attacks from newer malware and scripts that Automatic Updates would otherwise protect you from. As such consider this option carefully.


