In this article, we take a look at how to set Windows 7 firewall rules and create your own rules for greater security. Learn how you can apply rules for inbound and outbound traffic, and see how you can control the various ways in which those rules can be applied.
Introduction
Linux and Unix have had a bulletproof firewall solution in the form of Ipfilter, netfilter and iptables. Until Windows 7, the default firewall bundled with Windows was very ineffective, clunky, and weak. You could turn it on/off, and add rules for incoming traffic based on ports and executables. You could not do many of the things which are found in even free firewalls these days. But with Windows 7, Microsoft has finally worked on the built-in firewall and improved it by leaps and bounds. In this article we take a look at how to set Windows 7 firewall rules and how you can work with the firewall in Windows 7 to keep your computer more secure and finely control the outbound and inbound traffic on your system.
The Windows 7 Firewall
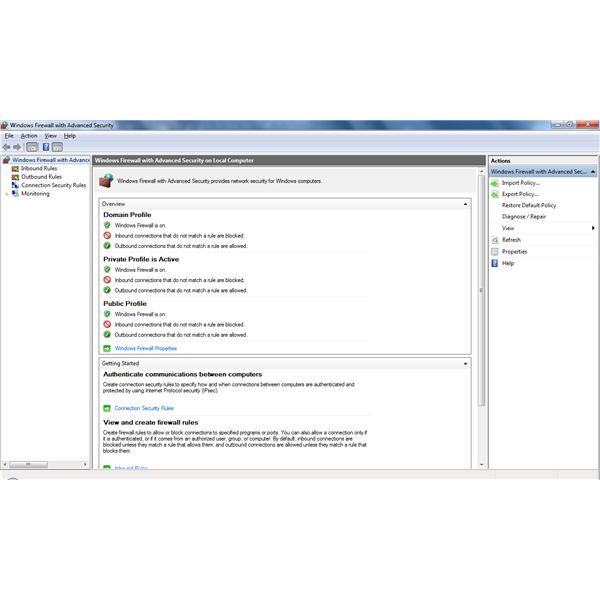
With Windows 7, you get a completely revamped firewall package. Not only do you get more control over incoming traffic, but you can finally monitor and control outbound traffic too. If you’re a novice user who just wants to get work done safely, the default rules will probably be good enough for you. On the other hand, if you’re a power user with a fetish for configuring every small thing by hand, the new firewall will be an incredibly valuable tool for you. So let’s start by opening the Windows Firewall. Click on the Start button, then go to Control Panel. In the Control Panel, choose Windows Firewall.
The first window you see is the simple window with enough information to satisfy a novice user’s curiosity. If you want to play with and create new rules for the firewall, click on the Advanced settings link on the left. This should open up a new window.
Creating New Inbound Rules
These rules will be applied to traffic coming into your system. This includes all traffic that comes in from other computers inside your home network, other private networks you might be connected to, and the Internet. To create a new rule:
Click on New Rule in the sidebar on the right. This will open up a new box asking you what type of rule you want to create.
The different types of rules you can choose from are Program, Port, Predefined and Custom.
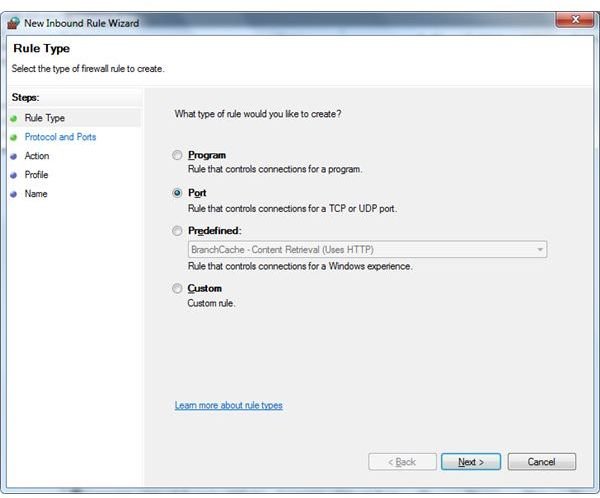
- The Program rule will apply to a program’s executable (.exe) file. By default, this rule will then apply to all information coming in for that application. It will apply on all ports and protocols by default. You can change this behavior afterwards by going to the rule’s properties and changing the relevant settings in the Protocols and Ports tab.
- The Port rule will apply to a specified port, ports or a port range. You can also specify the protocol (TCP/UDP) that the rule will be applied on. By default, this port will then be opened for any application that decides to use it. To open the port for only a specific application, go to the rule’s properties and change the relevant settings in the Programs and Services tab.
- The Predefined rule will allow a connection by selecting one of the programs or services from the list. Most of the well known services and programs available on computers running Windows 7 appear in this list. Network programs that you install typically add their own entries to this list so that you can enable and disable them as a group.
- The Custom rule will allow you to create a rule which cannot be properly described by any of the above type of rules.
Let’s say that you need to open a specific port so that you can run a web-server on your computer. A web-server listens on port 80 and this port has to be opened on your computer for any traffic/requests to reach the web-server application running on your computer.

- Select Port as the rule type and click on Next. It will now ask you the protocol for which you need the port opened. In our case, we need TCP port 80 opened. If you are unsure about which type of protocol you should select, refer to your application’s documentation for the same.
- Once you’ve selected TCP, it’s now time to type 80 in the Specific Local Ports textbox. In this textbox, you can open a single port by typing a number, multiple ports by separating them with a comma, or a port range by putting the start and end range with a hyphen, like 80-90. In our case, we type 80, then press Next.
- It will now ask what it’s supposed to do when it sees inbound traffic on TCP port 80. You now have 3 options to choose from: Allow, Block, or Allow if secure. The Allow if secure option relies on IPSec and is beyond the scope of this small guide. In our case, we select Allow since we want the traffic to reach our computer.
- The next option asks you the type of connections to which this rule will apply. If you want to run a web-server only for the local computers in your home network, you’d select Private and deselect the other two: Public and Domain. On the other hand, if you want to run a public web-server, you would select Public and Private from the list. The Domain option will only apply if your computer is part of a corporate domain.
- On clicking next, it will ask you for a name for the rule and a small optional description. We name our rule “webserver p80”. This will adequately describe our rule for anyone who takes a look at it.
Clicking on Finish will create the rule and make it active.
Creating New Outbound Rules
These rules will apply to all traffic going out of your system. This includes local LAN traffic and traffic for the Internet.
- Click on New Rule on the right-sidebar.
- This will open a box which we should be familiar with. We will now create a rule to open multiple ports and a port-range.
- Click on the Port rule and click Next.
- Select the protocol you want the rule to be applied on.
- Here, we will now type multiple ports and a separate port range. In the list, type 80, 22, 6667, 21, 3128-3130.
- Next, select Allow the connection. This will allow all applications to send outbound traffic through the above ports.
- Finally, select the types of networks that this rule will apply to, give it a name and a description and save it.
That’s it! You’ve created a new outbound rule. You can now customize these rules by double-clicking on them and changing the various settings in the different tabs.
Conclusion
These simple steps explain how to set Windows 7 firewall rules and allow you to create and fine-tune your firewall and specific rules for your computer. When trying to keep a computer secure, a firewall is one of the most important tools along with an antivirus suite and other malware detectors. Keep using and creating new rules for the Windows 7 firewall to get used to the power it gives you, and soon enough, you’ll be able to effortlessly keep your system secure from most online malware.


