If you find yourself in a position where your Windows 7 laptop with wireless Internet has the only Internet connection but you need to share the connection with your friends, if they have WiFi, it’s not hard to do. Here we show we you how.
First of all, please note that this article deals with creating an instant wireless hotspot in Windows 7. If you’re laptop is running Windows Vista, please see this article instead . If your laptop is running Windows XP, we have that covered, too .
Do you ever find yourself in a position where your Windows 7 laptop, using a built-in WLAN or a wireless card, is the only PC that has the Internet connection at a company or social event? If so, if the other laptops have Windows 7 or Windows XP, you can set up a simple wireless ad-hoc network for Internet Connection Sharing. This is not difficult to do, and Windows 7 comes with all the tools you’ll need.
Setting up the Ad-hoc Network
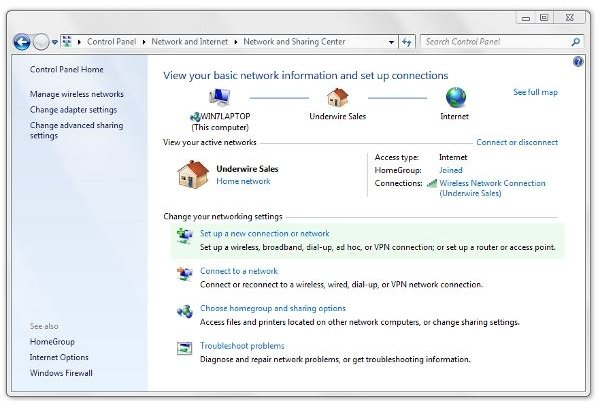
To start setting up your mobile hotspot, press the Windows key or click on the Start button/orb and go to Control Panel → Network and Internet → Network and Sharing Center. Click on “Set up a new connection or network.”
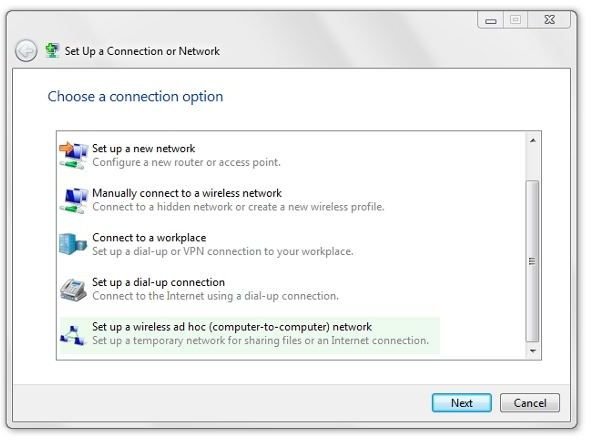
Scroll down, if necessary, and select “Set up a wireless ad hoc (computer-to-computer) network.”
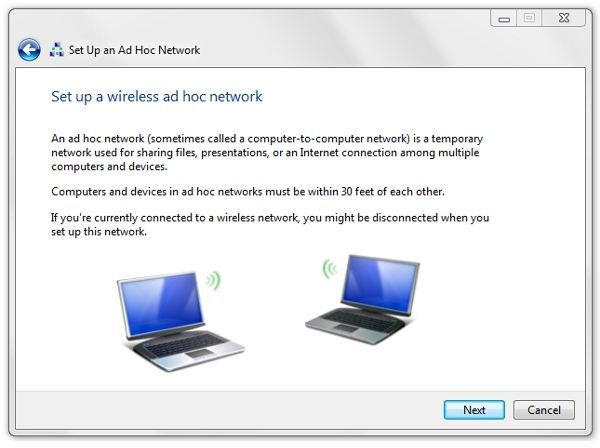
This will start a mini-wizard that describes setting up the ad-hoc network.
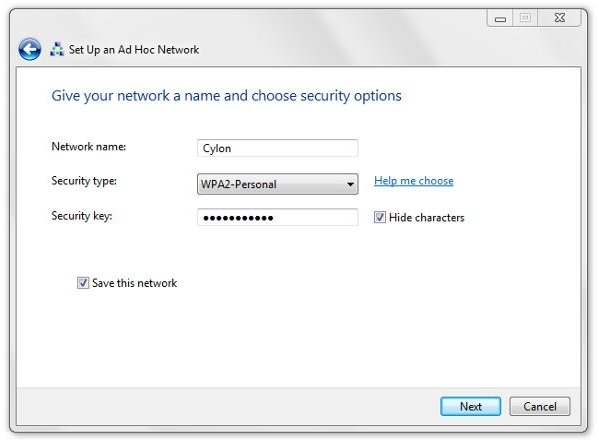
Enter a name for your new network, select your desired level of privacy, and set a password. Then click “Save this network."
About Wireless Security
In the past, I’ve advocated selecting WEP privacy. This advice has become a bit dated. WEP is an older protocol and is not the most secure. I’ve suggested WEP rather than a stronger protocol because it will allow older laptops and handhelds to connect to your network. WEP is better in a mixed environment, and ad-hoc networks are intended to be temporary. The relative risk is that WEP offers weaker security than WPA and WPA2.
With that said, however, if the other devices that will connect to the network were manufactured within the last two years or so, the stronger, and still uncompromised, WPA2-Personal security type should be selected. For a more in-depth discussion of the differences between the security types, please see WEP, WPA, and WPS - Which to Use?
The dialog says, “To share files, open Network and Sharing Center in Control Panel and turn on file sharing.” Actually, we probably don’t want to share files in our ad-hoc network. We want to just share the Internet Connection. Click on the “Network and Sharing Center” link to open the Network and Sharing Center, and in the left-hand pane, click on “Change adapter settings.”
Starting and Sharing the Internet Connection
At this point, Windows 7 is ready to share the default Internet connection, which is the Ethernet Connection. However, we want to share the wireless card or WLAN connection instead. On my Windows 7 laptop, the wireless connection is called “National Access – Broadband Access.”
In the dialog, right-click your wireless device and select “Properties.” Windows 7 may ask for permission to continue. Click on the “Sharing” tab and select “Allow other network users to connect through this computer’s Internet connection” and click OK. This sets up Internet Connection Sharing, and this completes setting up your portable hotspot in Windows 7.
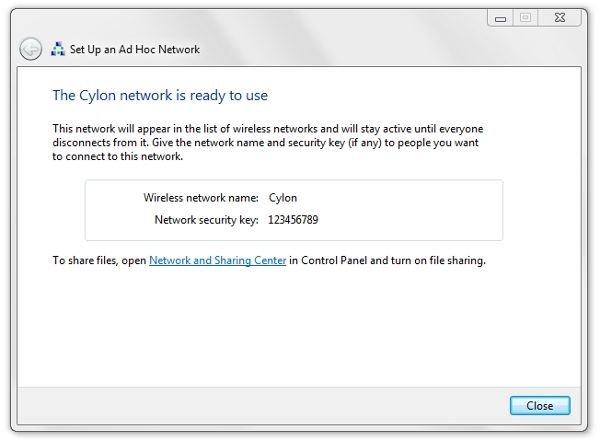
To use it, first connect to the Internet wirelessly using the usual method on your laptop. Then once you’re connected, go to Start → Network and select “Connect to wireless network.” Click your new network under Wireless Network Connections. If all goes well, Windows 7 will report “The [network] is ready to use” and will stay active until everyone disconnects from it.
Your friends and co-workers should now be able to go to their Network Sharing Center and find your new network listed under “Connect to a Network.” Note that only one Internet connection can be set up for sharing at one time. If you later decide to enable it for your Ethernet connection, you’ll need to go into Network Connections and Properties for your “Local Area Connection.”
Simplified Home Networking for Windows 7, Vista, and Windows XP - Want to set up the simplest wireless home network for your mixed Vista, XP, and Windows 7 computers? Want a network without a “boss” computer or cumbersome passwords that works even if some of the computers are not online and the simple rule for those that are connected is “share and share alike?”
Extend the Range of Your Wireless Network - Have “dim spots” in your wireless coverage or need to eke out just a little further coverage? Here are some strategies to extend your network that range from free and do-it-yourself to hardware upgrades and new appliances.
How Did Microsoft Come Up with “7” for the Newest Version of Windows? - Since Mike Nash announced in the Vista Team Blog last year that the next version of Windows was to be officially called “Windows 7,” some people have been wondering how they came up with this number. To find out, let’s take a brief look back at past versions of Windows and their numbered release sequence.


