
The Internet is an indensible part of our lives. For almost everything, we reach out to the Internet. In this regard Internet connection speed plays a major role. DSL broadband connections offer up to 2Mbps speed. Setting up Windows XP DSL Connections is easy and anyone can do it.
Introduction
One of the most important things that we cannot do without is an Internet connection. We need it to keep in touch with our near and dears, for official and business needs, for gaming, for our entertainment needs, and even for shopping.
In short, people have become dependent on an Internet connection for almost everything. Early operating systems had too complex interface to set up an Internet connection.
Among the different types of Internet connections available, the DSL connection is the best as we will learn in the later paragraphs. Moreover, setting up Windows XP DSL connection is comparatively easier owing to the auto network detection feature of the Windows XP computer and the simple Internet Connection Wizard provided by the operating system.
Internet on Windows XP: Why use DSL?
DSL is much faster than the conventional dialup connection. A traditional dialup connection can give you speeds of not more than 56 Kbps, which is too slow if you want to play games, listen to songs, or watch videos on the Windows XP computer. The dialup connection is also frustrating when you are trying to email a large file to your boss.
DSL is a broadband connection that offers up to 2MBPS of speed. Also known as pppoe connection, DSL stands for “Digital Subscriber Line.” The broadband connection employs two parallel copper wires that are similar to the ones used by telephone companies. In fact, you can also use a landline telephone with the Windows XP DSL connection. Under such case, both the telephone and the pppoe connection will act separately. This means that your Internet connection will not be disconnected if someone picks up the phone.
Other faster methods of accessing the internet are cable and satellite, but both are too costly and an average person cannot afford them easily. Considering all these points, the DSL connection is the best choice as it is fast and cheap too. Yet another reason to use the broadband connection on Windows XP systems is that setting up Windows XP DSL connection is as easy as a cakewalk.
Requirements for Setting up Windows XP DSL Connection
For setting up a Windows XP DSL connection, you need to get a DSL account from a local Internet Service Provider (ISP). The ISP generally has boosters called Central Offices at different places. We stress that you should choose a local ISP because the distance between the Windows XP computer and the central office affects the speed of the broadband connection.
Generally, when you apply for a DSL account with the local ISP, one of their technicians will turn up to set up the pppoe connection. However, you, too, need to know the steps for setting up Windows XP DSL Connection.
You will also need a DSL Modems in order to connect to the Internet. In case you intend to use the telephone service also, you will need a splitter device to split the carrier into individual and independent voice and broadband connections.
Before we start with setting up Windows XP DSL connection, let us again review the elements required:
- A DSL broadband internet connection account with a local ISP
- Modem DSL (provided by the DSL connection provider)
- Splitter (provided by the DSL connection provider)
- Splitter Wires (2), Data Cable (1), and a Power Adaptor (also provided with the DSL connection provider
- An Ethernet Card (comes bulit-in with most computers).
Ethernet Drivers for setting up Windows XP DSL Connection
Your computer hardware should also have an Ethernet card that can handle high speeds. Most of the modern Ethernet in
Windows XP computers and can handle speeds up to 100 Mbps.
To check if the computer has the Ethernet card drivers installed, open the Device Manager (Press the Pause/Break Key while holding down the Windows key). Expand the Network Adaptors. If the Ethernet card drivers are installed, it will show up there.
If the drivers are not installed, you can use the Motherboard CD to install the Ethernet drivers. Alternatively, you can download the Ethernet card drivers from your computer manufacturer’s website. Ethernet drivers are necessary for the DSL internet connection to work.
Setting up Windows XP DSL Connection: Configuring the Hardware
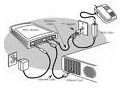
1. Connect the main phone line coming from the ISP (DSL line) to the splitter. The splitter will have one incoming port and two outgoing ports. As they are marked, you will not have trouble locating the port to which the wires are to be connected.
2. In the splitter, look for the port marked as “phone” and connect one end of the phone line to the port and the other end to the telephone. Connect the DSL Modem phone wire to the splitter port marked “ADSL”. Connect the other end of the phone wire to the Modem DSL. There is only one phone socket on the DSL Modem so you can easily set it up.
3. Connect one end of the data cable to the DSL Modem and the other to the Ethernet port on your Windows XP computer.
4. Finally, plug in the adapter pin to the DSL Modem and plug the adaptor to the power socket. Turn on the power to see if the DSL modem is receiving power. Once the Modem is turned on, you will see the power LED and Phone line LED blinking. There are two more LED on the Modem that will turn on after setting up Windows XP DSL connection on the computer.
Setting up Windows XP DSL Connection: Configuring the Network Connection
Setting up Windows XP DSL Connection is the easiest part of the process. The Windows XP will recognize the wire you plugged into the Ethernet card and show it in the Network Connections under Accessories -> Communications.
Basically, there are two types of ADSL connections. The first one in called Always On and does not require any ID or password. You can log on to the internet as soon as you power on the computer. The second one is Limited Usage DSL connection, where your ISP will charge as per the usage of connection.
If you have opted for Always On DSL connection, you need not do anything. The Windows XP will automatically fetch the network settings from the DSL connection provider and set it up for you. Sometimes it may fail and you may have to set it up manually.
For Limited Usage DSL connections, you will have to use the New Network Connection Wizard. You can also use the same if your Always On DSL connection is not detected automatically by the Windows XP computer.
If you have a CD from the ISP, you need not use the Wizard. The CD will set up your DSL connection. If you do not have the CD, use the New Network Connection Wizard.
Setting up Windows XP DSL Connection: Using the New Network Connection Wizard.

1. Click Start -> Programs -> Accessories -> Communications.
2. Select the New Connection Wizard and click Next.
3. The Wizard will give your several options. As you are setting up Windows XP DSL connection, select the topmost option that says connect to the internet. Click Next.
4. Select Setup My Connection Manually and click Next.
5. You will get three options in this screen. The first one is for the Dialup connection so we need not select it. If your DSL account is Always On, select the third option and click Finish and check out the next section on IP Addresses. If your DSL account is a Limited Account that requires password, select the second option and click Next.
6. Enter a name for this connection and click Next.
7. In this screen, enter your DSL ID and password that you got from the ISP. Click Finish.
Setting up Windows XP DSL Connection: Assigning IP Addresses Manually
Most Windows XP computers have the capability of detecting network settings and assigning them to your DSL connection. To see if your computer is configured to do this, reboot and try to connect to the internet. If you are able to connect, the DSL connection is working.
If the Internet Browser says that it cannot connect to the Internet, it means that the network settings for the pppoe connection have to be configured manually. Before we do this, we need the following information:
-
IP Address assigned to you by the ISP;
-
Subnet Mask;
-
Gateway; and,
- DNS Server Address.
Please call your ISP and note down the above.
Click on Start -> Programs ->Accessories -> Communications -> Network Connections. You can see the Internet connection icon in the window. Right Click on the icon and click properties to open the DSL Internet connection properties dialog box. Double click on the TCP/IP row (usually the last in the dialog box). Another window opens. Here you have to enter the IP address, Subnet Mask, Gateway, and DNS server address as provided to you by your ISP internet connection provider. Once you enter the information, click OK and close all the windows.
Open the Internet Browser, click on the Tools Menu and click on the option that says Remove Browsing History. This will clear any cookies that may create problems. Once done, reboot the Windows XP computer.
Now you can start using the internet connection. Setting up Windows XP DSL is easy and anyone can do it. The only thing is to be prepared with the requirements mentioned above. Happy Surfing!


