It is nice to know that you can create code in your office suite to automate some repetitive tasks, but it may seem frightening to those who haven’t tried before. No worries, here we explain Excel VBA basics.
A Tiny History of Visual Basic for Applications
BASIC has more than 20 years of history as a computer programming language. The name says it, it is “basic” and it is something like speaking with your computer. Later on BASIC evolved into Visual Basic, which you can use to design interfaces with your mouse. Meantime, Microsoft tailored Visual Basic to work with its Office suite and called it “Visual Basic for Applications”, which VBA stands for. In this article, we will touch the basics to give you a small step in getting going with your VBA programming experience. Even just a little knowledge of VBA can give a real boost of efficiency when working in Excel and other Office applications.
Getting Started with Visual Basic for Applications
Opening the VBA module is the same in all Microsoft Office programs, but I will choose Excel because we will have as much flexibility as we want with the calculations.
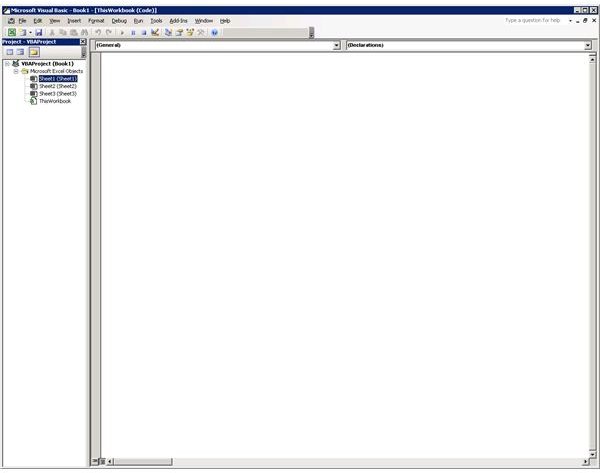
Let’s go step by step from opening a blank workbook. Open up Excel. If you did not play with the preferences, you should have Sheet1, Sheet2 and Sheet3. You can start the VBA module by going through Tools -> Macro -> Visual Basic Editor or simply hitting Alt + F11. Now, we have our worksheet open and our code window. As you see, the window is split into three: at the top there are the menu and icon bars, on the left your VBA Project and on the right the code window. On the left pane you see “VBA Project(Book1)” and then “Microsoft Excel Objects.” Our default worksheets are listed as “Sheet1(Sheet1)”, “Sheet2 (Sheet2)” and “Sheet3 (Sheet3).” On the right, at the top you see two dropboxes: (General) and (Declerations). We will get to each one in a minute.
You do not need to stick with the default naming scheme of course. If you rename your file (your Excel workbook) to something else, such as “My_Workbook” and save, you will see that on the left pane VBA Project(Book 1) changes to VBA Project(My_Workbook). The same way, if you rename the worksheets, the changes will be applied to the Sheets under Microsoft Excel Objects. Let’s rename Sheet1 to Calculations, Sheet2 to Detailed_Reports and Sheet3 to Summary_Report. On the left pane in Visual Basic Editor, you will see that Sheet1(Sheet1) has changed to Sheet1(Calculations), Sheet2(Detailed_Reports) and Sheet3(Summary_Report.) However, if you switch back to your workbook and change the order of the worksheets, for example move Summary_Report to the left of the Calculations, the Sheet1, Sheet2 and Sheet3 notation will not change. The notation has an advantage: you can refer to the sheets as you name them. You do not need to say “Sheet1” in your code, go with “Calculations.”
Regarding the two dropboxes, there is such a thing as declaring variables in programming. I will try to keep things as simple as possible here, and open things up where necessary, to avoid losing you in the article. There are two types of variables: global and private. Global variables will be available in all modules in the code, whereas Private variables will only be available in the module it is defined under.
Also, there are the Sub and Functions. These are the two sections of code that perform a specific action. Function returns a value and Sub does not. We will come back to that later.
Read on for more details on Global Declarations, our first excel VBA application and making calculations.
Global Declarations
Bringing it all together with the “Global” “Declarations”, you define variables and requirements that will be used in all the program. For example, if you say “Option Explicit” in Global Declarations, you must define each variable and type in the code. Failing to do so will return an error. Another example could be to define a = 5, which means that in all your code, Excel will assign 5 to the variable a. Summing up, the global declarations will be used in both Subs and Functions.
Getting Our Hands Dirty: Our First Excel VBA Workbook - Open Another Excel File
Now I will assume that we have a workbook in which we want to open another notebook saved on our computer. (I will stick with the notation of My_Workbook as the filename, Sheet1 renamed as Calculations, Sheet2 as Detailed_Reports and Sheet3 as Summary_Report.) When we open My_Workbook.xls, it will go to the “My Documents” folder and select the “Expenses” sheet and open it.
Go to the left pane, and double click on “This Workbook” in the left pane. In the right, make sure that “Workbook” and “Open” are selected. If not, select them. Now Excel will automatically insert the following code piece:
Private Sub Workbook Open()
End Sub
What Excel tells us is this: “I have opened a private sub for you. This is a sub, it will not return any value. It is private and what you do here will not affect the overall code. I have named this to Workbook_Open() so that when you open this file, I will know what I must do.”
Now, we will say that we are interested in Workbooks and we will open a file called C:\My Documents\Expenses.xls. (We must give the full path of the document to avoid any problems in the future.)
OK. We will proceed and insert our code as follows:
Workbooks.Open Filename:= “C:\My Documents\ Expenses.xls”
See? It is not any different from speaking to your computer.
Closing the filename is easy. Make the workbook which you want to close “Active” and then close it. In our example:
Windows(“Expenses.xls”).Activate
ActiveWorkbook.Close
Read on to find out more about making calculations and assigning codes to buttons.
Making Calculations - It Doesn’t Get Any Simpler Than That!
Let’s switch to the “Calculations” worksheet. Now, type “Value 1” to A2, “Value 2” to A3, “Product” to A5 and “Sum” to A6. In B2, we will enter the value of “Value1”, in B3 the value of “Value 2” and we will make Excel calculate the sum and product automatically, and write the result of the product to B5 and sum to B6.
To do this, we first go to the Visual Basic Editor and right click on the “Microsoft Excel Objects” and select Insert -> Module. Under the tree structure, you will see “Module1.” Now go to Insert at the menu and select “Procedure.” Make sure that “Sub” is selected under “Type”, “Public” is selected under “Scope” and “All local variables as Statics” is unchecked. Type something under the “Name” box as you prefer. I chose “Calculate.”
Between the Public Sub Calculate() and End Sub enter the following code:
Sheets(“Calculations”).Select
Range(“B5”).Value = Range(“B2”).Value * Range(“B3”).Value
Range(“B6”).Value = Range(“B2”).Value + Range(“B3”).Value
If you are with me so far, you already saw that we have selected the “Calculations” sheet and defined values for the cells. It is important that you use the .Value notation, otherwise “Range” may return text, which means that you may end up with two numbers put together instead of being added; the sum of 3 and 5 may return 35 instead of 8.
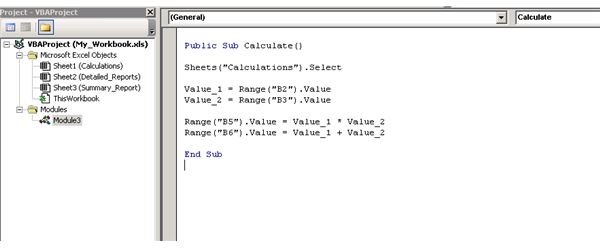
After this point, it is up to you to enter as many calculations as you want. At this point, I suggest you assign variables to cell values to save typing time. For our code, it is better to go like this:
Sheets(“Calculations”).Select
Value_1 = Range(“B2”).Value
Value_2 = Range(“B3”).Value
Range(“B5”).Value = Value_1 * Value_2
Range(“B6”).Value = Value_1 + Value_2
Homework: Go for a more complex sheet with more calculations.
Getting “Visual”: Assign a Button to Your Code
Building on our previous notation, we will add a button to our worksheet, which upon click will call our “Calculate” function.
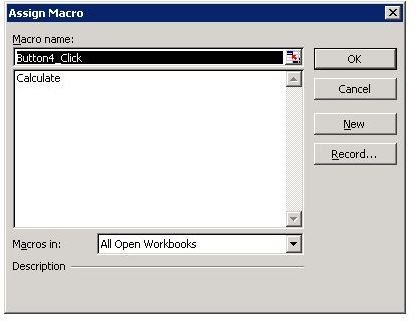
Switch to the Excel main window and right click on the toolbar and select “Forms.” A new toolbox will appear. Select “Button” and click and drag to place your button to where you want it to appear. When you relieve your click, a window will appear to ask you which macro you want to assign to the button. Select “Calculate” and click “OK.” That’s it! After that when you click on the button your code will run.
Homework: Change the default “Button 1” name to something else. Change your code to divide the numbers and write the results to the B7 cell.
Conclusion
It is very easy to get going with macros in the Microsoft Office suite. In the article we have just taken the baby steps to have Excel VBA basics explained. Having a solid base, you can now go on to build on top of this information.


