OK, you have read our previous article and said “Bah! Windows Vista is old stuff, I want my computer to have the Windows 7 look.” Well, here is how to change your Windows XP theme to look like Windows 7.
Introduction
In my previous article, I explained how to change Windows XP to look like Windows Vista for people that are bored with the default Luna theme. We will follow the same steps, do some downloading and installation (get our hands dirty) and finally have a Windows XP that looks like Windows 7.
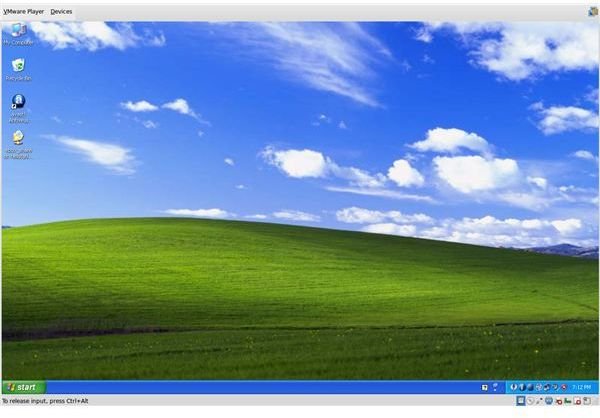
For your reference, we have the “Before” and “After” images. The screenshot on the left is my Windows XP desktop before going on to change it to Windows 7.
Changing the Window Look
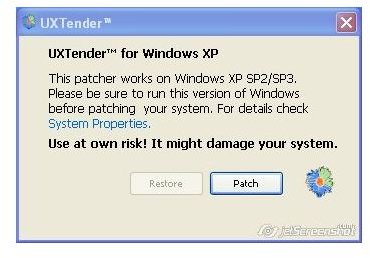
First of all, we need to make our XP allow installation of unsigned themes because Microsoft blocks their installation. We need to download the UXTheme Patcher . When you are downloading the program, make sure that the file you download is for your system (for example if you are using XP with Service Pack 3, download the file that is for SP3), otherwise you might end up with an unusable Windows XP installation. UXTheme Patcher is a small program that will change your uxtheme.dll file to make XP accept unsigned themes. After the download, double click on the file and select “Patch”. When it confirms the patch is applied successfully, reboot.
For breadcrumb navigation, you have to install the QT Tab Bar from its Wiki site . To install this feature, you have to have the .Net Framework 2.0 installed.
Now, head over to Vishal Grupa’s website and download the SevenVG Refresh Theme with SuperBar for Windows XP . When downloading is finished, extract the zip file. You will have five folders: Extra Common Tasks, Fonts, Iconized Taskbar Hack, Styler Toolbar and Theme. Don’t get excited and try to run every executable file you see; be patient for a moment.
Fonts
Vishal has done a nice thing and saved us from font installation. Open the Fonts folder and double click on the file to install the Segoe fonts to your system. This involves only one click; hitting the “Install” button on the opened window.
Styler
This is again easier than what we had to do when we were changing our Windows XP theme to look like Windows Vista in the previous article. Now, go to the Styler Toolbar folder and install the “First Install Me” file. Follow the usual “Next” steps and when finished run the “Then Run Me” file. Intuitive huh?
Theme
Now, switch to the “Theme” folder and double click the file you see. In a couple of seconds you will see the “Display Properties” window with the “SevenVG RC” theme selected.
Icons & Graphical Drive Status View
OK, Windows XP icons do not match our Windows 7 view. To change our icons, we will download the Stardock’s Icon Packager program. It is a trial version, but this is not important for our purposes, since we will only use it for a couple of minutes. When you are done with download and install, head over to download Vista Icon Pack for Windows XP . After you download the icon pack, open it with Icon Packager. Done.
*Just to note, you can uninstall the Icon Packager program from your system if you will no longer use it. I also advise you to run a tuning utility (such as CCleaner) to clean up the relevant registry entries and other leftover files.
Of course we will take care about our drive status icons in the “My Computer” view. To do that we download the Drive Status . After the download, we open the .rar file and install the program. Now, we see all the status of our drives in a graphical representation under the icons.
System Properties
Head over to Vishal Gupta’s website and download the Windows 7 System Properties dialog box. Extract the contents and copy the sysdm.cpl to C:\Windows\System32 folder. It will ask you to overwrite the existing file, choose “Yes” (but always, to be on the safe side rename the existing sysdm.cpl file to something like sysdm.cpl.old) and reboot.
You may not find this one so useful and I must state that I always have had problems running this. I do what I told above, double clicked on the sysdm.cpl file and it ran well. But after that XP always switched to its default system properties window.
AeroShake, AeroSnap and AeroPeek
These are among the many features that are introduced by Windows 7. AeroShake allows you to minimize all the open windows except the one where you are working (the active window) by simply holding the window’s title bar and shaking it with your mouse. AeroSnap lets you minimize, maximize or resize your windows by simply dragging them to the corners of your desktop. Finally, AeroPeek lets you peek at your desktop by just pointing your mouse to its icon. It is similar to the Show Desktop feature but different in the sense that it outlines the opened windows by transparent rectangles. When you move your mouse pointer from the icon, your windows come back again.
To install the AeroShake feature , download the executable file. Simply run it and you are done. For AeroSnap, go to the AeroSnap’s website and download the program developed by Christian ’edgi’ Schoch. But do note that this utility requires .Net Framework 2.0. And finally for the AeroPeek, it can be downloaded from the FogelSoft’s website .
Transparency & Window Previews
Approaching our final step, we will add thumbnail previews, which will make us see the contents of the opened windows when we hover our mouse pointer to the taskbar. We revisit the Crystal XP site and download the Visual Tooltip program. For the true transparency of the window titles, we download True Transparency program from the same website. There is no additional task here, install and enjoy.
Conclusion
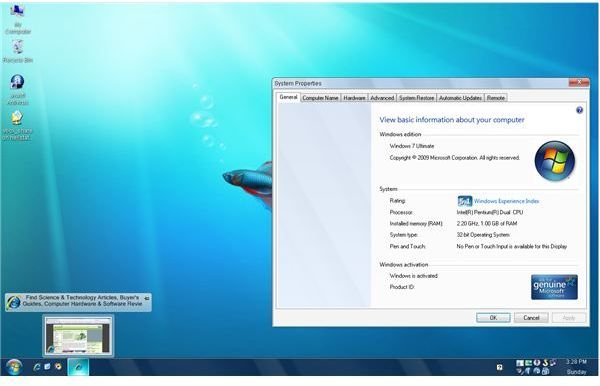
If you are still with me, you have successfully installed Windows 7 style XP theme to your computer and are enjoying it. (see screenshot on the left) However, please note that all the programs/items that we have installed do steal from your computer’s resources. If you have a relatively new computer, you can probably ignore this, but if you have an older one you will possibly experience some slowdown. If Windows XP complains that some system files are changed during the process and wants to revert the process, doing so will stop you from carrying on changing your theme.
What’s more, we have covered the basics to change your Windows XP theme. If you want to try additional themes, you can follow the instructions from the theme’s developer and install them more or less the same way. Unsigned themes will no longer be a problem because we have patched the uxtheme.dll at the very beginning.
By the way, the screenshot on the right is the “After” image, for which I applied all the steps above.
This post is part of the series: Theming Windows XP to Look Like Windows Vista or Windows 7
Want to give your Windows XP a new look? You can change your good old Windows XP to look like Windows Vista without sacrificing too much performance. Or maybe you want to jump over to Windows 7 directly? Here we go step by step to change our Windows XP’s look to Windows Vista and Windows 7.


