Word 2007 has some powerful tools to help every level of writer. Whether you are writing a freelance article or a formal research paper, the Word 2007 menu changes may confuse you at first but with the new writing tools you can now go way beyond the basics of grammar and formatting.
Discovering MS Word’s new look
Word’s new version of the world’s most widely used word processor appears somewhat daunting to the new user, until we discover that clicking on tabs at the top of the window now displays everything that used to be buried in menus. The Home tab, for example has the most of the formatting menus experienced users were accustomed to in the 2003 version. Writers will be happy to discover that the new References and Review tabs likewise resurrect the writing tools that made Word famous.
Reviewing beyond spellcheck
Switch to the Review tab to run a spelling or grammar check of your work, or to find a synonym in the Word Thesaurus. Working with another language? Word’s built-in translator tools, along with a screen tip translator, are at your fingertips. Need to research while you are writing? Click on “Research” next to “Spelling & Grammar” to activate the Research pane.
Fleshing out your writing with Flesch-Kincaid
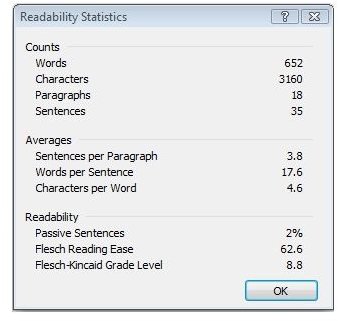
If you are interested in readability statistics (Flesch-Kincaid), you’ll need to turn this option on in Word Options (click the Office Button at the top left, click on Word Options on the lower right, and select “Proofing” from the left side of the dialog box). In the third group of the Proofing dialog box, click on the “Show readability statistics.” Writers should strive for a high Flesch Reading Ease percentage and a Flesch-Kincaid grade level between 8 and 10. You will also want to keep the percentage of passive sentences to an absolute minimum.
Editing without changing
Using the Comments and Tracking sections of the Review tab, the writer (or editor) can select words or sections of a document to add comments or questions. To use the traditional color-coded highlights, switch back to the Home tab and select the text highlight tab. Click around and experiment to see how you can annotate, track, and see a history of all the changes made to your document.
Making research papers easier
Buried in MS Word’s template treasury is an MLA research paper guide (written, of course, in MLA style). Find this beauty through the Office Button. Click on New and select “More Categories” under the Template list. Select “Papers” to open the MLA Template. MS Word has even automated the drudgery of listing and making citations in research papers. The References tab has all the tools the writer needs to add sources in MLA, APA, Chicago, etc., styles that will make anyone who graduated from college before 1990 quite jealous. (Remember all those 5 by 8 citation cards we old-timers had to use?) Word even automates the bibliography and Works Cited pages!
Easing other writing tasks
Need a table of contents, an index, a footnote or endnote? All that and more are accessible on the References tab. If you are planning to have a table of contents in your document, it is best to format your document with the built-in heading styles. Once you have formatted your document with the needed styles, just click on the “Table of Contents” icon on the far left, and watch MS Word do its magic. Making an index takes a little more patience, but the process is intuitive. Also, footnotes and endnotes are a breeze. They are self-adjusting, but footnotes can get a bit cumbersome and cause spacing problems at the bottom of each page if they are lengthy.
Getting to the bottom line
So today’s writer has an outstanding tool to ease the technical problems associated with the craft. Microsoft Word has always been the front-runner with tools to help the writer. Its 2007 version brings that help closer to the surface with automated tools that get the writer to the bottom line quicker.
Microsoft has prepared several useful on-line tutorials that cover some of the features discussed in this article. Visit Microsoft’s main tutorial page for Word 2007 to see the latest.


