Keeping track of spending in this economy has become something of a necessity. But, how can you do that without spending a bunch of money on budget software? Use Excel. It’s already available on many Windows systems and it’s easy to use. Learn more now!
Why Use Excel?
Creating a monthly budget is a necessity, especially in this economy. You want to be able to track what you have spent, how much you spend on bills and what your total income is. This way, you can always see how much that you are spending.
But, why use Excel? Well, first of all, it’s usually free (or free for a certain amount of time) since it comes with almost every computer that is on the market. If you’re trying to save money, you should not want to spend money on software. Depending on what version of Microsoft Office that you buy, you may only receive a 30- to 60-day trial version of Excel. You will probably have buy it for $229. If, however, you buy Microsoft Office Standard, Professional or Small Business 2007, Excel is included in these suites.
Second, it’s really simple to use. With a few easy-to-create formulas, you can have an easily updateable budget at your fingertips. Many of the most recognizable names in the budget-making software industry are fairly obtuse and difficult to use. And, finally, you can create a budget that you can easily customize to fit your needs..
Creating Tables for Your Expenses
The first thing that you need to do is create a new worksheet. While you can create your budget any way that best fits your needs, creating a few tables may be the easiest. To do this, follow the below instructions.
1. Open a new worksheet.
2. Right click on Sheet 1 at the bottom, and click rename.
3. Rename your worksheet.
4. Select the number of cells (the squares on the sheet) that you need to create the adequate number of spaces to put your information into.
5. Go to the Insert Tab at the top.
6. Go the Tables group, and click Table.
7. Or, you may press CTRL+L or CTRL+T for shortcuts.
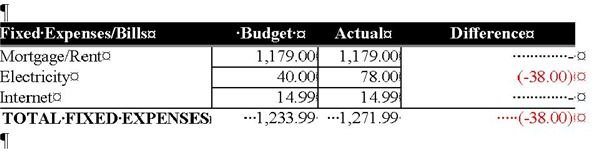
I would break your spreadsheet into three tables: Income, Fixed Expenses/Bills and Other Expenses. Some of the fixed expenses will not always be the same each month so you will have to estimate how much those variable bills are.
In each table, break it into four columns and however many rows that you need in order to fit in all your expenses. For example, you will want a row for each of these things: rent/mortgage, electricity, Internet, and so on.
Let’s take the Fixed Expenses table as an example. You will write Fixed Expenses/Bills in the first column, first row of this table. The second column, first row will be what you have budgeted for this item (Budget). The third column, first row will be what you actually spent (Actual). The fourth column, first row will be the difference between the two sums.
In this way, you can keep track of how well you are staying on budget. You can set up your negative numbers to always appear in red by using conditional formatting under your cell options.
Summing Up Your Expenses
You need to be able to add up your monthly expenses. You can Sum all your numeric data. Depending on the version of Excel that you have, you can either just click AutoSum at the bottom of the column that has your expenses. Or, you can use the following formula SUM(ColumnCell:ColumnCell).
Once you have your total of monthly expenses, you want to subtract your expenses from your income. This can be done by using the formula =(ColumnCell - ColumnCell). For example, if your total monthly expenses were in Column G, Row 3 and your total income was in Column F, Row 3, your formula would be =(F3 - G3). This will tell you whether or not you have gone over your budget. If this number is negative, then you have definitely overspent your budget.
As mentioned, you can customize your spreadsheet to fit your needs. It’s easy to do with Excel and can be easily updated with a few simple formulas.


