In this second of two parts, we cover how to setup a dedicated VPN Gateway server using Microsoft’s ISA on Windows Server 2003 (Part 1 covered using a standalone Windows Server 2003 with RRAS)
Simplified Overview and Related Assumptions
One of the simplest, yet more secure ways to setup Windows Server 2003 and higher in a VPN configuration is to use a dedicated Windows Server 2003 system configured with Microsoft ISA (Internet Security and Acceleration) software. ISA is Microsoft’s enterprise firewall offering.
This simplified scenario will assume that you have an edge router (a Cisco or other router between your network and the Internet). The edge router will pass traffic to and from your private network to and from the Internet.
Your edge router’s Outside (external or ‘public’) Interface might have an IP of 12.19.17.24 (some publicly-routable range). And you might have a DNS entry (an “A” or “host” record) with a public ISP such that “www.yourcompany.com ” equates your public IP address “12.19.17.24” so that, if someone surfs to ‘www.yourcompany.com ,’ that public connection will point to your “external/public ip address.”
Your edge router’s internal interface might have an IP of 10.1.1.250 (a private, non-routable range - one that does not route across the Internet).
In this case, your ISA (firewall) server would have its external interface (let’s use 10.1.1.249) with a default gateway setting that points to the router’s internal interface (10.1.1.250).
Here we assume an ISA server with 2 NIC cards – one for the external (Internet-facing) side and one for the internal (intranet-facing) side. And let’s assume that your ISA Internal (“Inside”) interface that faces your inside network has an IP address of 10.1.1.1.
Let’s also assume your internal server is 10.1.1.2 (assume it also is your DNS server) and your workstation range is 10.1.1.10 through 10.1.1.20
Details
In general, the default ISA setup is: “Allow passing of all outbound traffic from ISA ‘Internal’ interface to ‘External’ interface & Deny all Incoming traffic.”
In the ISA server, you will need to setup a VPN range of IP addresses as an External Allowed Network,
In ISA 2004 and 2006, the “VPN Network” is a built-in ’network group.’ In the ISA Management Interface, choose the VPN group, then follow the prompts (which will vary slightly in different ISA versions).
The prompts will include whether the VPN connection type should be PPTP or L2TP (let’s assume PPTP for purposes of this document), what DNS servers to use for the connection (you will want to list your internal DNS server[s]), what External interface to use for this VPN connection - in this example, the appropriate VPN external end-point for this ISA VPN group is the outside ip interface address of the ISA server: 10.1.1.249), what Internal interface to use for this VPN connection (in this example, the appropriate VPN internal end-point for this ISA VPN group is the ip address of the ISA internal interface: 10.1.1.1); what range of remote workstation addresses for the ISA to give out as valid DHCP IP addresses that will be within a range that is routable to the internal network.
You will want to pick a range of addresses to allow the ISA server to assign to the “remote VPN workstations” - let’s say, 10.1.1.21 through 10.1.1.30 [depending on how many VPN users you will have]), and you will give a name to this VPN connection group - such as “Company VPN.” Once you have entered all the necessary information, save the VPN connection configuration.
Now you will need to go to the “Rules” tab of the ISA Management interface, and (assuming you have your Internal network setup with a name such as “Internal Network,” and its range of 10.1.1.2 through 10.1.1.20) choose Configure Firewall Traffic Rule, then follow the prompts and setup a rule to “allow Inbound traffic from ‘Company VPN’ to ‘Internal Network.’ As part of this rule, you can either “allow all protocols,” or tailor this ‘inbound VPN rule’ to allow only certain ports and protocols. For simplification, let’s assume we simply “allow all protocols inbound.” Don’t forget to choose the check-box to “Enable Rule.”
Then click “Apply” and that will allow you to try your configuration changes before you do a permanent “Save.” Once you are satisfied that the server VPN setup is as desired, then click ‘Save’ to make the changes permanent.
Diagram, Final Steps, and References
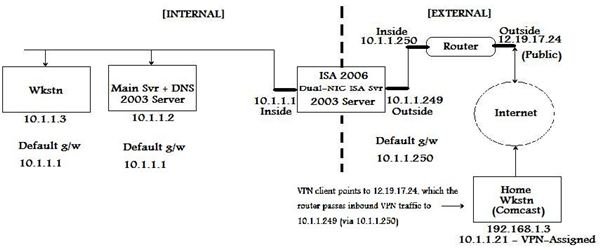
Below are simplified diagrams of the previously-mentioned setup:
= INTERNAL =
[Co. Wkstn 10.1.1.3] -> [Main internal+DNS server 10.1.1.2] (def g/w = ISA Inside interface)] –>
--> 10.1.1.1 [Inside [ISA] Outside] 10.1.1.249 (def g/w = Edge Router Inside interface) –>
--> 10.1.1.250 [Inside [Edge Router] Outside] 12.19.17.24 <–> [INTERNET a.k.a ’the cloud’]
<– [remote wkstn on Comcast, for example] <– 192.168.1.3 / 10.1.1.21(VPN-assigned once connected)
= EXTERNAL =
Diagram of the above Dedicated VPN Server setup (click to enlarge):
Two final steps to allow testing of the VPN gateway
Authorize VPN Users
Go to Active Directory Users and Computers and either create an AD Group (i.e. “VPN Users”) for VPN access, or choose the user accounts for which you want to allow access, go to ‘Properties’ on the AD user account, click the Dial-in tab, click Allow Access, then click OK.
Go back to the RRAS interface on the server, expand the server name, then click “Remote Access Policies.” Right-click in the right-hand pane, choose “New,” then click “Remote Access Policy.”
Click next, then give it a name like “Allow VPN Users,” then next, click “VPN,” then next. Click “Add,” then type the name of the group that you created for VPN access (“VPN Users,” in this case), click “Next,” then follow the on-screen steps to “Finish.”
Setup VPN Client
Outside the scope of this document is the fact that you also want to setup at least one VPN client (XP or Vista workstation) with a VPN connection, which can be done via Microsoft’s “Create a new connection” option under Network Tasks, “Connect to the network at my workplace,” click “Next,” choose “Virtual Private Network connection,” “Next,” give the network connection the appropriate name, i.e., “Connect to Company VPN,” “Next,” “Do not dial the initial connection,” “Next,” type the IP address of your public interface; in this example: 12.19.17.24, “Next,” “Anyone’s use,” “Next,” “Finish.” You can then do “Start,” “Connect To” and choose the “Connect to Company VPN” connection that you just created – you will be prompted for username/password credentials if appropriate. Once you successfully authenticate to your work network, you then should be able to access resources over the VPN as if you were on the LAN locally at the office.
Conclusion and Disclaimer
This is a broad and simplified overview of setting up a Windows Server as an ISA VPN gateway server - details will vary, depending upon the VPN product(s) you use, but this article includes the basics and is an adquate overview of the steps needed.
References:
Microsoft’s Server VPN setup instructions can be found here .
A TechRepublic VPN setup article can be found here .
Microsoft’s Client VPN setup instructions can be found here .
Microsoft ISA VPN Configuration overview can be found here .
This post is part of the series: VPN Setup on Windows Server 2003
This two-part series covers the two most common ways of setting up VPN on Windows Server 2003 - Part 1 covers using a Windows Server 2003 server with RRAS; Part 2 covers using a Dedicated ISA VPN gateway server


