This Windows tutorial will show you how to adjust the settings of a program or process so that it will temporarily run with a higher or a lower CPU priority.
Tip # 4: Adjust the CPU Priority of a Program or Process
Using Vista’s Task Manager, you can set the priority for a particular process higher or lower to increase or decrease its access to CPU resources. This enables you to indicate to Vista which particular process or program should run with a higher or lower CPU priority as needed.
For example: If you locate a program that is draining memory, you can re-set the program’s priority to low, so as to free up some resources. While this will slow down the program’s responsiveness, it will enable you to continue to use it while minimizing its use of CPU and/or RAM resources.
On the other hand, if you are using the memory-draining program, you can assign it higher priority so as to speed it up temporarily and help it finish the task faster.
How to Adjust the CPU Priority of a Program or Process
- Open the Task Manager: right-click on your taskbar and then click on Task Manager.
- Click on the Processes tab.
- Click on the “Show processes from all users” button at the bottom of the dialog box.
- Enter a password or provide confirmation if prompted by the UAC.
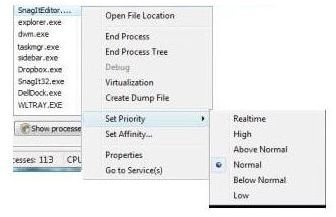
- Right click on the process whose CPU priority setting you would like to adjust.
- Select Set Priority from the drop-down menu.
- Click on the desired priority level that you want to have for the process. The options available are: Real time, High, Above Normal, Normal, Below Normal or Low**, where Realtime** adjusts to the highest priority, while Low will adjust it to the lowest priority.
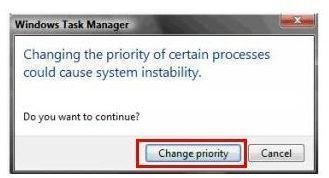
- Click on the Change Priority button in the confirmation window that pops up.
- Exit the Windows Task Manager. The process will now run with the CPU priority that you have set.
NOTE
- Vista will maintain the adjusted CPU priority you choose only for as long as the particular process is open. If you close the process or its associated program, log off your account, or shut down your PC, then it will automatically default the CPU priority back to normal.
- You cannot adjust the CPU priority level for a process that is associated with a service, or with some programs that may run their own services such as an anti-virus or anti-spyware programs. You also cannot adjust the priority for a system processes such as the svchost.exe process.
- To find out which service a process is associated with, right click on the process and then click on Go to Services(s). This will switch you to the Services tab where the service will be highlighted
This post is part of the series: 14 Ways to Speed Up Vista
Concluding the series by Dianna Monda Dill, this part brings the final 14 tips to speed up Vista. She’s not exactly saved the best for last, but these are some that power-users, especially, will enjoy.
- 14 Ways to Speed Up Vista - Part 1 - Create a Striped Volume
- Tip 2 & 3: Configure Your Vista Hard Drive For Advanced Performance
- Manually Adjust CPU Priority on Windows Vista
- Optimize or Disable Windows Search Indexing: Vista Tips
- Monitor Resource Usage Regularly on Your Vista Computer
- Use Vista Reliability and Performance Monitor
- Disable Excess Security Features on Windows Vista
- Tweak Windows Vista Network Settings


