This step-by-step Windows tutorial shows you how to use two page files to boost page file performance and speed up your Vista system.
Tip #8: Use Two Page Files to Optimize Page File Performance
When your system runs low on physical memory (RAM), it will use a page file to extend available memory. If you have two hard drives, you can use two paging files – one on each drive – to speed up disk access of your page file.
This optimizes page file performance because your PC’s hard drive controller is able to read and write simultaneously from more than one hard drive. What’s more, based on its algorithm, Vista will use the paging file from the partition that is accessed less frequently. By default, this will be the second paging file on the separate hard drive. As such, using two paging files will speed up the paging process and boost system performance.
Requirements
- Each page file must be located on a different physical hard drive, not just on different partitions of the save drive. For example, you may have a page file on your C: and F: hard drives.
- The second hard drive must be almost as fast as or even faster than the first one, in order to realize any benefits from having two paging files.
- The first page file will remain on the drive Vista is installed on, and the second page file will be located in the first partition of the second hard drive.
- The page file’s sizes must equal at least the same amount of physical RAM that you have. Say, for example, you have 2GB of RAM installed, then you should have 2 page files of 2048 MB.
How to Use Two Paging Files to Speed up Vista
- Click on Start. Right-click on Computer. Select Properties from the context menu. This opens the System window.
- In the left-hand side pane, click on Advanced system settings. This opens the Performance Options window.
- Click on the Advanced tab and then go to the Performance section. Now press the Settings button. This opens the Performance Options dialog box.
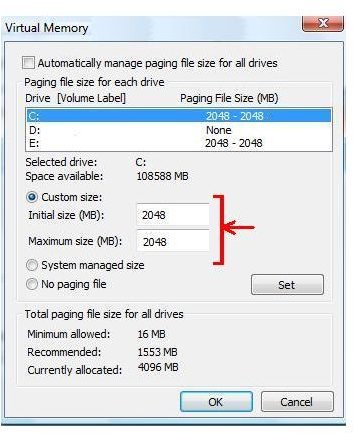
- Select the Advanced tab in this dialog box. Go to the Virtual Memory section, and click on the Change button.
- Uncheck the box that is labeled: Automatically manage paging file size for all drives.
- Highlight the C: drive (or whichever drive Vista is installed on). Select system managed size. Click the Set button.
- Highlight the second drive. Select system managed size. Click the Set button.
- Click OK and then reboot your computer as required for your changes to take effect.
NOTE
Do not create or place a paging file on a fault-tolerant drive such as a RAID array or a mirrored drive. The way in which data is written to this type of drive may decrease performance rather than boost it.
This post is part of the series: 21 More Super Ways to Speed Up Vista
Continuing in the series, Dianna Monda Dill shares 21 more of her favorite tips for improving the performance of Windows Vista. From the simplest to the most complex, here are 21 more power-user tips for Vista.
- 21 More Super Ways to Speed Up Vista - Part 1 - Setup Advanced Cleanup
- 21 More Super Ways to Speed Up Vista - Part 2 - Clean Up System Restore and Shadow Copies
- 21 More Super Ways to Speed Up Vista - Part 3 – Use ReadyBoost to Extend Memory
- 21 More Super Ways to Speed Up Vista - Part 4 - Optimize Your Paging File
- 21 More Super Ways to Speed Up Vista - Part 5 - Use Two Paging Files
- 21 More Super Ways to Speed Up Vista - Part 6 - Manage Your Virtual Memory Resources
- 21 More Super Ways to Speed Up Vista - Part 7 - Buy Vista Compatible Upgrade Components
- 21 More Super Ways to Speed Up Vista - Part 8 - Install Additional RAM
- 21 More Super Ways to Speed Up Vista - Part 9 - Upgrade Your Graphics Card
- 21 More Super Ways to Speed Up Vista - Part 10 - Upgrade Your Hard Disk Drive


