In this guide, we’ll take a look at Expression Web’s built-in FTP client and how to use it to publish your web site to a remote web server.
FTP and Expression Web
FTP, or File Transfer Protocol, is a standard way to transfer files from one computer to another. If you’re curious and want to learn more about this methodology in general, check out this FTP overview . For the purpose of this guide, we’ll restrict our discussion of FTP to how it is used within Expression Web to publish and maintain web sites.
In order to utilize this method of web publication in Expression Web, your web host provider must support FTP, but that is pretty standard in this day and age. Also, you may need to create a special FTP account to transfer the files from your local directory to the remote web server. For information on how to do this, you’ll need to check with your web hosting service as the process varies from host to host.
Publishing using FTP
Many of the steps used to publish a web site in Expression Web using FTP are the same as described in Part 2 of this series where we discussed how to publish using FrontPage Server Extensions. We’ll just look at the ones that are different here.
Before you begin the file transfer process, you should review how certain files are being transferred. There are two common ways to transfer data via FTP: ASCII and Binary. The ASCII mode is used for text files such as ones that have extensions like .html, .htm, .txt, .asp, .php, and .css. Binary mode is a means to transfer raw data and is used for media files such as ones with extensions of the form .jpg, .wav, and .mp3.
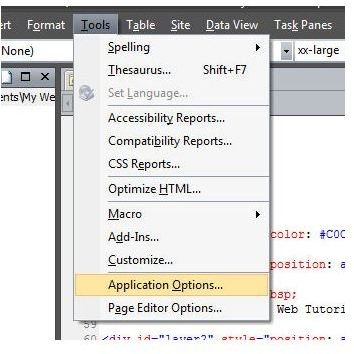
By default, Expression Web has assigned certain file types to be transferred as ASCII. To see a list of these file extensions, first select Application Options from the Tools menu on Expression Web’s main toolbar. (Click the image below for a larger view.)
Next, click on the FTP tab of the Application Options box. If there are any items in the list of Extensions to transfer as ASCII that you need to be transferred as binary, select the item and click Remove. Likewise, if there are any file extensions not on this list that need to be handled as ASCII data, type the extension name into the New Extension field and click the Add button. Any file that is not designated to be transferred as ASCII data will be transferred as binary.
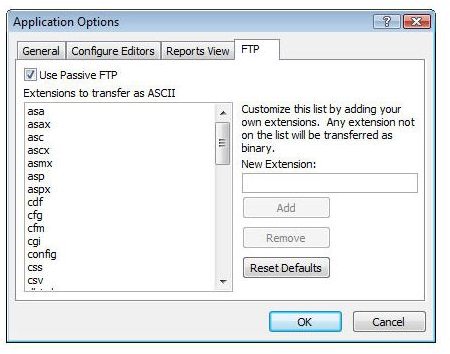
Unless your web site has something unusual about it, all of the default options in this window should be fine. Still, it’s a good idea to remember this list in case you have problems properly transferring a file at a later date.
Now, it’s time to turn our attention back to publishing the web site. Begin as we did in Part 2 of this series and select Publish Site from the File menu on Expression Web’s main toolbar. If the Remote Web Site Properties window does not appear on your screen, press CTRL + SHIFT + R to access it.
In the Remote Web Site Properties window, click on the radio button next to FTP. Enter your FTP hostname in the Remote Web site location field. If you don’t know the name of this directory, check with your web host provider. Additionally, you can enter a specific directory in the FTP directory field if you are publishing to a subdirectory. Place a checkmark in the box next to Use Passive FTP if you wish to use that FTP mode, or leave the box empty if you wish to use normal FTP.
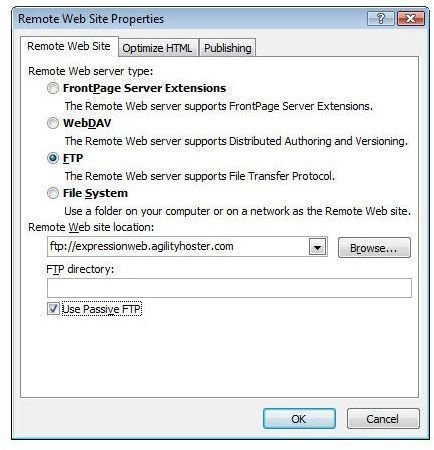
It’s best to try to transfer the files using passive FTP mode first as this is the most secure way. However, if you have problems publishing your site using this option, uncheck the box and use the normal FTP mode.
Next, just as in Part 2, navigate to the Publishing tab and select which default options you want to use when publishing the entire site with one click.

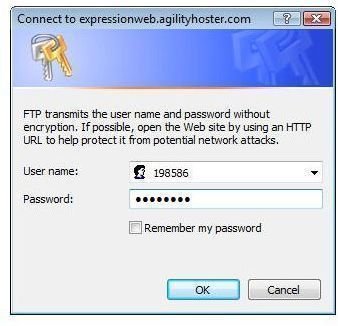
Click OK when done to continue. After doing this, a connection dialog box will appear on the screen prompting you to enter your User name and Password. Remember that this is the user name and password for your FTP account on the web server, and this may be different from your standard login credentials. Check your web host provider’s FAQ for more details on this.
When finished here, click OK and Expression Web will connect via FTP to the remote server. From here, we can transfer files just as we did in Part 2 of this series.
For more tips and tricks, be sure to browse through the other items in Bright Hub’s collection of Expression Web tutorials .
This post is part of the series: Publishing a Web Site with Microsoft Expression Web
In this set of guides, we’ll cover how to publish and maintain your web site using Microsoft Expression Web.


