Did you know that Windows 8 comes with built-in safety features to help protect your family from spending too much time on the computer and give you the ability to monitor child activity on your computer? This article will show you how to get started with the Family Safety Settings in Windows 8.1.
Getting Started
The Family Safety settings in Windows 8.1 apply to children’s accounts. First we need to make sure we have a child account set up.
- From the Charms bar, select Search.
- Enter the term “accounts” in the search bar and click on Add, Delete and Manage Other Accounts.
- From the Accounts page click Add an Account.
- Fill in the username, password and password hint and click Next.
- Next, the wizard will ask if this is a child account. Check the box and click Finish.
Once a child user account is set up we can set up the Family Safety settings.
Images
Configuring Family Safety
You’ll need to be logged into your computer with your main account for this section.
- From the Charms bar, select Search.
- Enter the term “family safety” in the search bar and click on Family Safety.
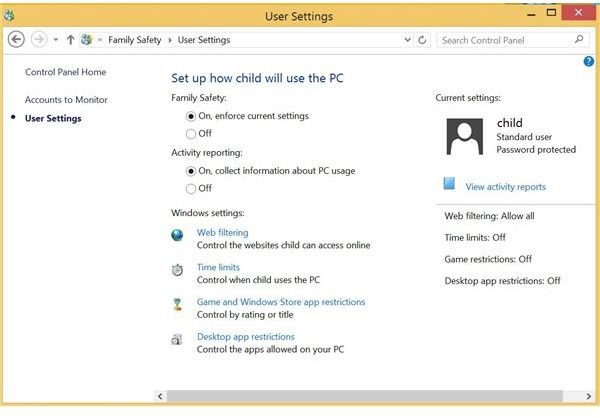
- You should see your new account listed with “Family Safety On.” Click on the child account to view the settings for Family Safety.
- As you can see in Figure 1, the default is to have Family Safety turned on for child accounts and to collect usage information.
- From here, you can set web filtering, time, app and store limits. Let’s cover each separately.
Images
Web Filtering
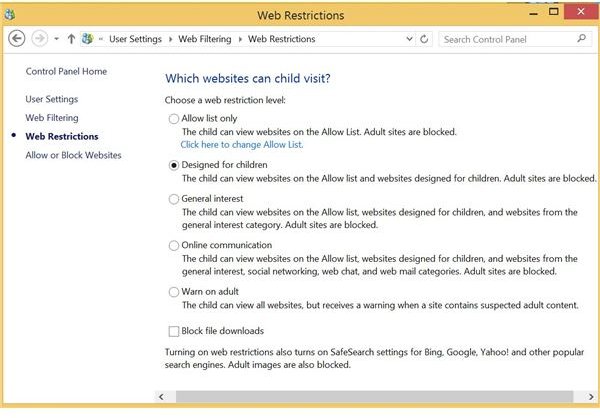
When you click on the Web Filtering link, you have several options. You can either allow all websites or you can specify websites based on content and rating or only allow websites you specifically list. Let’s allow sites based on content. From the web filtering link we’ll click Account Can Only Use the Websites I Allow. Next, click the link to Set Web Filtering Level.
The content filtering page gives numerous options including only children sites, general interest, online communication and so on (Figure 2). We’ll select the Designed for Children category.
Now that a general content filter is set, we can also add specific websites to an Allow or Block list. Click on the Allow or Block Websites link. Add sites you wish to grant access to or deny. Note that the content filter will work in conjunction with your allow\block list.
Time Limits
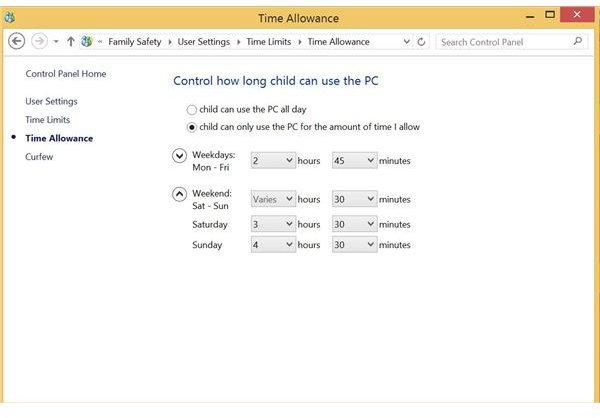
Clicking on the User Settings link on the left side will always take you back to the main Family Safety control panel. From here, click on Time Limits. You can set up time allowances to specify how many hours (or minutes) can be spent on the computer in a given day. As you can see in Figure 3, you can also specify the amount of allowance given for a specific day of the week if desired.
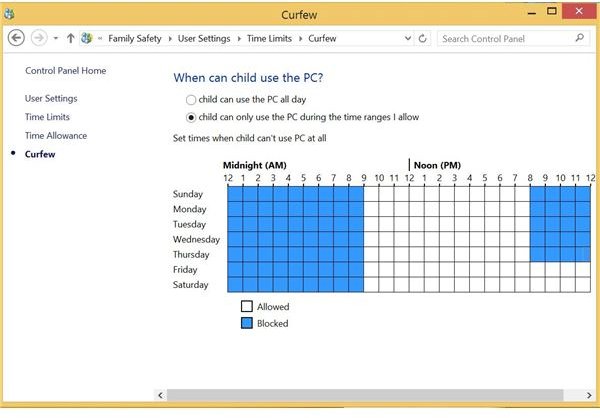
The Curfew link will allow you to specify when your child can use the computer by day and time. As you can see in Figure 4 I’ve set up a limit to only allow access from 9am to 8pm Sunday through Thursday but Friday and Saturday the hours are from 9am to midnight.
Images
Game and Windows Store Restrictions
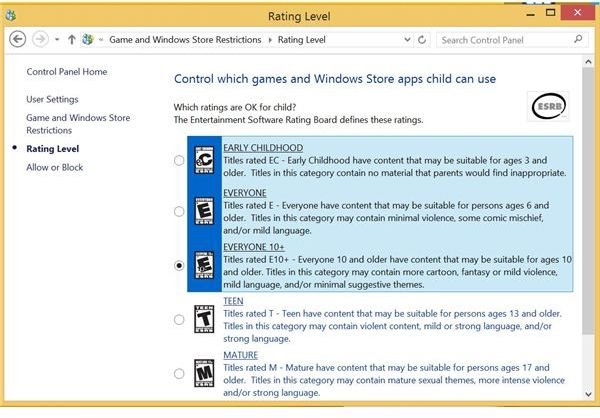
This section allows you to specify the type of games your child can play based on the ESRB rating system. Click on Child Can Only Use Games and Windows Store Apps That I Allow and then Set Game and Windows Store Ratings. Similar to the web filtering, you can now choose an acceptable ESRB rating for games (Figure 5).
Images
Desktop Apps
The last setting is for desktop applications. Once you specify that you want to restrict access, you will be presented with a list of all installed applications. Simply select the ones you wish to grant access.
Reports
Once you have finished setting your restrictions, you can log in as your child account and verify the child is still able to do what you want them to do. This is especially important if you are blocking Windows Store and Desktop apps. To check in on what your child is doing, log back in with your account and click the Family Safety link to view activity reports (Figure 6).
I hope you’ve found this article useful and will be better prepared to keep control of your child’s computer habits.