Do you find yourself sending out the same email to a bunch of different people but you want the email to be customized for each person so it’s a bit more personal? Try using mail merge in Outlook 2013 to make you more efficient at sending out your mass emails.
What Does Mail Merge Do?
So what exactly is mail merge? Mail merge utilizes two pieces of information that you have – a list of contacts and an email form. You’ll need to have your list of contact information in Outlook. Once you have this, you can create an email form that will be customized with the information in your contacts. For example, you can have your email greeting include the person’s first name that is pulled from your contact list.
Once you have your list of contacts and an email form, Outlook will be able to merge the two together to send out individual personalized emails to each person you selected. Let’s dive into the details.
Contacts
Navigate to the People tab along the bottom of Outlook 2013. Create contacts for the people that will be receiving your mail merge. At the very least, you’ll want to make sure each contact has the first and last name along with email address. What other merge fields will you want to use? Do you need their mailing address, phone number or any other information? Make sure each of the contacts has information entered in for any of the merge fields you’ll use (Figure 1).
Select each of the contacts you wish to use and click the Mail Merge button under Actions.
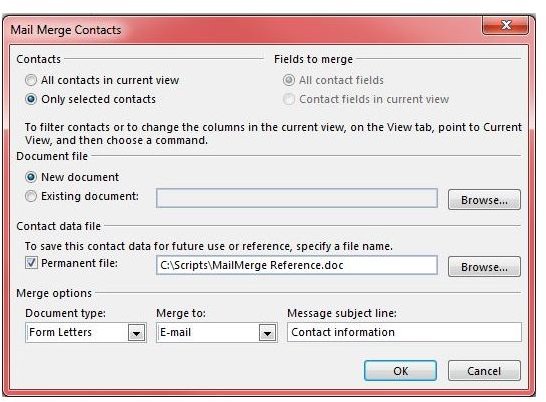
Mail Merge Options
In the window that opens, select the option to send to only the selected contacts. Note that if you want to send to your entire contact list just select the “All contacts in current view” radio button. Under Document File, select the option to create a new file. You can save the contact data for reference by checking the “Permanent file” box and giving it a name.
Under the Merge options section be sure to select Form Letters for the “Document type” and E-mail for “Merge to.” Type in a subject line for your form email and click OK (Figure 2).
Creating the Form Document
Word will open and from here you can craft your form letter. In our example we’ll create an address block, add a greeting line and then insert a block of text that uses our contact’s first name and email address.
To add the address block, click the Address Block button. You can specify the way you want your recipient’s name to be addressed. You can also choose whether or not to use a company name (if present) and the way you want the address formatted. On the right side you’ll see a preview of what will be added. If you’re happy with the results click OK (Figure 3).
Back in Word you’ll see something like «AddressBlock» was added to your document. This is called a merge field. When we merge the document, Outlook will replace these fields with the data from your contact list. Add a few line breaks and click Greeting Line. Choose the options you wish to use and click OK. This will add a second merge field to Word.
Add a few more line breaks and start typing your letter. As I mentioned above I want to use some custom merge fields including the full name and email address. To do this, I click the drop down arrow on the Insert Merge Field button. I then select FULL_NAME and EMAIL. As you can see in Figure 4, I’ve added both fields. Note that you can apply formatting and font properties to the merge fields. You can easily cut and paste merge fields to other areas of the document if desired.
To verify the letter will look the way you want it to, click the Preview Results button (Figure 5). Once you’re happy with the results click the Finish & Merge button and click the Send Email option. Outlook will then send out individual emails to each of your contacts using the form you created. It’s probably a good idea to send a test message to yourself before sending it out to a large group to ensure everything came together properly.


