
In order to create a storyboard with PowerPoint you will have to have installed Visual Studio 2013 Premium, Ultimate or Team Foundation. Then you can use a new tab on your PowerPoint menu called Storyboarding. Learn how to get started using this new tab.
PowerPoint 2013 allows you to create user interface (UI) mockups using both PowerPoint 2013 and Visual Studio 2013 Premium, Ultimate or Team Foundation. Mockups allow you to quickly convey the look and flow of a user interface to your customers. Storyboards in PowerPoint can have animations and will allow you to build a close approximation of a real user interface. Read on to find out how!
Getting Started
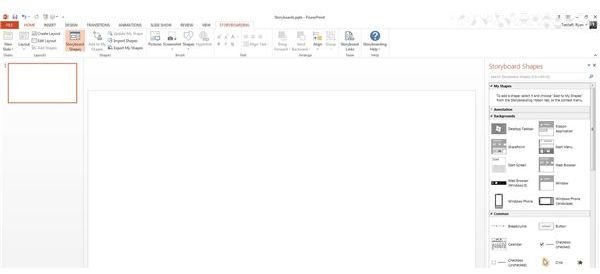
In order to use Storyboards in PowerPoint 2013, you will need to have PowerPoint installed and then install Visual Studio 2013 Premium, Ultimate or Team Foundation editions. Once Visual Studio has been installed, it will automatically create a new tab on your PowerPoint menu called ‘Storyboarding’ (Figure 1).
At the most basic level, Storyboards in PowerPoint are simply icon sets that represent various user interface elements in Windows such as buttons, Start menu, scroll bars and video players. You can add storyboard elements to your slide by clicking and dragging them. Just as with any other PowerPoint object, storyboard items can have animations applied to them to offer a closer approximation of what the real user interface will look like.
Creating Your Storyboard
Open PowerPoint 2013 and create a new blank presentation. Verify the Storyboarding menu tab is available. Decide what your storyboard will show. Are you going to simply show a static UI design on a single slide or do you want to add animations? How many slides will you need and how do you want them laid out?
For my sample Storyboard I’m going to create a simple phone ‘app’ user interface. To get started I’ll click on the Storyboarding menu and then Storyboard Shapes (Figure 2). You’ll want to start with the background shapes first. Since my sample will be a phone app, I’ll choose the Windows Phone icon. I then drag the icon over to my slide and it will appear.
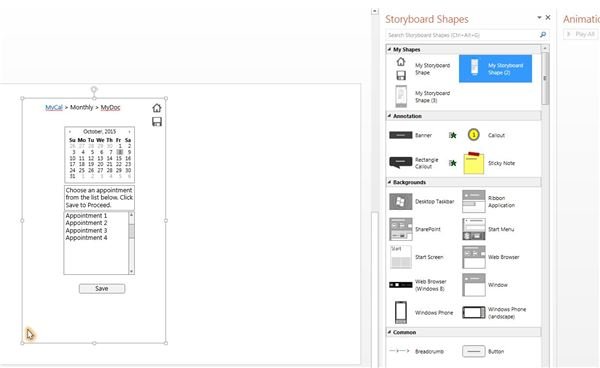
From here I can easily search for shapes or I can browse the shapes by category. Drag the shapes over to your main background shape and start building out your user interface. As you can see in Figure 3 I have a basic phone user interface created with very little effort.

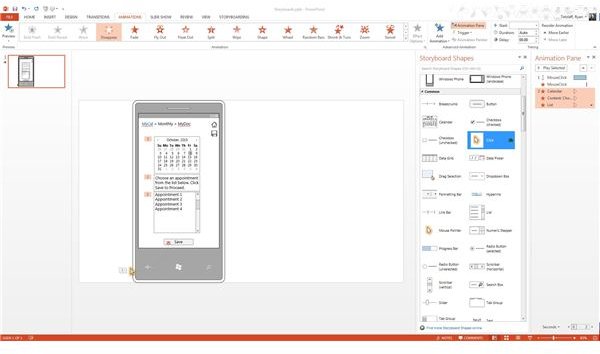
Once you have your shapes in place you may want to start animating them. Under the ‘Common’ shape heading you’ll see a ‘Click’ shape with a small green star next to it. This is a shape that has animation added to it already. You can tie your click animation to another user interface element to ‘appear’ once clicked. This will give the illusion of a working interface. In my sample I added animations to the calendar, text and appointment picker to disappear once the Save icon is clicked (Figure 4). You can view the animation pane by clicking on the Animations tab and then the Animation Pane button on the right hand side.
If you are reviewing someone else’s storyboards, you may want to add annotations. You can find several annotations under the Annotation category. Note that two of the annotations include animation.
If you like certain icons or groupings of icons you can create custom shapes and store them in the My Shapes category. To do this, select the icon(s) you wish to store and click the Add to my Shapes button on the Storyboarding menu. You can add your custom shapes just like any other shapes from the shapes list. In figure 5 you can see I created a basic UI shape without the phone background and saved it to My Shapes. If you wish, you can easily export your custom shapes by using the Export My Shapes button. This lets you easily share your shapes with others.
This was just a brief overview of the Storyboarding functionality in PowerPoint, but as you can see it offers many options to developers and designers using familiar tools they likely already have access to.


