Tired of resetting document colors and fonts every time you create a new Word doc? Save your preferred choices as a custom theme, and apply them to a document with just one quick click.
A Little About Themes
In Microsoft Word, a theme is a collection of fonts, colors, and effects that you can apply to an entire document. A cool thing about themes is that you can share them across multiple Office products. That is, if you create a theme in Word, you can also use it in PowerPoint and Excel – and vice versa.
In this tutorial, we’ll focus on the major components of a theme and look at how to customize them, save them for use in future documents, and designate default options.
Changing Color Palettes
To set the colors for your document, go to the Design tab and click on Colors in the Document Formatting grouping. A number of preset color palettes are available in Word 2013 right out of the box – you can either select one of these or click on Customize Colors to create a new one.
If you choose the Customize Colors option, a new window will pop up on your screen. In this window, you can define your theme colors for a variety of elements, including text, background, accents, and hyperlinks. As you make your selections, you’ll be able to see how the colors you choose will look together in the Sample area.
When you’re finished, enter a name for your new color palette in the appropriate field and click the Save button. The next time you click on Colors on the Design tab, your newly created palette will appear in the Custom group.
Picking Document Fonts
The tool for creating and selecting theme fonts is also found on the Design tab. Each font setting actually contains two fonts – one for headings and one for body (or paragraph) text. When you click on the Fonts button, you have the option of choosing one of the many presets or selecting Customize Fonts to define a new setting.
If you select Customize Fonts, you’ll be presented with a dialog box in which you can choose both a heading and a body font. You can choose the same font for both types of text if you like. The Sample area lets you preview your choices.
After you’ve made your selections, enter a name for your new setting and click the Save button.
Default Shape Effects
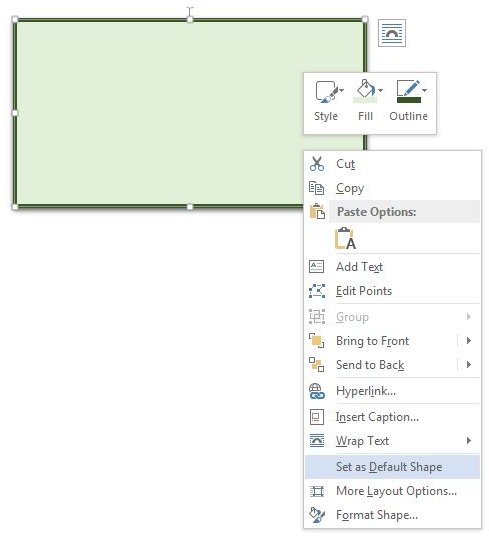
Certain types of effect settings can also be saved with themes. For instance, you may want all of the shapes you create in a document to have a light green fill with a darker green border and a small drop shadow.
Simply apply those settings and any other effects you like to the shape. Then, right-click on the object and choose Set as Default Shape.
Now, these same effects will be automatically applied whenever you create a new shape in a document with this theme.
Save the Theme and Make It Default
To save your theme and all of its components, click on Themes on the Design tab. Select Save Current Theme. A dialog box will appear and ask you for a file name. Once you enter a name, click the Save button.
Now, whenever you click on the Themes button, your new theme will appear as one of the options you can select.
Want to save this theme as your default setting so that every time you open Word, it is automatically chosen for you? Just click on Set as Default on the Design tab. This option is located right next to the Colors and Fonts icons, as shown in the screenshot above.
Deleting Themes
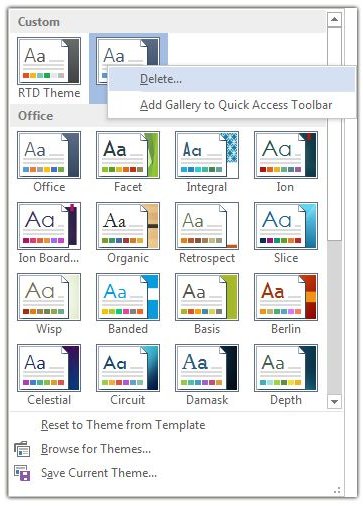
If you ever need to delete a theme, return to the Design tab and click on the Themes button again. Right-click on the unwanted theme and select Delete.
A confirmation box will pop up just to make sure you haven’t accidentally chosen the option. Click Yes and the theme will be deleted – and it will no longer show in your list of available options.
Tip: If you really just want to remove the theme from the list that appears when you click on the Themes button, but don’t want to delete it permanently, move the file to a new folder instead. You can always access it later by choosing the Browse for Themes option and navigating to that new folder.


