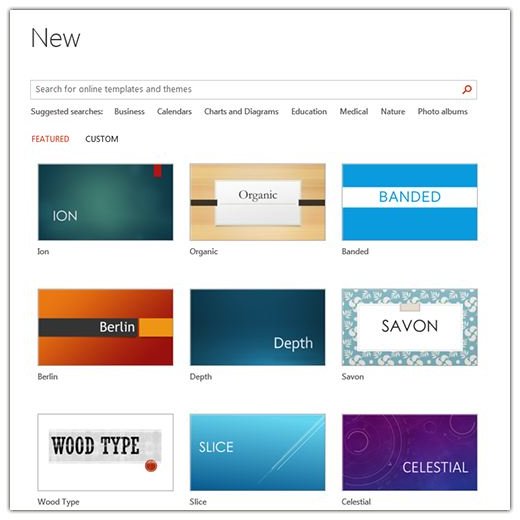
Planning on creating multiple presentations and want each one to have the same look and feel? Spend a little time up front creating a custom theme, and you?ll save tons of more time later down the line.
Themes vs. Templates
When talking about PowerPoint, many people use the terms “theme” and “template” interchangeably – but there is a bit of a difference.
In Microsoft Office, themes are collections of color, font, and effect settings that can be applied across multiple applications. For instance, if you come up with a great color palette and font when creating a PowerPoint presentation, you can save that theme and use it in Word documents as well.
A PowerPoint template, on the other hand, is application-specific and will often include slides with pre-designed layouts as well as a default theme. So, while a template can include a theme, the opposite is not always true.
As an example, PowerPoint 2013 may appear to let you save a background style as part of a theme, but that background will only appear when you use the theme in other PowerPoint presentations. If you select that same theme to use in a Word document, the background will not be applied.
Theme Colors
In PowerPoint, you can define and edit theme colors in a couple of different places – on the Design tab and on the Slide Master tab. I prefer the latter option because it allows you to see how the choices will affect all of your slide layouts.
First, go to the View tab and click on Slide Master in the Master Views grouping. A new tab, conveniently called Slide Master, will be created. In this tab, click on Colors and you’ll have the option to choose an existing color palette or create a new one.
If you want to create a brand new one, select Customize Colors. This will bring up a new window in which you can play around with different color combinations. As you try out different colors, a preview of the changes will be shown in the Sample area of the window.
When you’re happy with your selection, give it a name and then click the Save button. Now, whenever you click on Colors again, you’ll see this newly defined palette. If you should need to edit it, simply select Customize Colors again, make your changes, and save.
Theme Fonts
The tool for defining your theme’s fonts is also found on the Slide Master tab – right under Colors. Click on Fonts, and either choose one of the existing presets or select Customize Fonts to define a new setting.
If you choose the second option, you’ll be presented with a dialog box in which you can select fonts available on your system. Don’t see a font you want to use? Check out Bright Hub’s collection of font resources to find out where you can download more for free.
Once you’re happy with your selection, give it a name and click the Save button.
Theme Effects
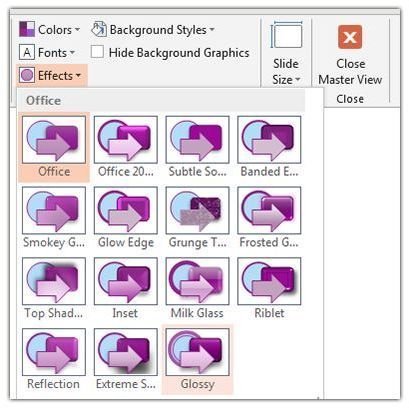
Before leaving the Slide Master tab, you may also want to choose a default effects setting for your theme.
To do so, click on Effects and pick one of the options available. This will cause that effect to be applied by default when you add certain types of objects to a slide in your presentation.
You probably already noticed that you aren’t given a lot of customization options here – just pick one of the predefined settings and that’s it. There is another way to have more control over effects in your presentation, and we’ll talk about that in the next section.
If you haven’t done so already, click on the Close Master View button in the Slide Master tab to return to the standard PowerPoint environment.
Default Shapes and Text Boxes
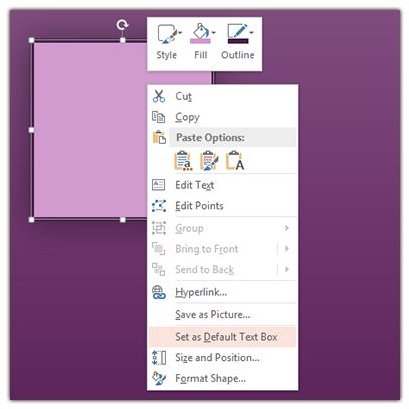
So, what if you’re not really thrilled about any of the preset designs available in the Effects options? No problem – we’ll just create a new one. As an example, we’ll look at how to create a default text box effect for your theme, but the same principle can be used to create effects for other types of objects.
First, insert a blank side just for the purpose of adding a sample text box. Insert a text box and format it the way you like – change the fill and outline colors, add a drop shadow or reflection, etc.
When done, right-click on the object and select Set as Default Text Box. Now, when you save your theme, these settings will be included.
Saving the Theme
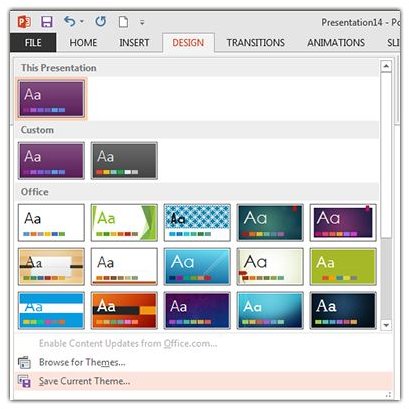
There’s only one thing left to do now – save the theme so we can use it again.
Go to the Design tab and click on the More arrow in the Themes grouping. (That’s the symbol that looks like an upside triangle with a line over it.) Select Save Current Theme.
A dialog box will appear, prompting you to name and save your theme file. Once you’ve done this, click on the More arrow again and you’ll see your theme available in the Custom section.
If you want to make this theme your default choice, right-click on it and select Set as Default Theme. You can also remove the theme completely by right-clicking on its preview and selecting Delete.
Have any theme creation tips of your own? Share them with us in the comments!


