With Windows Live OneCare gone, what are users supposed to do if they used OneCare’s backup features? This article will cover how you can use Windows Live SkyDrive and Windows Live Mesh to pick up the torch dropped by OneCare.
Microsoft used to offer their ‘all in one’ security and backup solution called Windows Live OneCare for consumers and small businesses but discontinued support for the product in mid-2009. If you were an avid user of OneCare for making backups, then you have a few options that you can easily move to under the Microsoft ‘Live’ umbrella – Microsoft Windows Live SkyDrive or Microsoft Windows Live Mesh.
Although neither solution will completely fill the hole left by OneCare, either solution can be made to work for the basic backing up of data.
Windows Live SkyDrive was introduced in August 2007 as a way for users to upload and access files of up to 100MB in size from the ‘cloud’. Microsoft offers users 25GB of storage space for files. Today, after several improvements, you can access SkyDrive from a web interface, Windows Live Photos and Office Web Apps, as well as from within Microsoft Office 2010.
Windows Live Mesh has itself gone through a few iterations but currently allows you to synchronize data from one or more computers to not only the cloud, but to other computers as well. When it comes to cloud storage, Microsoft gives you up to 5GB for free. PC to PC synchronization is nearly unlimited - allowing for large file transfers. This gives you a fair amount of flexibility in how you perform backups. Live Mesh is included in the Live Essentials bundle or available separately.
Using SkyDrive
As mentioned earlier, SkyDrive can be accessed in a number of ways. For the purposes of this article, I’ll discuss accessing SkyDrive via web browser and Microsoft Office Word 2010. At the end of this article I’ll give you the pros and cons of using SkyDrive compared to Live Mesh.
Accessing SkyDrive via Browser
- Browse to https://login.live.com and sign in or sign up for a free account.
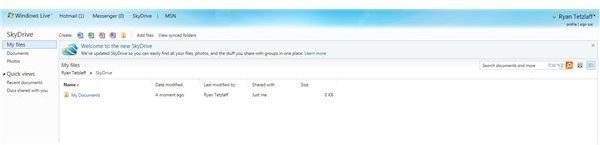
- Once logged in, click on the SkyDrive link. You will be presented with the main user interface (Figure 1).
- To upload files, you can click on the ‘Add Files’ link.
- Create a new folder or use one of the existing ones. Your documents will be stored in this folder in SkyDrive.
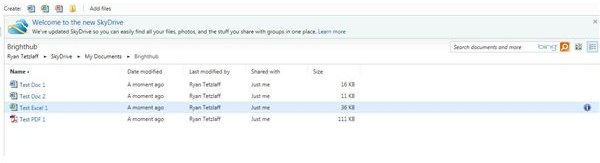
- Assuming you are using a newer version of Internet Explorer, you can now drag and drop files to the window to upload them to SkyDrive. You cannot upload folders and the individual file limit is 100MB – otherwise you can upload nearly anything you’d like. Click Continue when you are done and you’ll be brought to the folder view showing your newly uploaded files (Figure 2).
Accessing SkyDrive via Office 2010
- Create a document in a Microsoft Office application such as Word, Excel or PowerPoint.
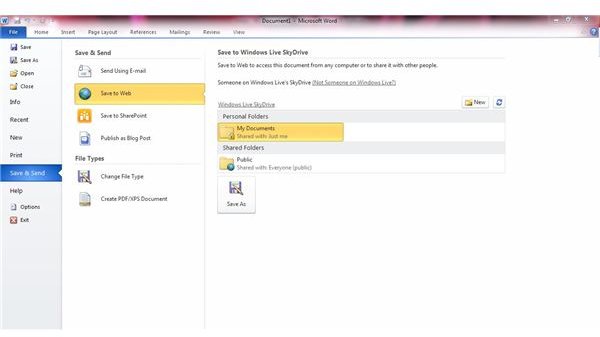
- Click the Office button and select ‘Save and Send’ and then ‘Send to Web’.
- Select SkyDrive and log into your Live ID. If you need to create a new account, visit https://login.live.com .
- Now you can choose the folder you wish to save to or even create a new folder (Figure 3).
For much more information regarding SkyDrive, take a look at Arun Kumar’s SkyDrive Help series.
Using Live Mesh
Windows Live Mesh is a free component of Microsoft Live Essentials, but can be downloaded separately from the Live Mesh site . Once you download and install the client, you can select which folders are synchronized to the cloud and which are synchronized to other computers in your ‘mesh’.
Synchronizing A Folder
- Open the main interface by going to the Windows button and running ‘Windows live mesh’ (Figure 4).
- Click on the ‘Sync a folder’ link.
- Select the folder you wish to synchronize.
- You will now be asked which device(s) you wish to synchronize and whether or not you also wish to sync to your 5GB cloud storage – confusingly named ‘SkyDrive synced storage’ (Figure 5).
- Back on the main screen, you can modify your device selection by clicking the ‘Select Devices’ link.
- If you wish, you can also share your synchronized folders with up to nine other people by clicking the link next to ‘Shared with’.


Summary
Now that you have a better understanding of the mechanics of how SkyDrive and Live Mesh work, let’s discuss which is the best Windows Live small business backup solution.
If you have a relatively few number of documents (under 1000), you can probably safely use SkyDrive to manage and store your documents. The main benefit of using SkyDrive is the tight integration with Office 2010 since you don’t need to go through the extra steps of logging into a web site. The other big benefit is the large amount of space allowed – 25GB per account. Finally, the fact you can access SkyDrive from any web capable computer is a definite plus.
The main downside to using SkyDrive is the manual nature – you need to manually drag and drop files to upload them or manually save them using Office to SkyDrive – this is not a synchronization tool.
Live Mesh is closer to being a true ‘backup’ solution when compared to SkyDrive. Mesh’s automated synchronization allows you to set up folders that need to be backed up without the need to continually drag and drop files. Even though the cloud portion of Live Mesh is limited to 5GB, you can synchronize a heck of a lot of data between multiple systems for free.
These solutions can’t replace a traditional backup solution but in a pinch, either solution could work. For more information on popular backup solutions, take a look at Donna Buenaventura’s guide on “Which backup software and method is best ?”
Hopefully the loss of Live OneCare can be negated with one of these other two great products.
References
- Author’s knowledge and use of using SkyDrive and Live Mesh
- Screenshots taken by author


