Desktop shortcuts can provide a shortcut to any software package or document file on Windows 7. This article covers how you can add Windows 7 desktop shortcuts, and then how you can remove them. In addition to this, hints and tips for customizing Windows 7 shortcuts are also included.
The great thing about Windows is its desktop shortcuts that can provide a quick way to open any software or document file. You can add many shortcuts to the Windows 7 desktop, its Start menu and also to the Windows 7 Taskbar. Windows 7 also has some new options for desktop shortcuts such as Jump Lists. In addition to this, these desktop shortcuts can also be customized in a variety of ways.
Desktop and Start Menu Shortcuts
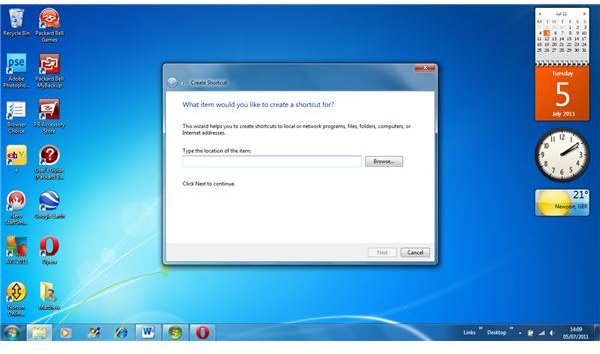
You can add any software package or file shortcut to the Windows 7 desktop. This can be done in a few ways. One of the best ways to add Windows 7 desktop shortcuts is to right-click on the desktop and select new. Then you can select the shortcut option. After selecting shortcut you should then select the file or software destination of the shortcut by selecting browse. When you have done this, click on next and enter a relevant name for the shortcut. The document or software title should be fine for this. If you want to add a folder shortcut to the desktop just select folder instead of shortcut and the rest is the same.
That is one way that you can add shortcuts to the desktop, but you can also add shortcuts to the Taskbar and Start menu as well. Adding any of the shortcuts included on the main desktop to the Taskbar is easy; right-click the shortcut that is to be added to the Taskbar, and then select the option pin to Taskbar. The shortcut will then be added to the Taskbar as well, and you can remove the other desktop shortcut as covered in the section below.
You can add shortcuts to the Start menu in pretty much the same way. Although it should be noted that document file shortcuts cannot be pinned to the Start menu. As such, only software shortcuts can be pinned to the Start menu. To pin to Start menu right-click the software icon that you would select to open the software and then select the option to pin to the Start menu. This will pin a shortcut at the top of the Start menu.
The Windows 7 Start menu also includes Jump Lists which provide further document shortcuts options from the desktop. Jump Lists are small document lists for recently opened documents with any of the recently opened software applications on the main start menu. As such, if you select the small arrow to the right of the shortcuts this small list will provide a shortcut to their recently opened documents. You can also pin documents to these Jump Lists by right-clicking a document included in the Jump List and selecting pin to this list.
Removing Windows 7 Desktop Shortcuts

After adding your desktop shortcuts at some stage you may need to remove them. When you remove software from Windows the desktop shortcuts are one thing that can be left behind. These shortcuts can be easily removed by right-clicking any shortcut on the desktop and selecting delete. Then select yes to confirm and the shortcut will be removed from the desktop. Or you can just press the delete key when the shortcut is selected.
In much the same way you can unpin Taskbar shortcuts and Start menu shortcuts. Simply right-click the shortcut on the taskbar or Start menu and select unpin, or remove from this list if you are removing a Start menu shortcut. They will then be removed from either the Taskbar or Start menu.
It’s worth noting that deleted shortcuts will then be in the Recycle Bin. To completely remove these shortcuts you should empty the Recycle Bin as well. Select the Recycle Bin from the top left of the Windows 7 desktop. When the Recycle Bin is open you can then empty the Recycle Bin by selecting the empty Recycle Bin option which will clear the bin.
Customizing Shortcuts
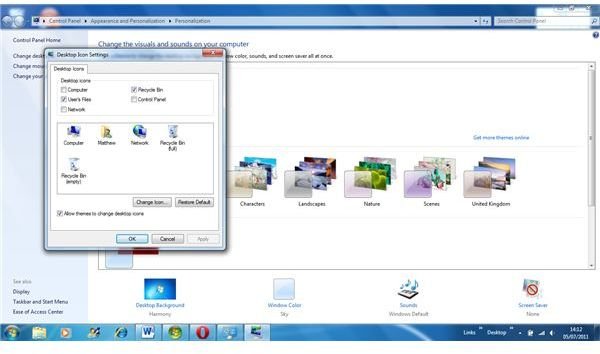
This is where the fun really starts! Windows 7 also includes a few options for customizing the shortcuts that are added to the Windows desktop. To begin, right-click the desktop and select the personalize option from the desktop. From this window select the option: change desktop icons. When you select this option you can add five of the following desktop shortcut icons to the desktop: the control panel, network, user’s files, Recycle Bin and computer shortcuts. Select the check boxes to include any of these on the desktop. In addition to this, you can also change the desktop icon for one of these shortcuts by selecting the shortcut and then change icon option. From here you can select from a range of alternative icons.
Some may note that you can also select an option included here for allowing themes to change desktop icons. If you select this option then changing Windows 7 themes may also change the desktop shortcut icons if the theme has different icons from your current theme. As such, if you select this option then changing the Windows 7 theme can be another way to customize the desktop shortcuts more generally.
You can also change the desktop icon of any Windows 7 desktop shortcut. To do this, right-click the desktop shortcut icon that is to be changed, and then select properties. The properties window includes a change icon option that you should select, and then you can pick from a range of alternative desktop icons for the shortcut.
However, further icons for Windows 7 desktop shortcuts can also be downloaded from various websites. These websites can include a range of alternative desktop icons for both files and folders. Websites such as Bestfreeicons.com and Freeiconsweb.com are two good sites for finding and downloading new icons. After you have downloaded go back to properties menu, select change icons, browse, the folder that includes the new desktop icons and then one of these icons to replace the old shortcut icon.
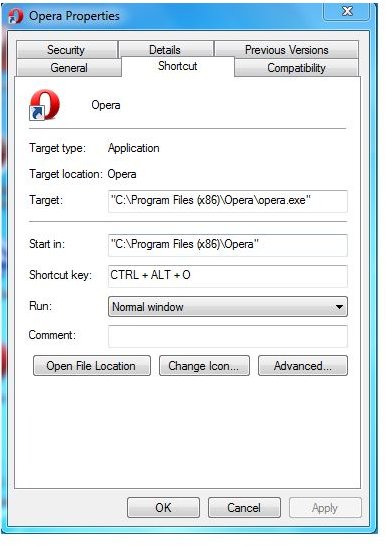
Another customization option worth noting is that of keyboard shortcuts which can be added to desktop shortcuts. A shortcut key can be added to any software shortcut and will then open the software when pressed; to add a shortcut key to a desktop software shortcut, right-click the relevant desktop shortcut and then select properties. From the properties window you can then input a shortcut key in the shortcut key box. The shortcut key for the software will then be Ctrl + Alt and then whichever shortcut key you added. So, if you added an o then the keyboard shortcut will be Ctrl + Alt + o. Click on okay to close the properties window and press the shortcut key to open the software.
So overall there are a number of options for adding, removing and customizing Windows 7 desktop shortcuts. With these options you can ensure that your favorite software and more essential documents are no more than just a click away.
References
Screenshots provided by author.


