You don’t have to put up with spam e-mails in Outlook 2010, and you don’t even need to spend money on additional software to block them…
No End to Spam
Spam is no longer something to be feared when you find your larder is empty and there is only canned meat left. These days spam is the term most commonly used to describe unsolicited e-mail messages, usually sent by automated systems that for some reason want you to spend money on marital drugs and purchase Russian brides. You can learn how to manage your outlook spam filter details with ease.
There are various estimates about the impact of spam on our daily lives concerning the amount of time we spend deleting them and the size of their carbon footprint. Such estimates are always considerable but they don’t really change what spam does – it just keeps on coming.
As such a useful spam blocking system is often the answer, and there are various such utilities that can be used with all of the popular e-mail clients.
However, before you start looking into spam blockers, why not check the existing Outlook spam filter tool?
Editing the Outlook Spam Filter Details
To use the built-in spam filter in Outlook 2010, go to Home > Junk > Junk E-mail Options, where you will find a set of configuration options that will allow you to determine how Outlook treats spam e-mail messages.
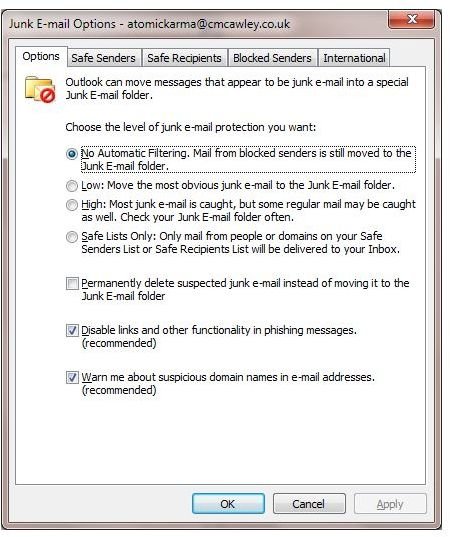
The first tab, Options, is used to decide how Outlook will treat spam and junk e-mail, and it features the opportunity to specify what level of junk e-mail protection you wish to apply.
You might choose No Automatic Filtering, which will only move messages from blocked senders (see below) to the Junk E-mail folder; Low, which moves the most obviously junk and spam messages to the junk folder; or High, which will catch most junk mail but also the odd regular mail item, necessitating regular checking of the folder.
A Safe Senders List, where only messages from addresses or domains on your safe senders list will be forwarded to your inbox, is the other option.
Using the Junk E-mail Options box you can also toggle options for permanently deleting junk e-mail instead of forwarding it to the appropriate folder (possibly a dangerous option if you have your filtering set to High), for disabling links and other scripts in phishing messages and for displaying warnings about suspicious e-mail addresses.
As you can see there are quite a lot of details you can use in the Outlook 2010 spam filter!
Outlook Spam Filter Lists
After configuring the various options you should then turn your attention to the white lists and black lists that can be setup in Outlook 2010. This is a way of blocking senders from certain domains and permitting messages sent by users on other domains, which can prove quite successful.
The Safe Senders list is where you would Add… email addresses of regular, appropriate senders. You will also see that you can toggle whether or not to trust messages from your contacts as well as add people you e-mail to the Safe Senders list.
The Safe Recipients list works in a similar way, but is for outgoing e-mail. You might opt not to use this tool.
More useful is the Blocked Senders list where you can Add… e-mail addresses and domains that you would like to block. E-mails from addresses and domains on this list will always be sent to the Junk E-mail folder.
Finally the International tab is particularly useful for preventing messages from automated spam senders in Eastern Europe and Asia, for instance, via the Blocked Encodings List… which allows you to block messages with different language encodings (each language has its own character encoding). You can also use the Blocked Top-Level Domain List… to block addresses ending in, for instance, .mx to block e-mails sent from Mexico.
With the Outlook spam filter details explained, you should now be able to configure your e-mail client to junk spam e-mail!
References
Author’s own experience.
Screenshot by the author.


