Installing Microsoft Outlook 2010 is not as difficult as you might think, so take a deep breath, prepare your installation disc and read on…
Take it Step-by-Step
Installing software can be a difficult job, especially for first timers. If you have just got hold of a copy of Microsoft Office or Microsoft Outlook and you’re looking for a bit of help in setting it up correctly, this guide should help you out.
Rather than go through a step-by-step process of installation, however, we’re going to look instead at key stages of the process and avoiding common mistakes.
This should help you to better understand the installation process and your part in it. If you’re consulting the web looking for Microsoft Outlook setup help, the chances are that you have already run into trouble, and you probably have the disc in the drive and the installation setup program running…
Stick to Outlook
When installing Outlook from a Microsoft Office disc, you will find that there are many different options that you can choose from, such as Word, Excel, installing the whole suite or just sticking to Outlook.
If you only need Outlook there is no point in making the process any more complicated, so ignore the other options in favor of the e-mail software.
Users with a standard Microsoft Outlook disc need not worry about this as there will only be one application on the disc!
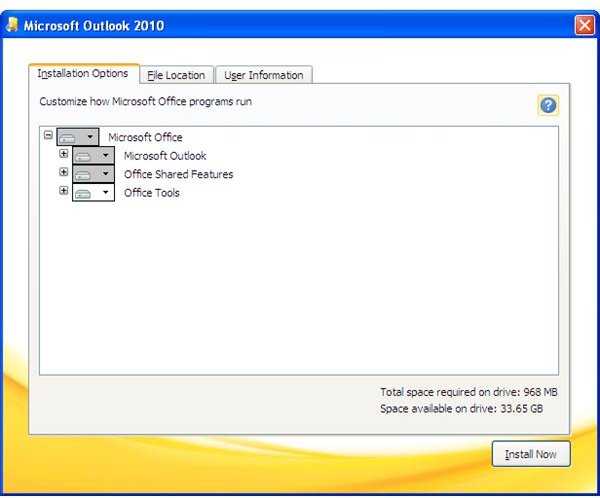
Choose the Options You Need
When you’re performing installation you will be presented with a choice of Install Now and Customize. If you’re happy with the default location (your C: drive) and don’t require any less-common options installed, use the Install Now button to let Outlook proceed.
Otherwise, use the Customize option to display the Installation Options. Here you can select the drive you want to install to (see below) as well as select which options to run from your computer and which to leave out of the installation for accessing from the disc.
Just choose the drop-down menu next to each option (such as shared features and tools) and select Run from My Computer if you wish to install everything, or Not Available if you would rather not install that option.
Screenshot by author
Choose a Drive with Enough Space
Also in the Customize view you can decide which hard drive you’re going to install Outlook to. This is an important area as it isn’t uncommon to find, when you’re installing software, that the target drive is full.
Outlook 2010 requires 2 GB of space for installation, so you should have at least this much free. You can find out how much space is free on your C: drive by going to Start > Computer and right clicking the C: drive, choosing Properties and then viewing the remaining space on the General tab.
If the remaining space is less than 2 GB then you will not be able to install Outlook.
Get the Activation Code Right
Naturally you won’t be succeed with any amount of Microsoft Outlook setup help without the correct activation code entered. This should be found on the CD or in the packaging, and without correct entry of the code you will be caught in a loop of entering it until you get it right.
Certain characters that appear in these codes can cause difficulty. As such, if you have difficulty distinguishing Z and 2, 1 and I or any other similar characters that occur regularly in the English language, it might be an idea to get a friend over to help with this stage.
As this is the last stage of installation you won’t want to get this wrong, so take your time with it and stay calm.
References
Author’s own experience.


