
Cyclic redundancy check errors in Outlook indicate that the mail client can no longer read your personal messages. Outlook data will remain inaccessible until you repair your .pst file with Scandisk or the Inbox Repair Tool included with Microsoft Outlook.
Understanding PST File Corruption in Outlook
Cyclic redundancy check Outlook PST file errors occur when your PST file becomes corrupted. Microsoft Outlook stores your personal data in a personal folders, or PST, file on your computer unless you use a Microsoft Exchange server. The PST file includes all your personal Microsoft Outlook data, including your emails, address book and calendar events.
There are a couple of ways of repairing a corrupted PST file, as outlined below.
Perform Cyclic Redundancy Check & Outlook PST Scan with Scandisk
Microsoft recommends that you first run the scandisk utility to check your hard disk for errors and repair them. This scan may fix the corrupted .pst file, allowing Outlook to read from it again.
- Close Microsoft Outlook before you begin, if it’s still open.
- Click “Start” and click “Computer.”
- Right-click your “C:” drive in the Computer window and click “Properties.”
- Click the “Tools” tab at the top of the properties window and click the “Check Now” button.
- Verify the “Automatically Fix File System Errors” checkbox is checked and click the “Start” button in the Check Disk window.
- Click the “Schedule Disk Check” button to schedule the disk check for the next time you reboot your computer. Windows can’t scan disks that are in use, such as your C: drive.
- Restart your computer. Windows automatically restarts and performs an error check operation before booting to the desktop.
- Try opening Microsoft Outlook again. The CRC error may be fixed. If not, move on to the next section and try using the Inbox Repair tool.
Inbox Repair Tool
If the scandisk program doesn’t fix the cyclic redundancy check error, you can use the Inbox Repair Tool included with Microsoft Outlook.
-
Close Microsoft Outlook if it’s running. Click “Start” and click “Documents.”
Advertisement -
Double-click the “Outlook Files” folder in the Documents library.
-
Create a backup copy of the Outlook.pst file.
Advertisement -
Right-click the “Outlook.pst” file, click “Rename,” type “OLD” and press “Enter.”
-
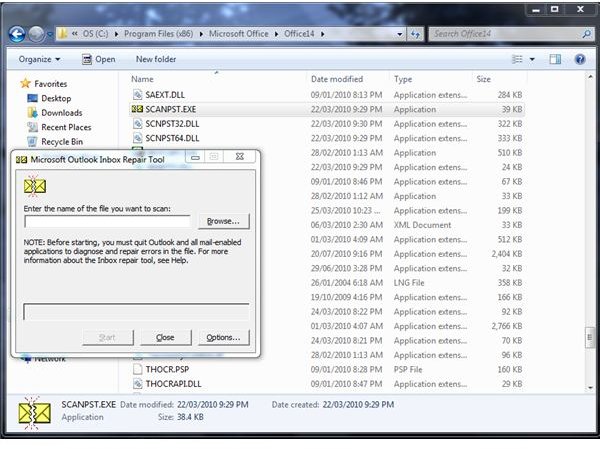
Navigate to the “C:\Program Files\Microsoft Office\Office14” folder on your computer and double-click the “Scanpst.exe” file to open the Inbox Repair Tool.
Advertisement -
Click the “Browse” button in the Inbox Repair Tool window, browse to the “OLD.pst” file on your computer and double-click it.
-
Click the “Start” button at the bottom of the Inbox Repair Tool window.
Advertisement -
Click the “Repair” button after the tool finishes scanning your .pst file.
Advertisement -
Open Microsoft Outlook and click “OK” to the error message that appears.
-
Click “Open” in the file browser window that appears to create a new .pst file.
Advertisement -
Provide an optional password, if you want one, and click “OK.”
-
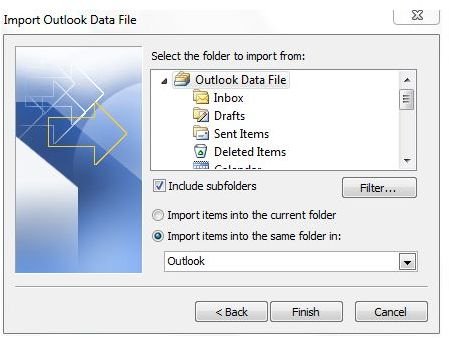
Click the “File” menu, click “Open” and click “Import."
Advertisement -
Click “Import from Another Program or File” and click “Next.”
-
Click “Outlook Data File (.pst)” and click “Next.”
Advertisement -
Click the “Browse” button and double-click the “OLD.pst” file.
-
Click “Next” and “Finish” to import your old data into the new .pst file.
Advertisement
Be sure to back up your Outlook data in case you have another problem.
References
Microsoft: “Data Error (Cyclic Redundancy Check)” Error Message When Outlook Downloads E-mail; https://support.microsoft.com/kb/319128
Microsoft: How to Perform Scandisk in Windows; https://support.microsoft.com/kb/156571
Microsoft: How to Find and Run the Inbox Repair Tool in Outlook; https://support.microsoft.com/kb/272227
Screenshots provided by writer


