In this guide, we will take a look at how to remove items from the notification area in Windows 7. There are many icons and notifications in the Windows 7 taskbar and this guide will help you sort through them.
Windows 7 Notifications
Sometimes, those Windows 7 notifications can get quite irritating when you are on your computer. You will be browsing the internet and constantly have something popping up over there at your clock. You X out of it and it comes back before you know it. No worries, we can turn those off. This guide will show you how to remove items from notification area in Windows 7, so you won’t have to deal with that. So, let’s get started with this Windows 7 guide .
Opening the Windows 7 Notification Area
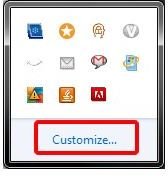
We will begin this guide will opening the notification area of Windows 7. In the bottom of your window, near your clock, you will see the arrow. Click this arrow with your mouse and a small box with all of your icons in the taskbar will pop up. In this menu, you will see the Customize link and this is what you will need to click in order to open your Windows Notification area. When you click the Customize link, you will see a larger box open with the notification options.
Removing Notifications in Windows 7
Your notification area should now be opened. In this section, you are going to see all of the icons that are in your taskbar where the
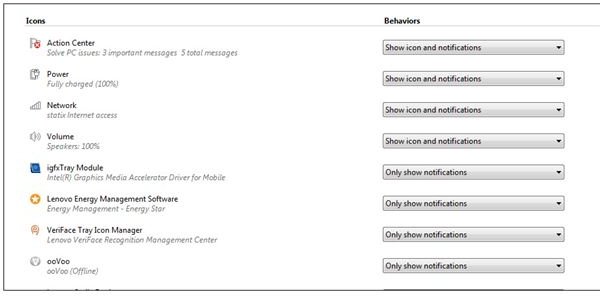
clock is. The names of the icons will be on the left and the options box will be on the right. The boxes on the right are where we will change the notifications.
We are going to use the Volume icon as an example for this guide because everyone has one of those. On the left side, find the Volume icon. Straight across to the right, under the Behaviors column, you will see the drop down box. By default, it will say “Show Icon and Notifications”. To hide the notifications, you will need to click the arrow on the box to open it. In the drop down box, select the Hide option. That will hide that particular notification.
You can go through your list and hide what you want. When you are finished removing items from the notification area in Windows 7, you can click the OK button at the bottom of the window. Any time you need to edit the notifications in Windows, this is where you will need to go.
If you need help with customizing your startup menu, take a look at How to Customize Windows 7 Startup Menu .
Windows 7 Notification Tips
Here are a couple of tips to keep in mind when working with the notifications in Windows 7.
Show Notifications Only - If you don’t like for your taskbar to be cluttered with icons, you can choose to show notifications only. That will show you important notifications, but hide the icon so your taskbar won’t be cluttered. You can select this option in the notification window that we opened above.
Restoring Default Icon Behaviors - If you have changed your settings in the notification area and you feel that something isn’t right, you can set the settings back to the default behaviors. In the notifications window, look at the bottom of the window and find the “Restore Default Behaviors” link. Click that link and everything will be reset to the behaviors that were selected when you purchased your computer.
For more tips on customizing Windows 7, take a look at this guide .
Image Credits & References
All screenshots were taken by the author for educational purposes only.
www.microsoft.com/windows/windows-7/default.aspx


