In this guide, you will learn how to customize your Windows 7 Startup Menu. You will learn how to add and remove programs and also how to pin programs to your taskbar. If you are new to Windows 7, start here to get started with personalizing your computer.
Windows 7 Startup Menu Options
With Windows, you have the option of customizing the Startup Menu. This means, you can choose what programs, applications, or other items are displayed when you click your start button (Orb for WIndows 7 users). This is a very useful option if you have a lot of items in your start menu and use certain things a lot more than others. For example, if you use Word every day, you can add it to your startup menu and you won’t have to browse through the long start menu to select your Word application. So, let’s get started with this guide to learn how to customize your Windows 7 startup menu.
Customizing Windows 7 Startup Menu
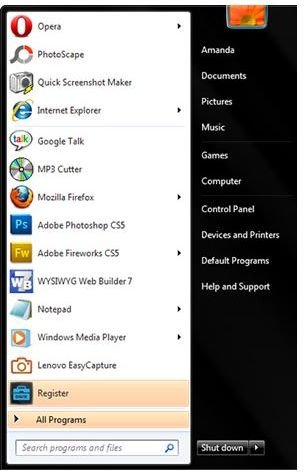
To customize your start menu, you will need to do what is called “Pin to Start Menu”. Click your Orb to open the start
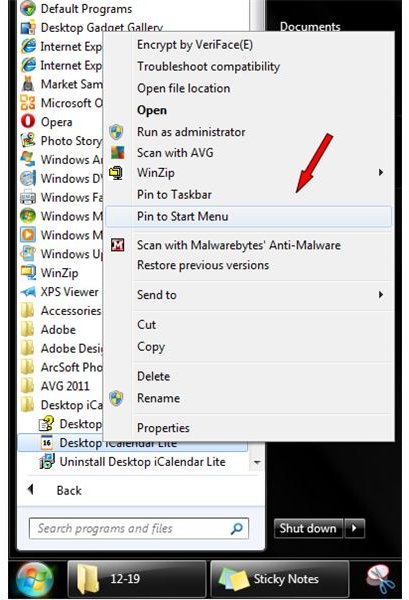
menu. Click the “All Programs” option to view the programs that are in your start menu. Find a program that you use often and click the folder to expand it. If it is not in a folder, skip that step. Once you see the actual program, right click on it and a menu will open. In the menu, look for the “Pin to Start Menu” option and click it. Once you click it, the menu will close. Click the Orb again and you will see the program you just pinned to your start menu.
If there are items in the start menu that you want to remove, follow these steps. Click the Orb again to open the start menu. Locate the program you want to remove and right click on it. In the menu, select the “Remove From This List” option. The program will then be removed from your Windows 7 startup menu.
So, now that you know how to customize your startup menu in Windows 7, you can go through and remove the programs you do not want in the menu and add the ones you do want.
What Does Pinning to Taskbar Mean?

Before I show you how to pin things to your taskbar in Windows 7 , let me explain what it is. When you pin something to your taskbar, you are basically making a shortcut to a program. The shortcut is then placed in the Windows 7 taskbar. This is good for programs that are used daily. An example is the calculator. If you use your calculator often, you can pin it to your taskbar and open it with one click of the mouse. The image to the left will show you how the items will look in your taskbar. Now I will show you how to pin things to your taskbar in Windows 7.
How to Pin Startup Menu Items to Taskbar
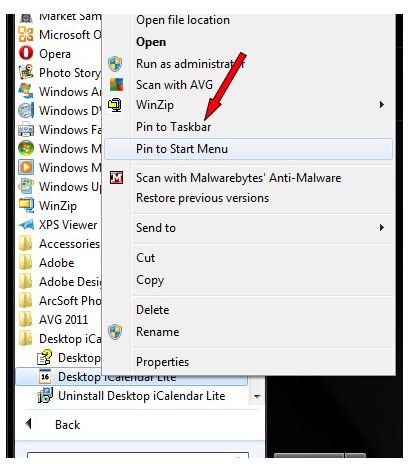
Let’s begin with pinning items from the startup menu to the taskbar. Open your startup menu and find a program or application you want to pin to the taskbar. Right click on the application or program and select the “Pin to Taskbar” option in the menu that opens. The start menu will close and you will see the new icon in your taskbar.
Folder to Taskbar in Windows 7
To pin a folder to taskbar in Windows 7, you will first need to locate the folder on your computer. Once you have located it, click it one time and hold your mouse button down. Then drag the folder to the taskbar and let it go. The folder will then be pinned to the taskbar.
How to Add Desktop Icon to Taskbar in Windows 7
To add a desktop icon to the taskbar in Windows 7, you will need to minimize everything and view your desktop. Locate the desktop icon that you want to pin to the taskbar and right click on the icon. When the menu opens, click the “Pin to Taskbar” option in the menu. The menu will close and you will see that icon in the taskbar.
Unpinning Items from Taskbar
Unpinning items from the taskbar in Windows 7 is very simple. Right click on the icon of the program or application you want to remove. When the menu opens, select the Unpin option and the icon will be removed from the taskbar.
Image Credits & References
All screenshots were taken by the author for educational purposes only.
Windows 7 - Amanda Presley


