SkyDrive offers not only backup services but also allows you to create, edit, and share files with others. This article has some tips and guides you through the most common tasks.
SkyDrive is more than just a remote storage facility from Microsoft. If you need SkyDrive help, continue reading on, as we will discuss some of the main aspects of how to use Windows SkyDrive. The facility is free to use and offers 25 GB of free storage per account. This means you can easily use the SkyDrive for backup purpose also.
SkyDrive help sources are few on the Internet. The SkyDrive website itself offers few pages on how to use the SkyDrive. You can also contact Microsoft if you need more help on SkyDrive. However, as we will be covering main aspects here, you would seldom need to call the customer support. Note that there is no dedicated SkyDrive help line. You may just dial the regular customer care numbers and ask them about SkyDrive.
The following are the main features of the cloud service from Microsoft. You can:
- Upload files of any type to store them into different folders in Windows Live SkyDrive
- Create folders in the root of SkyDrive and assign sharing permissions to them
- Create subfolders to arrange your files
- Create files in root or any of the folders or subfolders that you have created
- Share the files with others
Note that the sharing permissions of a subfolder or file cannot be different from the parent folder. For details on how permissions are allotted, please read our article - “SkyDrive Privacy .”
The following paragraphs explain how to create folders/files and how to upload files. It also helps you set sharing permissions and informs you how to view the contents of your SkyDrive.
SkyDrive Help - Viewing the Contents of SkyDrive
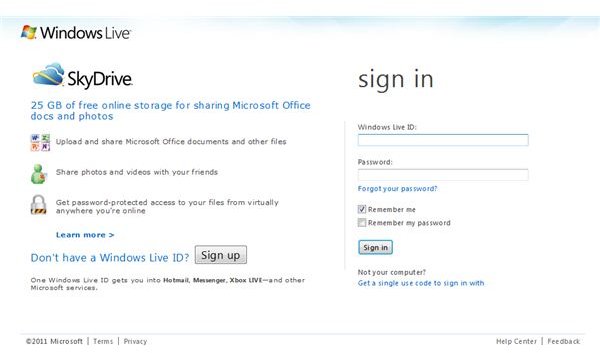
This section on SkyDrive help, deals with how to view contents of SkyDrive. To view the contents of your SkyDrive, login into SkyDrive.live.com using your Windows Live ID or Hotmail ID.
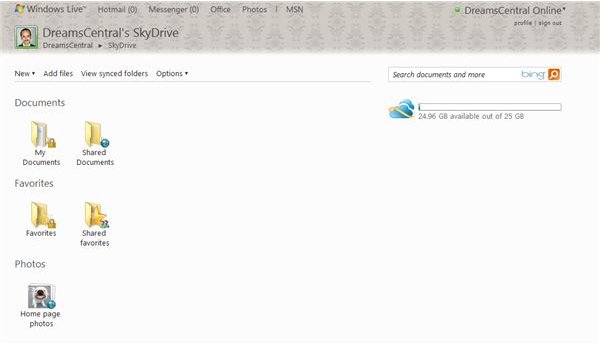
The first page you get shows the contents in the root folder of your SkyDrive. Normally, you can find the following four folders that SkyDrive creates for you: Shared Documents, Shared Favorites, My Documents and Favorites. You will also find a folder named Photos that you can use to store images.
Unless you change the share permissions, the contents of Photos, Shared Documents and Shared Favorites can be shared with anyone. Only you can view the contents of My Documents and Favorites. While you can store any type of file in My Documents folder or in Shared Documents, you can store only URLs or bookmarks in the Favorites and My Favorites folder. The Photos folder enables you to upload, store and share images. You can also upload images to the Documents folders or any other folder you create. The only advantage of uploading images to Photos folder is that you can see the thumbnails.
Note that you can create new files in the root of SkyDrive but you cannot upload files to the root as of now. You can upload files only to folders and subfolders.
SkyDrive Help - Creating Items and Assigning Share Permissions
This section on SkyDrive help will deal with:
- Creating folders in the SkyDrive root and assigning permissions
- Creating Subfolders
- Creating and Editing Files using Office Web Apps
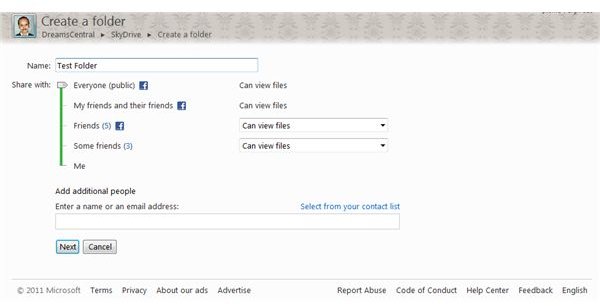
To create a folder in the SkyDrive root, you click on New while on the first page and from the drop down list, select Folder. You will get Create a Folder page. Type the name of the folder in the text box. By default, SkyDrive will assign Everyone as the sharing permission. If this is okay, click on Next. If you wish to change the permissions, click on Change. When you click on Change, you will get a slider that you can use to change the permissions for the folder. You may also type in names of your Windows Live Friends or use contact list to select people with whom, you wish to share the contents of this folder.
Note: The sharing permissions you assign to this folder will be applicable to all its contents, including subfolders.
When you click Next, you will get a page that asks you if you wish to upload files to that folder. If you wish, you can use the Browse button to upload files. If you wish to do that later, or if you wish to create files using Office Web Apps, click on Cancel.
To create a subfolder, click on the folder wherein you want to create the subfolder. When the page opens showing the contents of the parent folder, click on New and then on Folder (see Image below). The process to create the subfolder is same as that of creating a folder. You cannot however, change the share permissions of any subfolder. The subfolder will inherit the share permissions from the parent folder.

To create a file using Office Web Apps, click on New and select one of the following options:
- Word Document;
- Excel Spreadsheet;
- PowerPoint Presentation; or
- OneNote Notebook
Once you click on the above options, you get a text box where you can type in the name of the file. The extensions are automatically compatible with the latest version of MS Office. Click Next to open and edit the file. Go to the File menu and then Close to return to the folder view.
If you need to edit the file again, hover the mouse on the filename and click on Edit. This opens the file again so that you can edit the file.
SkyDrive Help - Other Common Tasks
This section on SkyDrive help will deal with other common tasks that you may need to perform.
>>To go back to the main page, the SkyDrive root, click on the Office link. The Office link is available at the top of any SkyDrive page. This will show you folders arranged by permissions. If you wish to view all folders, click on View All.
>>To upload files to the SkyDrive, click on Add Files. This opens up a page where you need to select a folder. Once you select the folder where you wish to upload files, you will be presented with a page with five Browse buttons. Each one is used to select one file. Once you select the files to upload, click on Upload. If you wish to upload more files, you can again click on Add Files. For bulk transfer of files to and from SkyDrive, use one of the SkyDrive plugins. Details are available in our article on Integrating SkyDrive with Desktop .
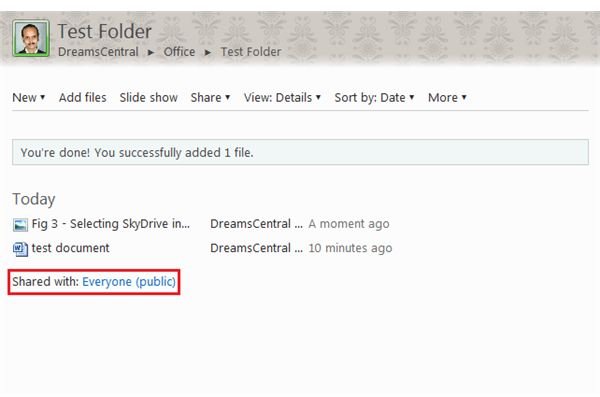
>>To change permissions for an existing folder, click on the folder. Once it opens, it shows the share permissions at the bottom of file list (see image below). Click on the link next to Shared With to change the permissions. You will again get the slider through which, you can change the folder permissions.
I guess I covered every important task related to the Windows SkyDrive. If you need further assistance or if you think I missed something, please feel free to use the comment boxes.
References
Windows SkyDrive: SkyDrive.live.com
Images from Author’s SkyDrive
This post is part of the series: All About Windows SkyDrive
This series on Windows SkyDrive aims to offer you complete information on the cloud storage product from Microsoft. SkyDrive is more than just a remote storage. This series assists you figure out what all you can do with Windows SkyDrive.


