iTunes 64-Bit is specifically meant for Windows 64-Bit users. This article will cover how to download, install and use iTunes with some useful tips and tricks. We’ll also learn how to import files into iTunes from CDs and other sources.
Introduction
iTunes can be a wonderful program for playing music, videos and podcasts. The software allows users to easily synch with iPod devices and copy songs onto CDs. However, if not installed properly, there can be issues.
For those not familiar with this version, 64-Bit is simply a faster version and is compatible only if you are running a 64-Bit application of Windows.
If you follow these simple tips and tricks for using iTunes 64-Bit, you’ll be well on your way to enjoying your new music library.
Download iTunes 64-Bit
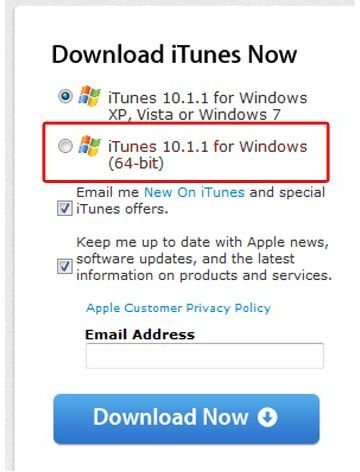
First, visit iTunes to download the proper version. Click on the “iTunes for Windows 64-Bit” option that should show up for Safari and Firefox browsers. Enter your e-mail address if you wish to register for their newsletter and uncheck any of the notification options above the e-mail address field that you do not want. Click on the “Download Now” button to begin the download. Follow the computer’s instructions to save the file to a location you desire.
Install iTunes 64 Bit
Double-click the “iTunesSetup.exe” file from the location in which it was saved. Follow the wizard, continuing to click on the “Next” button to complete the installation. If you need any specific help with your installation, please consult this detailed iTunes install guide .
Download iTunes 64 Bit
iTunes Libraries
For multiple users on a single computer, you’ll want to setup different libraries. To setup and use a different library, hold down the “Shift” key and then double-click the desktop icon to open iTunes. A pop-up window asks you to locate the correct user’s library. Click on the “Choose library” button and locate the iTunes library you wish to open. The library is the file in which all of the music files are stored for an individual occurrence of iTunes.
NOTE: If this is the first time iTunes is being used, select the “Create library” button.
The default folder for iTunes is the “My Music” folder. The sub-folder “iTunes” is where you will store each individual user’s library.
Backup the iTunes Library
Backups are important for anything stored on a computer. iTunes libraries are no different. Ensure that the library files are among the files listed on your specific backup device. It is a good rule to backup iTunes every time new music is downloaded or added to the iTunes library. If you need specifics options for an iTunes backup , read the linked article.
Purchase Music from the iTunes Store
iTunes allows users to purchase music from the iTunes Store, along with movies, podcasts and more. To purchase music or movies, click on the “iTunes Store” option on the left menu. Browse the store through the options on the screen, or click on the “Search Store” field in the upper right corner of the window. Search by typing an artist’s name or song name into the field and pressing the “Enter” key on the keyboard.
Click on the “Buy” button to purchase individual songs, or the entire album, whichever you prefer.
NOTE: A PayPal account makes purchasing iTunes easy. All that is needed is a quick confirmation to ensure that the purchase is approved and that the user understands that the PayPal account will be charged accordingly.
Importing Music from Other Devices
Should you wish to copy music from CDs or other files on the computer, follow these instructions.
When iTunes is open and a CD is inserted into the computer’s drive, iTunes automatically brings up a pop-up window asking if you would like to import the CD. Follow the instructions and the CD will be copied into the iTunes library.
If other music or movie files are located on the computer, click on the “File” menu and select the “Add File to Library” option from the menu. Locate the file or files and double-click to select and import them into iTunes.
Synch iPod
Once the library is setup with your preferences, the next step is to copy the files to your iPod device. This is called synching.
With the iPod attached to the computer, click on the “File” menu and select the “Synch iPod” option.
It is important that you not disconnect the iPod device until iTunes confirms the synch has been fully completed. Doing so could harm the iPod.


