Here are a few great screen capture applications compatible with Windows 7. They are small, easy to use and work very well. You can now take screen shots with just the press of a key.
The Best Free Print Screen Software for Windows 7
If you are an avid PC user, you might need to take screen shots or screen captures frequently. Most of us know how to take a screen shot - just press the Print Screen key and go to Microsoft Paint and Paste the captured screen. It will be saved as an image. However, this is quite basic and can be very tedious if you need to take a lot of screen shots.
In this guide, I will showcase some of the best free printscreen software that is compatible with Windows 7 .
Faststone Screen Capture
Faststone Capture is a small application which you can use to capture screen shots easily and save them. It allows you to take a wide variety of screen shots like full screen capture, window or object capture, rectangular region capture, freehand capture and capturing a scrolling window. You can also use shortcuts which capture the whole screen or active window and save it in a predetermined location.
First, you need to Download FastStone Capture 6.7 . After downloading the setup, just run it and install FastStone.
You can also use the portable version of FastStone if you can’t install it normally.
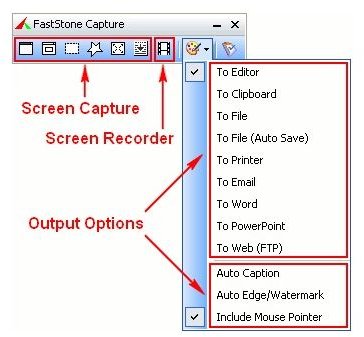
Next, just open FastStone Capture from the Start Menu or the desktop shortcut. You should see a small toolbar window which offers a series of screen capture options. You can choose from different types of capture types or view the application settings.
To use it, first select the type of screen shot you want to take. You can take screen captures directly using shortcuts (you can change the hot keys if you want).
- Active Window - Alt + Print Screen
- Window / Object - Shift + Print Screen
- Rectangular Region - Ctrl + Print Screen
- Freehand Region - Ctrl + Shift + Print Screen
- Full Screen - Print Screen
- Scrolling Windows - Ctrl + Alt + Print Screen
In the toolbar, you can also select where you want to save/open the captured screen image - to editor, file, clipboard, printer, email, Word/PowerPoint document, etc.
In the Settings option, you can change the default file save location in the Auto Save tab.
Just use the shortcut depending on the type of screen shot you want to capture and it will be saved/sent as you want.
I would prefer the File (Auto Save) option, in that case, it will be saved to a file automatically.
Snippy Screen Capture
Alternatively, you could also use a program called Snippy.It’s a nifty little tool which doesn’t have as many features as FastStone, but it’s much smaller and simpler. Click here to Download Snippy .
After it is installed, run the Snippy application. When you want to take a screen shot, just press F11 and select the area you want to capture using the pencil.
To capture a rectangular area, press Shift when you drag the mouse pointer to select the area.
Then just run MS PAINT or your favorite graphic editor and paste the captured screen shot.
Both FastStone and Snippy are screen capture applications compatible with Windows 7, but I would recommend FastStone for its ease of use.


