In this tutorial, you will learn how to make an audio recording using your computer’s built-in or external microphone. Using Microsoft’s improved default application, you can record your own sound, music and audio chats on the computer.
Things You’ll Need
You will need two things for making the recording, a microphone and Windows computer. In particular, I’ll cover cover how to do this in Windows 7.
Most laptop computers these days are equipped with built-in microphones. If not, you can buy one for as low as $10. You can even get a microphone headset, which is commonly used for audio recording purposes. Check out this microphone guide to know which microphone to get, if you don’t have one already. Also, check out this list of the best microphones .
Installing the Microphone
Before trying to record audio, you need to check whether the microphone has been installed correctly on your Windows PC.
Just attach the device to your computer, and go to the “Control Panel,” which you can access by clicking the “Start” button and typing “Control Panel” in the search field.
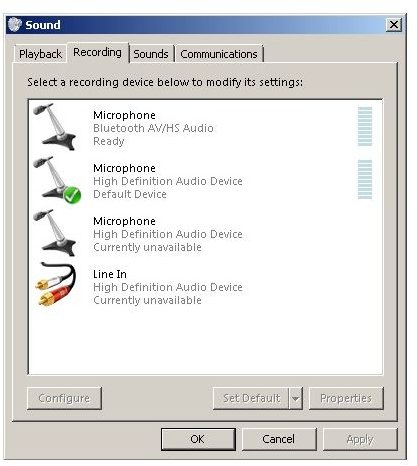
Click the “Sound” icon and navigate to the “Recording” tab. You should now see your microphone in this list. If you can’t, then it hasn’t been installed properly, in which case you need to insert the installation disk again (that came with the device), and follow the onscreen instructions.
If you can find your microphone on the list, select it, and click the “Properties” button. Now go to the “Levels” tab and set the recording volume level that you want. You can adjust it later if you find the recording volume to be too low or high.
In the “Advanced” tab, select the recording quality and format.
Your microphone is now set up.
If you want to record from some other source instead of a mic, just connect that device to the “Line In” jack of your computer.
Start Recording
Although there are countless advanced sound recording applications designed for Windows 7 computers, why purchase one when you can use the default application that your computer came with? The “Sound Recorder” application is capable of handling audio recording tasks of different kinds. The best part is that it offers a simple and easy-to-use interface.

To open the Sound Recorder, go to “Start” > “Accessories” > “Sound Recorder.”
Click the “Start Recording” button when you want to record audio. Speak whatever you want to record it.
When you are done, click the “Stop Recording” button and specify the folder you want to save the audio recording. It will be saved in the location you specify as a WMA file. You can play it later using any player, like Windows Media Player, Winamp, KMPlayer or VLC.
The basic Sound Recorder utility doesn’t allow any editing though, so if you want to edit your recordings or want an advanced interface, you can use applications like Audacity. Here’s a tutorial that explains the basics of Audacity .
References
Microsoft. (2011). Record Sound. Retrieved from: https://windows.microsoft.com/en-US/windows-vista/Record-sound
Images provided by the author.


