This Windows SkyDrive Tutorial offers you an introduction to SkyDrive, one of the first cloud packages, before proceeding with tips on how to use Windows SkyDrive.
Windows SkyDrive Tutorial - What is Windows SkyDrive?
The first part of this Windows SkyDrive Tutorial offers an introduction to the Windows cloud package. The subsequent sections focus on how to use Windows SkyDrive to its max potential. Please note that this Windows SkyDrive Tutorial is based on my own experiences with Microsoft cloud. Some of the views herein may or may not match with the ones presented by Microsoft.
The idea of Windows SkyDrive when it was launched was to provide remote storage for your files. As the concept of cloud computing started gaining ground, Microsoft started adding more features to SkyDrive while experimenting with other cloud services such as Office Web Apps, which is now a part of Windows SkyDrive.
Windows SkyDrive offers a whopping 25GB of storage per account. There is no charge for using Windows SkyDrive. With Windows SkyDrive , you can upload files of almost any type and share them with others. The cloud package gives you options to create folders so that you can arrange your files for quicker access. You may name the folders with captions that help you identify the contents. Similarly, you can rename your files so that you know the contents of the file.
You can create Word, Excel, PowerPoint, and OneNote files using Office Web Apps without paying anything. You can read uploaded files related to the above mentioned Office applications even if you do not have a local copy of MS Office installed on your computer. Thus, Office Web Apps is basically an online version of basic Microsoft Office version that you can use for free.
SkyDrive also offers you different privacy options so that you can save a file (almost any type) that only you can access. Or if you wish, you may set the access settings so that only certain people can access your files. You can also rename, delete, move, copy, and download the files on SkyDrive. You can also send these files as attachments to Facebook.
Windows SkyDrive Tutorial - Create, Access SkyDrive
This part of Windows SkyDrive Tutorial will help you create your own SkyDrive. It also tells you what to expect when you first login into the SkyDrive - the first step towards how to use Windows SkyDrive.
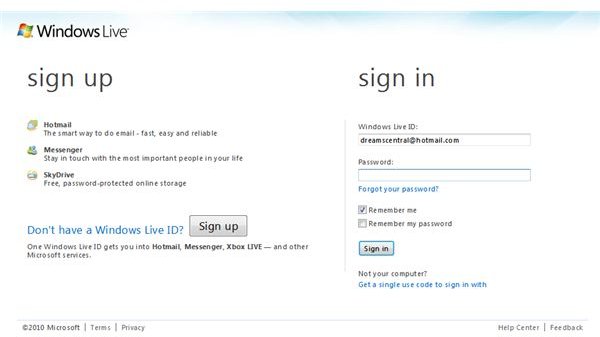
Unlike other Microsoft cloud services, Windows SkyDrive works on a range of browsers. You need not necessarily use Internet Explorer to use Windows SkyDrive. To access, type https://skydrive.live.com into the address bar of your browser. You will be redirected to Windows Live login page so that you can log in. Type your. Net passport ID, Hotmail ID, or your Windows Live ID followed by your password to access the Windows SkyDrive. If you do not have any of these, you can create a Windows Live ID from the same page. Just click on the Signup button for a free Windows Live ID (Fig 2).
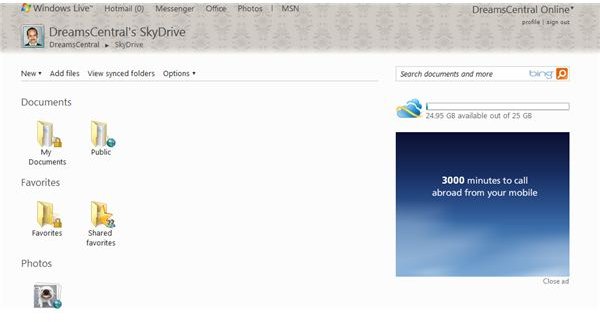
Once you login, you get the SkyDrive main page with your main folders to left and “available space” to right (see Fig 1 in the first section). If you are logging in for the first time, you will be presented with My Document, Public, Favorites, and Shared Favorites folders. Remember that whatever you store in Public folder and Shared Favorites will be visible to everyone. You can see the lock symbol on the My Documents icon. This means that the files you store won’t be visible to others unless you specify the access rights.
The next page of Windows SkyDrive Tutorial explains how to use Windows SkyDrive to create and upload files. It will also explain how to perform different operations on the files and folders stored at the Microsoft free cloud storage.
Windows SkyDrive Tutorial - Create Files and Folders
Now that you are on the main page, you can access to a range of options that help you create new folders; create files compatible with Word, Excel, PowerPoint, and OneNote; upload files of any type; delete, rename, and download files of any type; and edit the files compatible with Word, Excel, and PowerPoint.
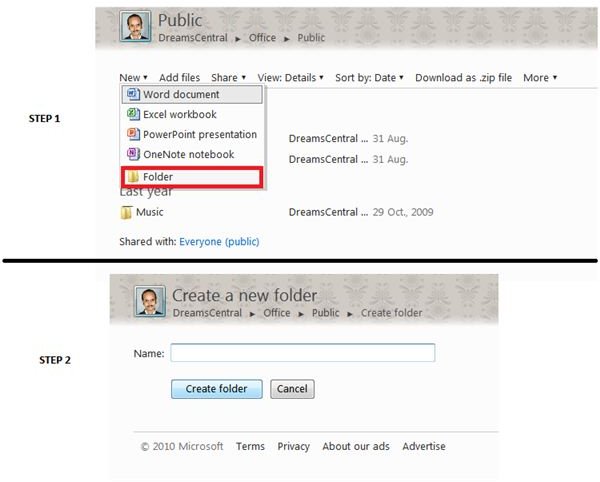
To create a new folder, click on the New option that shows a black triangle. It opens up as a drop down list. Click on Folder. You will be presented with a page that asks for the folder name. If you wish to create a folder within a pre-existing folder, click on the folder to open it. Once the folder is open, you can follow the same method to create a sub-folder. The following image shows how to create a sub folder in the Public folder. Remember that Favorites and Shared Favorites are used to store web addresses and not files.
Once you type the name of folder and click on Create, Windows SkyDrive creates a new folder and opens it with options to add files/folders, upload files, share, delete, and move the folders. Sometimes due to lack of space, Windows SkyDrive groups different commands under an option labeled More. Most of the times, the commands to delete, rename, and move files/folders are present under More option.
Important: If you are creating a folder or file in Public folder, you cannot set permissions. The contents of Public folder will be visible to all. Of course, you have to give out the link to people before they can open and view the contents of a folder. In case you give the link of a file inside the public folder, people can use the SkyDrive navigation to see other files in the folder as well. If you wish to give out the link of a particular file to people, use the My Documents folder and set permissions using the Share option.
Windows SkyDrive Tutorial - File/Folder Operations
Once you have the folder, you may want to add files to it. You can either create files using the New option or upload files using the Add Files option. As shown in above image, when you click on New, you get options to create a Word document, Excel Spreadsheet, PowerPoint presentation, or a sub folder. If you wish to upload files, click on Add Files.
You get a page with a blank square and a link saying drop documents here or select documents from your computer. This means you can drag and drop files to the area or click on select documents from your computer to use the Open File dialog box. To upload more than one file at a time, press CTRL key while selecting multiple files.
SkyDrive employs indicator for each file that is being uploaded to show the progress. Upon completion of upload, you can see the files in the folder view. If any file could not be uploaded, you get a message with a cross icon to indicate problem. You can choose to upload it again using the same procedure.

Once you click on the Continue button, you get the folder view with commands to work on the individual files or on the folder.
Remember that the options present above the folder contents apply to the entire folder. Commands for each file are shown when you point your mouse to the file. You have options for sharing, downloading, moving, and other tasks.
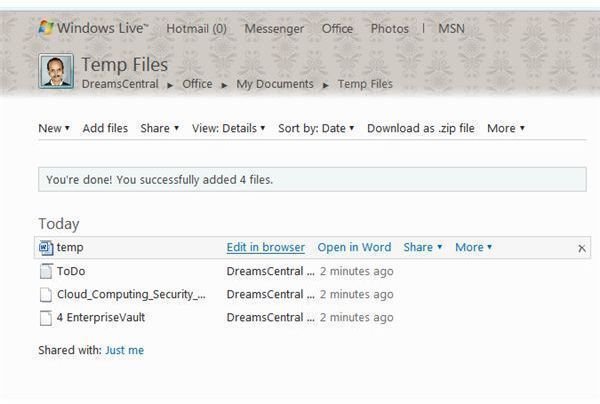
Note: You can perform online editing only for Word, Excel, and PowerPoint files. The option to edit is displayed when you hover the mouse on the file (see image above).
I hope I covered all important aspects in this Windows SkyDrive Tutorial. If you still have doubts on how to use Windows SkyDrive, please get into touch using the comments box below.
See Also: Microsoft Cloud Computing
This post is part of the series: Microsoft Cloud Computing
Microsoft Cloud Computing Services are aplenty. The company offers a range of services. This series on Microsoft Cloud Computing discusses some of the best cloud computing services including Office Live Workspace, Office Web Apps, and BPOS.


