
In this article, learn how to create a Domain Controller in your home network and how to install a DNS Server, which is necessary for the client computers to reach the DC. This article assumes you have Windows 2003 installed on your computer.
Before configuring your Windows home Server as a domain controller, make sure that Windows Server 2003 is installed on your host computer and you have assigned a static IP address to the Server .
The new version of Windows Server 2003 - Windows Server 2008 can also be configured as a domain controller, but for home use the Windows Server 2003 will adequately suit your needs. It is less complicated than Windows Server 2008, and also cheaper. The Windows Server 2008 is an advanced version of the Windows Server 2003 and more suitable for business environments. So, why spend extra money on Windows Server 2008 when Windows Server 2003 can vwork the same way in your small home network set up for a lower cost?
So, in this tutorial I will walk you through all the steps you will need to configure Windows Server 2003 as a domain controller. The process is very easy and you do not require very high expertise to do it.
Step 1: Start Domain Controller and DNS setup process. Go to Start -> All Programs -> Administrative Tools and click on “Manage Your Server”.
Step 2: In the Manage your Server wizard that opens, click on “Add or remove a role”.
Step 3: Verify that all the steps mentioned in the “Preliminary Steps” page have been completed. If so, click the “Next” button.
Step 4: In the next page, select “Domain Controller (Active Directory)” and click “Next”.
Step 5: In the “Summary of Selections” page, click “Next”.
Step 6: The “Activity Directory Installation Wizard” starts. Click on “Next”.
Step 7: In the “Operating System Compatibility” page, click “Next”.
Step 8: In the next page, select the “Domain controller for a new domain” option, and click “Next”.
Step 9: In the “Create New Domain” page, the “Domain in a new forest” option must be selected already, so keep that selected.

Step 10: In this step you have to think of a name for your new domain. The domain name can be anything you wish; it could include numeric and alphanumeric characters. It can even be like a website address, for example myhomedomaincontroller.com. Once you have chosen a name, enter it under “Full DNS name for new domain”, and click “Next”
Step 11: In the “NetBIOS Domain Name” page, click “Next”.
Step 12: In the next page, browse and select the folders where you wish to store the Active Directory database and the log files. Then click “Next”.
Step 13: In the “Shared System Volume” page, you can select a folder to store things like .MSI files and other shared files. The default folder is “SYSVOL”; you can change it or just leave the default settings.
Step 14: The next page will tell you that the wizard encountered an error. Nothing to worry, the DNS server is not installed on the
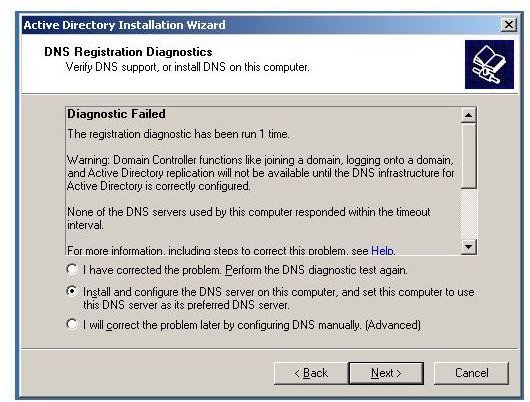
computer, so select the 2nd option - “Install and configure the DNS server on this computer, and set this computer to use this DNS server as its preferred DNS server”, and then click “Next”.
Step 15: In the next page, select “the “Permissions compatible only with Windows 2000 or Windows Server 2003 operating systems” option, and click “Next".
Step 16: The next page allows you to set the “Restore Mode” password. You will need this password if something wrong ever happens to the server and you need to perform a system restore. After entering the password, click “Next”.
Step 17: You will see a summary of the options you have selected. If you want to change an option, use the “Back” button to go to the previous page(s), otherwise click “Next”.
The “Active Directory” installation starts and can take several minutes.
Note: You may be asked to insert your Windows Server 2003 CD during the process, so have it handy.
Step 18: Click “Finish” when the “Completing the Active Directory Installation Wizard” page appears.
Step 19: You will be prompted to restart Windows. Click on the “Restart Now” button on the screen to restart immediately.
Step 20: After rebooting, you will see a different login window. Enter your Windows Server 2003 password to login.
Step 21: As you log in to Windows Server 2003, a window will open saying that your Windows Server is now a Domain Controller. Congratulations!
Once you have configured your Windows home Server, you can then add your client computers to the Domain Controller, to create a domain network.


