
Conflicker is a nasty worm infection that millions of computer users have. Many users have the infection and do not know it. Avast! is a free antivirus program that is excellent at helping computers recover from a Conflicker infection. Check out how to download, install an use Avast! here.
Uh-Oh! You’re Infected with Conflicker!
Using the Avast! Antivirus program to remove a Conflicker worm infection from a PC is a relatively safe and effective method that can be
accomplished by most users, even beginners. Avast! is a free antivirus software package that many people use to protect their computers. Used on a consistent basis, it can protect a PC and prevent it from getting an infection to begin with.
Assuming that a user’s system is unprotected and that the Conflicker virus made a home on the user’s system already, you will be happy to know that the Avast! Conflicker removal tool is ready and able to detect and clean a Conflicker infection. However, if the user’s system is already infected, there are some steps to take in addition to using Avast. Let’s walk through the steps to detecting and cleaning a Conflicker infected computer using Avast!
How Did I Get Conflicker?
The reason the computer system became infected is due to a specific vulnerability in certain versions of the Microsoft Windows Operating System that the Conflicker infection exploits . The first step is to go to the Microsoft TechNet Support website to download and install the patch that closes the security vulnerability, if the update was not already installed. It is listed under, “Microsoft Security Bulletin MS08-067"–a link is provided to this bulletin below). Each operating system will have its own download link. Simply click on the link for your respective operating system and it will take you to the download page for the patch. Download and install the patch to close the security hole.
Conflicker Removal Preparation
Prior to the Avast! installation, make sure the user that is logged in has administration permissions or that he or she is the system administrator . Next, you will need to uninstall any existing antivirus software installed on your system. Once again, if you have a Conflicker infection or suspect that you do, then assuming your existing software failed is reasonable.
- In Windows XP: Click on the “Start” menu button then click on “Control Panel” and when the Control Panel opens, click “Add/Remove Programs.” Scroll down the list to find the software already in use then click, “Remove or Change Program.” Follow the prompts until the program is uninstalled.
- In Windows Vista or Windows 7: Click the “Start” button, and then click “Programs and Features.” Scroll until you find the program you want to uninstall then click the “Uninstall Program” button. If there are problems uninstalling any program, the software vendor will have its own directions and troubleshooting sections to which you can refer. After removing the antivirus software, close all programs and open windows.
Downloading Avast!
Now it’s time to use Avast! to clean an infected computer. Visit the Avast! website and choose either the free or paid version of the
software. The free version offers the same functionality and real-time protection as the paid version does, so in cleaning Conflicker with Avast! from a computer, there is not too much difference, no matter which version you choose; the free Avast! version is adequate .
However, if you opt for the paid version, it is good to know that it adds additional types of protection for other situations. Avast! requires Windows 2000 Professional, Service Pack 4 or higher to install on your system, and that you have an active Internet connection for registration and updates. You will also need 256MB minimum RAM to run it.
Installing Avast!
First, find the downloaded Avast! file; it should be named, “setup_av_free.exe.” If you are running Windows 7 or Vista and have a user account with administrative permissions, then you will need to right-click on the file and select “Run as Administrator.” Otherwise, double-click on the installation file to begin the Avast! installation . A security message may appear asking if you wish to allow the program to make changes to the user’s system; click “Yes.”
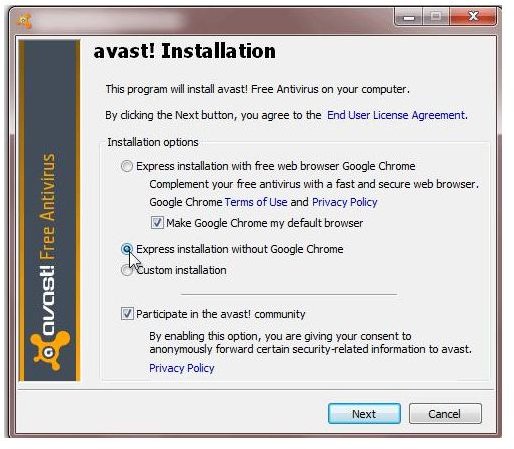
There will be a number of options presented, some will refer to optional software you can install with Avast! , such as Google Chrome. It is recommended that you install the browser another time, when security is not at stake. It is also recommended you choose express install if you are a beginning user; however, advanced users can use Custom Install, which gives advanced set up options. Make your selection and click, “Next” and Avast! will install itself. When it is finished, click the “Finish” button to confirm.
Avast! Set-Up and Scan
To use Avast!, you will need to input a license key which will be sent via email upon registration. To register the product, right click the icon in the
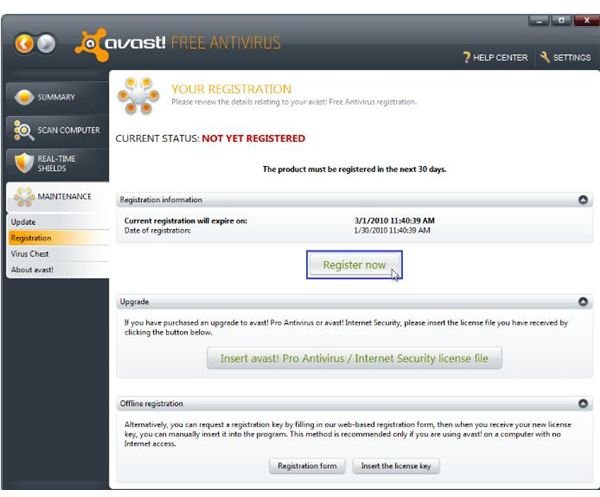
icon tray at the lower right corner of the desktop. From the options available, choose “Registration Information.” When the interface opens, choose the “Register Now” option and fill out the registration form that appears. When finished, a dialogue box appears confirming that registration is complete. You are now ready to use Avast!.
While the program is open, initiate a full system scan by first clicking the button that looks like a hard disk drive. Change the setting to “On.” Do the same for the buttons below it until the settings are all set to the “On” position. Then, set the sensitivity to “Thorough Scan” and make sure that the “Scan Archive Files” option is also checked. Click OK and the scan will begin. This scan could take up to four hours to complete, depending on various system conditions.
Deleting Infections Found
If Avast! finds an infection, such as the Conflicker worm, then it will open a dialog box noting that the Avast! Conflicker infection is recognized and it gives options on what to do with it. It is recommended that the user move all files to the quarantine chest by clicking the “Move to Chest” button. One this is done for all infections found, go to the chest and make sure these files are in fact infections. Select the infection files and click the “Delete” button. When finished, your system is clean of the Conflicker worm.
For more Information and Support:
- Microsoft Update Knowledge Website - https://www.microsoft.com/technet/security/Bulletin/MS08-067.mspx
- Avast Installation & Registration Support - https://support.avast.com/index.php ?_m=knowledgebase&_a=viewarticle&kbarticleid=564&nav=0,2,41
Screenshots by author courtesy of Avast! .


