If your desktop background changed into something that contains a “Warning: Spyware threat has been detected on your PC.” message, then your computer is infected by a virus. Read on how to remove this virus and the system changes it made.
The virus that displays the message “Warning: Spyware threat has been detected on your PC.” is known as Renos, FakeAV, or FakeAlert to some antivirus vendors. This virus has some similarities to SmitFraud in which it infects computers via adware or a fake codec without user’s consent, and it changes the desktop background. It does not infect DLL files like SmitFraud does which makes this virus somehow easier to remove.
Signs of Infection
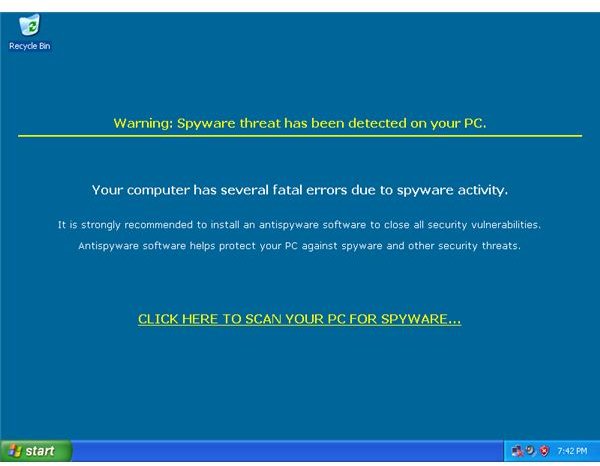
Some signs of infection shows a modified desktop background having the complete message:
Warning: Spyware threat has been detected on your PC.
Your computer has several fatal errors due to spyware activity.
It is strongly recommended to install an antispyware software to close all security vulnerabilities.
Antispyware software helps protect your PC against spyware and other security threats.
CLICK HERE TO SCAN YOUR PC FOR SPYWARE
And here’s the screenshot:
The “CLICK HERE TO SCAN YOUR PC FOR SPYWARE” is a hyper-link that points to a URL that downloads a rogue antispyware program.
One of the URL it connects to is:
hxxp://antispywareupdates.net/?aid=496.caccc8d1cbcbc7
Some security forum members reported that some variants of this virus takes you to:
hxxp://teslaplus.com
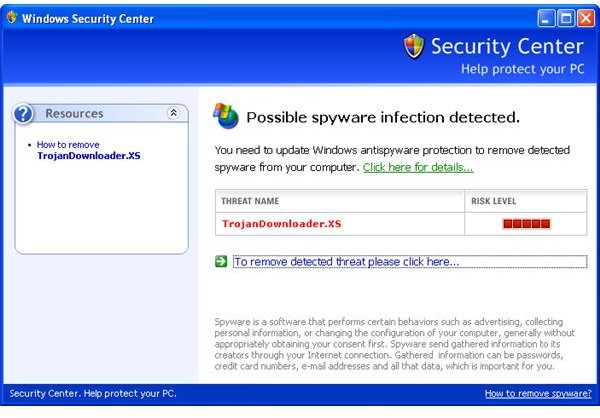
An application window with a name “Windows Security Center system” warning shows up.
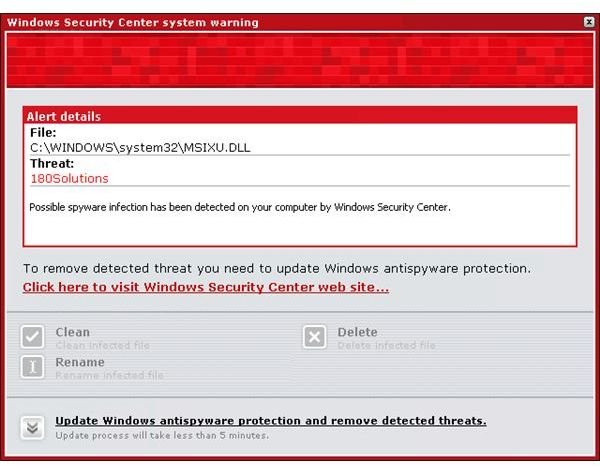
A fake Window’s Security Center message suggesting to visit the malware’s website.
It also create dummy folders in Program Files directory having the following names:
- 180search assistant
- 180searchassistant
- 180solutions
- stc
- Sysmnt
- seekmo
- zango
It drops a non-executable file on those folder using an executable EXE extension name. It create these dummy files to make it look like it is actually detecting malware, when in fact the files it is reporting are generated by the same fake antivirus.
It drops a copy of itself in Windows’ System32 directory. One of the many name it uses is mgmrwmrv.exe.
Additional behavior is that Internet Explorer keeps opening and accessing its malicious URL and that the Task Manager has been disabled.
Manual Removal
Step 1: Finding the Malware’s Executable
We need to know what executable name the malware is using. The virus add its autostart routine in Userinit to automatically start itself every time the current user account logs in. With our first clue, let us open up regedit by clicking Start > Run > and typing regedit in the input box.
Find the Userinit registry entry in:
HKEY_CURRENT_USER\Software\Microsoft\Windows NT\CurrentVersion\Winlogon
For this case, Userinit contained the following string (notice the comma):
,C:\WINDOWS\system32\mgmrwmrv.exe,
The filename may vary and we need first to inspect the file before we start removing the virus references in the registry.
Step 2: Verifying the Malicious Executable
Open the file using your favorite hex or text editor such as notepad. Scroll down to the bottom and see if we can find some clues that can link the executable to the spyware’s website.
For our example, I’ve managed to find this:
496.caccc8d1cbcbc7
Which is being used by the hyperlink in the fake warning message that points to:
hxxp://antispywareupdates.net/?aid=496.caccc8d1cbcbc7
Don’t save an opened executable in notepad or your changes will be saved and that might corrupt a legit app.
Manual Removal - con’t
Step 3: Deleting the Malware’s Winlogon References
As a precaution, be careful when deleting files used by the Registry for it may render your PC unable to boot.
The malware also modified the Userinit in HKEY_LOCAL_MACHINE. This was done so that if any user account logs in the PC, the fake anti-spyware will run.
Since we have found the path to the malicious file, we then verify next if there is the same entry in HKEY_LOCAL_MACHINE.
With the regedit still open, go find the Userinit’s entry in:
HKEY_LOCAL_MACHINE\Software\Microsoft\Windows NT\CurrentVersion\Winlogon
Find if it has the same malware’s file path that we found in Step 1.
Once it has been verified that both exists, we can now remove those malware’s Userinit references, both in HKEY_CURRENT_USER and HKEY_LOCAL_MACHINE, by replacing them with blanks.
But be careful not to modify or remove the default HKEY_LOCAL_MACHINE Userinit’s setting having the following content:
C:\WINDOWS\system32\userinit.exe
Step 4: Deleting the Files
With the malware process still running, deleting its executable file is restricted.
Opening the Task Manager has been disabled also, but we can use taskkill to do the same thing we need.
Click Start > Run > and type the following command in the input box:
taskkill /F /IM mgmrwmrv.exe
The mgmrwmrv.exe filename is just an example I’ve used, it should match the filename from the filepath you found earlier.
With the process already terminated, we can then delete the file.
Additionally, delete the HTML file it uses as its background is located in Windows folder as:
C:\WINDOWS\default.htm
Step 5: Enable Task Manager
With the regedit still open, go find and delete the DisableTaskMgr entry in:
HKEY_CURRENT_USER\Software\Microsoft\Windows\CurrentVersion\Policies\System
and also in:
HKEY_LOCAL_MACHINE\Software\Microsoft\Windows\CurrentVersion\Policies\System
You can now open the Task Manager window.
Removing Dummy Files
As of this stage, the virus executable have already been removed from running in the computer.
Some of the virus’ dummy folders are located in the Program Files directory and should be deleted:
- 180search assistant
- 180searchassistant
- 180solutions
- stc
- Sysmnt
- seekmo
- zango
The virus also dropped dummy EXE and DLL files with generated filenames in Windows and System32 folders. Some of the dummy files that has been generated were the following:
- C:\WINDOWS\180ax.exe
- C:\WINDOWS\2020search.dll
- C:\WINDOWS\2020search2.dll
- C:\WINDOWS\apphelp32.dll
- C:\WINDOWS\asferror32.dll
- C:\WINDOWS\asycfilt32.dll
- C:\WINDOWS\athprxy32.dll
- C:\WINDOWS\audiosrv32.dll
- C:\WINDOWS\autodisc32.dll
- C:\WINDOWS\avifile32.dll
- C:\WINDOWS\aviwrap32.dll
- C:\WINDOWS\bjam.dll
- C:\WINDOWS\bokja.exe
- C:\WINDOWS\browserad.dll
- C:\WINDOWS\cdsm32.dll
- C:\WINDOWS\changeurl_30.dll
- C:\WINDOWS\msa64chk.dll
- C:\WINDOWS\msapasrc.dll
- C:\WINDOWS\mspphe.dll
- C:\WINDOWS\mssvr.exe
- C:\WINDOWS\ntnut.exe
- C:\WINDOWS\saiemod.dll
- C:\WINDOWS\salm.exe
- C:\WINDOWS\swin32.dll
- C:\WINDOWS\updatetc.exe
- C:\WINDOWS\voiceip.dll
- C:\WINDOWS\winsb.dll
- C:\WINDOWS\Installer\id53.exe
- C:\WINDOWS\system32\MSIXU.DLL
- C:\WINDOWS\system32\MSNSA32.dll
- C:\WINDOWS\system32\ntnut32.exe
- C:\WINDOWS\system32\shdocpe.dll
- C:\WINDOWS\system32\SIPSPI32.dll
- C:\WINDOWS\system32\WER8274.DLL
The dummy files pose no harm in the system and I suggest not deleting any files which is based on suspicion.
Conclusion
So that’s it! We’ve removed the virus that modified your desktop wallpaper with a fake warning sign. We were able to restore Task Manager via the registry and are now able to personalized our wallpaper. We’ve also learned how this virus had modified the registry to allow itself to run every startup and how we fixed that one.


