Windows 7, the latest Operating System from Microsoft has some excellent security features. Read about them in this article.
Introduction
Windows 7, the new Operating System by Microsoft for personal computers has so many security features in it. Majority of the applications compatible with Vista are compatible with Windows 7 also. New features include an improved Windows Shell, a new taskbar, and much more. Applications that are excluded or omitted with this release of Windows are Windows Mail, Windows Calendar, Movie Maker and Photo Gallery. Let us look at tweaking the security features of Windows 7.
1. Fine Tune User Account Control (UAC)
User Account Control (UAC) is available with Windows Vista too; however, it has been improved in Windows 7 and is more user-friendly. This is a feature by which you can control the way programs are changed in your system. You will be notified if changes have to be made to the programs. Actions like browsing, chatting, or e-mailing doesn’t require administrator-level permission and therefore you can use them as standard user. This way it is easy to prevent the installation of malicious virus or spyware.
How to set User Account Control:
1. Click Start > Control Panel.
2. Search Change User Account Control.
3. You will be given the following options:
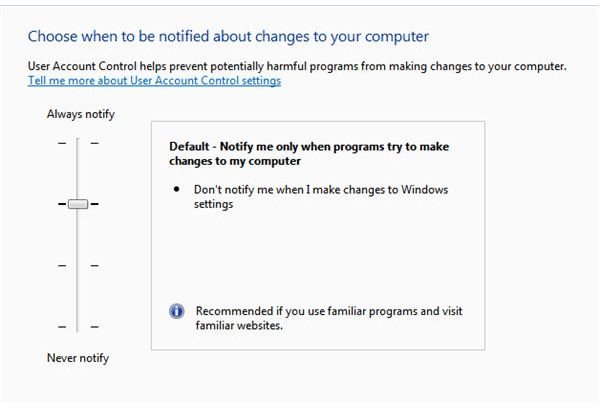
a. Always Notify
b. Notify me only when programs try to make changes to my computer
c. Notify me only when programs try to make changes to my computer (do not dim my desktop)
d. Never notify
4. Move the slider and set the settings of your desire. (Ref. Fig 1 - User Account Control)
Image Source: Recipestr
Significance of each option in User Account Control:
Always Notify: You will be notified whenever a program is trying to make changes or there is a change in Windows settings that requires administrator privileges. Your desktop will be automatically dimmed when an alert pops-up and therefore no other program can run in the background. This is one of the safest and secured options.
Notify me only when programs try to make changes to my computer: You will be notified only when a program requires administrator privileges to make changes or when a program outside of Windows is trying to make some changes.
Notify me only when programs try to make changes to my computer (do not dim my desktop): This works very similar to the earlier option; however, you are not on the secured desktop.
Never notify: As the name indicates, you’ll never be notified. If you are logged in as an administrator, you can install or remove any programs of your choice and if as a standard user, it’ll simply not allow them to install or remove programs. This option is considered to be one with least security.
Fig 1 - User Account Control
2. “BitLocker To Go” to encrypt removable flash drives
An easy way to protect data is to use “BitLocker To Go”. Microsoft has introduced “BitLocker To Go” to encrypt data in Windows 7. You can even encrypt external hard drives. How to do so? Here are some simple steps to encrypt flash drives using BitLocker To Go:
1. Plug-in the flash drive you wish to encrypt.
2. Double-click My Computer to open it.
3. Right-click the flash drive; let me mark the flash drive as H:
4. Select Turn on BitLocker.
5. You will be prompted to enter a password.
NOTE: You may also use smart card to unlock your device if the flash drive has smart card capabilities.
6. Click Next
7. You will be prompted to store the recovery key. It is always advisable to store it just in case you forget your recovery key, you still can retrieve data. Please store the recovery key in a separate file and do not store it in the same drive.
8. Click “Start Encrypting”
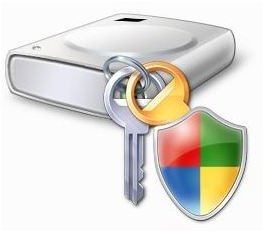
9. Once the encryption is finished, encrypted drive will look like this:
Ref: Fig 2 - BitLocker To Go
Image Source: win7deployment
10. When you wish to open the file, you will be prompted to enter the password.
11. Once you have entered your password, you will see a read-only interface. You can extract files you wish to read and can make necessary changes.
Fig 2 - BitLocker To Go
3. Removing personal information from office documents
Are you worried that your personal information will be stolen by others if used in Office documents? There is a simple way to remove personal information from office documents. How?
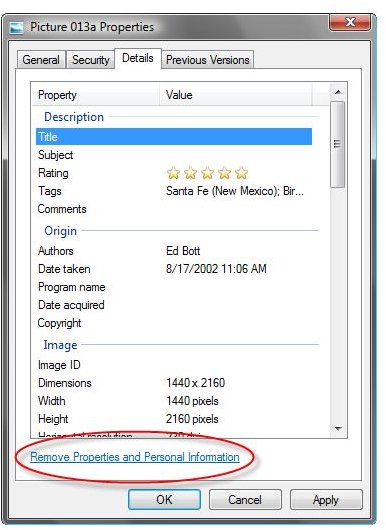
1. Right-click the document from which you wish to remove your personal information.
2. Click the tab that says “Details.”
3. You can find a window at the bottom that says “Remove Properties and Personal Information.” Click this window. (Ref: Fig 3 – Removing Properties and Personal Information from Office documents)
Image Source : Zdnet
4. You can find list of items like Name, company, computer name, etc. Check the items that you wish to remove. If wish to remove all the items, check “Select All.”
5. Press OK.
Hurray…you have successfully removed all personal information from office documents.
Fig 3 – Removing Properties and Personal Information from Office documents
Images
4. Windows Update
It is advisable to turn on automatic updates as you can stay updated with latest patches and fixes that are available from Microsoft. This will increase the security of your computer. How to turn on windows updates?
1. Click Start > Control Panel.
2. Locate Windows Update.
3. Click “Change Settings” from the left pane.
4. You will have a number of options. Choose “Install updates automatically” if you wish to turn on Windows Update. You may alternatively choose any other option given under “Important Updates.”
5. You will find an option called “Give me recommended updates the same way I receive important updates” under “Recommended Updates,” select this option and click OK. You will be prompted to enter the administrative password. Type in to allow Windows automatically check and install Windows update.
Windows update is now installed in your system.
5. Backup and Restore
Backup and Restore utility of Windows 7 is definitely a best backup tool. Let us see how it works. To set the backup, follow these steps:
1. Click Start > Control Panel > System and Maintenance.
2. Click Backup and Restore.
3. Click Setup Backup
4. Choose the drive where you wish to store the backup else Windows will automatically search for a suitable drive and store the backup.
5. When it comes to what to backup, you will be given two options; they are
a. Let windows choose
b. Let me choose
6. Choose one of the two options.
7. Click Save settings and Run Backup
NOTE: You may also choose to backup on a specified time; for example, every month at a particular time.
8. To restore the files, go back to Control Panel and click Restore My Files.
6. Preventing or putting an end to spammers in MSN / Windows Live Messenger
Are you using Windows Live Messenger like me and is spammed by spammers? There is a solution for this in Windows 7. You will be able to block the message first time when you receive. If you don’t block the first time, it is not possible to block the spammer at a later point of time. How to block?
1. Sign on to MSN / Windows Live Messenger
2. You will receive a prompt asking whether to allow messages from unknown users or to block them when you receive messages from those who are not on your list.
3. Choose the option to block messages. You will receive a prompt saying anybody who is not in your list will not be able to send e-mails or messages to you. Click OK.
4. If you are worried that some of your friends or relatives may not be able to contact you as they are not in your list, you have an option for them to contact you. Click Options in MSN / Windows Live Messenger > Privacy
5. Choose “Only people on my Allow List can see my status and send me messages.”
You can now get rid of spam messages sent by unknown persons.
7. Action Center to view alerts
With the introduction of Action Center in Windows 7, you need not worry about alerts popping up on your computer screen from various applications. It is a central place where you can view alerts from all applications and can take the appropriate actions.
Ref Fig 4 - Windows Action Center
Source: Gtsamis
Ref Fig 4 - Windows Action Center

8. Windows Live Family Safety
This is yet another wonderful feature in Windows 7. You can now set controls for web content that your children can see. You also can get reports about the online activity of your children. If you have two children in your household, you can get separate reports for each child’s web activities. What all you can do with Windows Live Family Safety?
a. Set web filtering
b. Get detailed web activity reports for each child
c. Contact management
When installing Windows Live Essentials choose “Windows Live Family Safety” and install it.
1. Click Start > Getting Started > Get Windows Live Essentials
2. Select your language from the pop-up window and click Download
3. You will get a list of products to install, choose “Windows Live Family Safety”
4. Wait till the application is downloaded and installed.
The application is now installed; let us see how to set the security settings.
1. Create a Live Safety account if you do not have one.
2. Once you sign in, there are three security levels available for you to choose from. These options are Strict, Basic, and Custom.
3. You can set controls on what websites they can visit, with whom they can chat, etc.
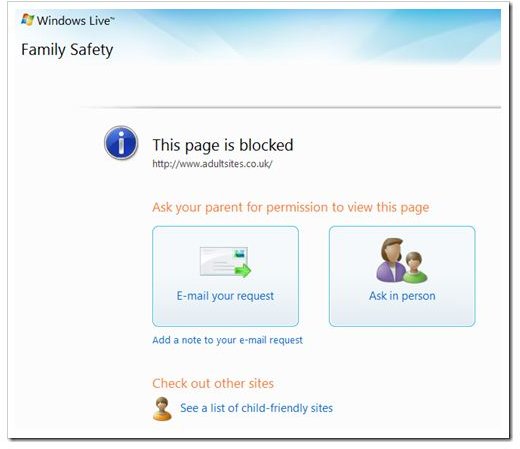
4. If your child is trying to access a website that you have blocked, they will receive the following screen:
Ref: Fig 5 - Windows Live Family Safety
Image Source: websoftdesign
Ref: Fig 5 - Windows Live Family Safety
9. Windows Firewall
Technology can be used both for good and bad purposes. Hackers have increased and so do malicious viruses and spyware. How to safeguard the computers against these? This is where Windows Firewall comes into place. Let us see how.
You can browse safely and securely if you allow a program to communicate through Windows Firewall. In general, all programs will be blocked.
1. Click Start > Control Panel
2. Type Firewall in the search box. Find Windows Firewall and click it.
3. Number of options will be displayed in the left pane. Click “Allow a program or feature through Windows Firewall.”
4. Click Change Settings. If prompted for administrator password, provide it.
5. Select the program you wish to allow to communicate and click OK.
You can do the following things with Windows Firewall:
a) Turn on/off Windows Firewall
b) Block all incoming connections, including those in the list of allowed programs
c) Notify me when Windows Firewall blocks a new program
10. Scanning and removal of malicious viruses
Everyday there is a new virus cropping up and it is becoming very difficult to scan or remove these malicious viruses. There is an easy way to remove them in Windows 7. Use Microsoft Windows Malicious software removal tool to remove these malicious viruses. How to use it? Here you go…
1. Download Microsoft Windows Malicious software removal tool from Microsoft.
2. Run the tool.
3. If viruses are found, it will automatically remove the virus and will alert you about it. If not, your computer is safe and you need not worry about virus attack at that point of time.
NOTE: Remember to update Microsoft Windows Malicious software removal tool through Windows update. If not, download the tool whenever necessary, run it and check for viruses.
These are the top X security tweaks available in Windows 7. Take advantage of these tweaks and make your system less susceptible to viruses and internet threats.
Sample contents.


