TrueCrypt is safe to use, and should be considered by anyone looking for trustworthy open-source software.
“Warning: Using TrueCrypt Is Not Secure…” was the opening message on TrueCrypt’s May 2014 home page update, shaking the confidence of many long-term users. The warning remains even months later, but it references the lack of continuing support for the award-winning, open-source encryption program.
Currently, there’s no indication that TrueCrypt’s impressive security has been diminished in the least; it’s just the original creators won’t close any holes should any be discovered. After extensive research in the matter, experts at Gibson Research Corporation conclude, “Yes…TrueCrypt Is Still Safe to Use.”
It remains a mystery (one that conspiracy theorists are loving) why the developers abruptly closed shop and pointed users to Windows BitLocker Drive Encryption, which is only available in the Professional and Enterprise versions of Windows 8. The developers even went so far as to develop a neutered 7.2 version that only allows users to decrypt existing TrueCrypt volumes, so they can completely migrate away from TrueCrypt and follow the posted tutorials to establish BitLocker. Regardless of their motives or public response, however, TrueCrypt is still a formidable foe again data thieves and should be considered if you distrust closed-source, corporation-sponsored encryption that may or may not have governmental influence (removing the tinfoil hat now).
The advantages of TrueCrypt container files are numerous. For one, data inside is protected by 256-bit encryption using various encryption algorithms, including AES, Serpent, Two-Fish or a combination thereof. The containers remain encrypted until you “mount” them, at which time data is decrypted when needed in volatile RAM instead of temporarily transferring decrypted data to the hard drive where they could be recovered. Containers are also mounted to their own drive letter, so as far as Windows is concerned, they’re separate drives. Furthermore, container files are just that: individual files than can be copied, backed up to another drive or emailed to others without losing they encrypted state.
Creating a TrueCrypt Container File
Download and install TrueCrypt 7.1a. Avoid version 7.2, which won’t allow you to create encrypted container files. Although TrueCrypt has removed version 7.1a, Gibson Research Corporation hosts version 7.1a for anyone seeking it.
2. Open TrueCrypt and click “Create Volume.”
3. Select “Create an Encrypted File Container” and click “Next.”
4. Select “Standard TrueCrypt Volume” and click “Next.”
You could also select “Hidden TrueCrypt Volume” if you wanted to hide a volume inside a standard container, but to keep things simple, select a standard volume.
5. Click “Select File” and choose a save location and name.
The name and extension can be virtually anything, so you can choose something that conceals the container’s true purpose.
6. Click the “Encryption Algorithm” drop-down menu and select your preferred encryption method.
If you don’t have a preference, choose “AES” and keep the Hash Algorithm the same. You can also click “Benchmark” to see which algorithm performs best on your computer (higher MB/s meaning better performance); in most cases, this will be AES.
7. Enter the size of the proposed container, select the appropriate unit and then click “Next.”
In this example, a 10MB container is being created.
8. Choose a strong password up to 64 characters long (at least 20 random characters are recommended), enter it in both password boxes and click “Next.”
For increased security, check “Use Keyfiles” and click the “Keyfiles” button to add keyfiles, folders or tokens to the encryption key. This option requires the unmodified keyfiles in addition to the password to later open the container. Be forewarned, however, that if you lose or modify the keyfiles, the data in your container will be lost.
9. Choose “Yes” if you foresee storing files larger than 4GB in the container.
If you will not be storing files larger than 4GB, choose “No.” Click “Next.” This screen only appears when creating a container larger than 4GB.
10. Randomly move your mouse around for several seconds to randomize the encryption key and then click “Format.”
If you want to change the file system, click the “Filesystem” drop-down menu and select your preferred file system. However, this option was selected based on the container size and your selection of large file support, so in most cases, leave the default selection alone. TrueCrypt defaults to FAT, unless you need to store files larger than 4GB, in which case it selects NTSF.
TrueCrypt displays a progress bar after you choose “Format,” so you know how much longer you need to wait, but you’re free to use your computer during this time.
11. Click “OK” to close the resulting dialog after successfully creating the container.
Click “Exit” to close the original window.
Mounting a TrueCrypt Container
1. Select an empty drive letter, click “Select File” and choose your container file. Click “Mount.”
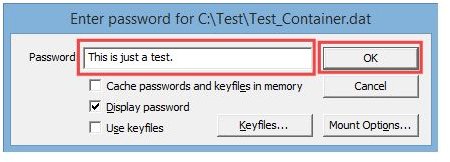
2. Enter your password and click “OK.” If you used keyfiles, check “Use Keyfiles,” click the “Keyfiles” button and select the appropriate files.
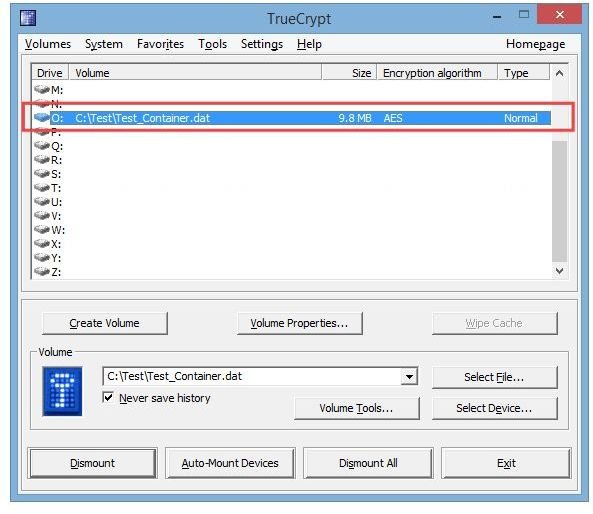
3. The container is then mounted to the selected drive letter and is accessible there through File Explorer. If you need to decrypt the drive again, close any programs that may be accessing data in the container, select the drive letter and click “Dismount.”


