Are you ready to protect your computer from viruses and spyware and want to configure scans in Spyware Doctor 2011? We got you covered! Read on to learn how to customize and use the features in this Spyware Doctor 2011 guide.
Initial Configuration and Setup
Spyware Doctor 2011 comes in two versions; however, it’s best to know how to setup Spyware Doctor 2011 scans the correct way. If you haven’t installed the program already, double-click the installation file if you purchased the digital download version of the software. Otherwise, insert the CD to begin setup. Click Next through the following screens to begin the installation. You’ll see Spyware Doctor update its database to add the newest signature files before the program initially starts running. After you click Finish, your first scan is performed. If any infections appear, click Fix Checked to repair the infected files.
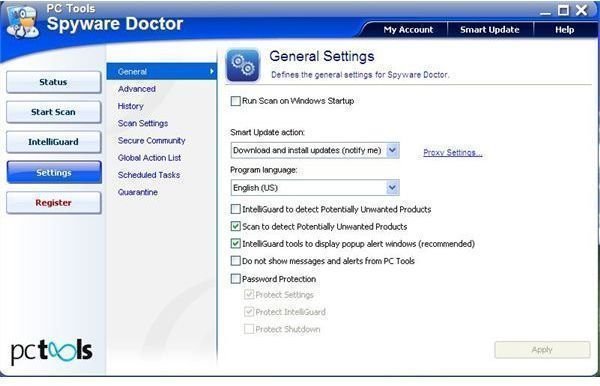
After your first scan runs and Spyware Doctor removes any existing infections, you’re ready to configure the program’s settings. Double-click the Spyware Doctor icon in the notification area of the Windows taskbar to open the main screen and click Settings on the left side.
The General tab lets you configure password protection, preferred actions for updating signature files, startup settings and notifications. If you are an advanced user who wants to use a power saving mode, scan for threats on the MBR or enable kernal compatibility mode , you can select these settings on the Advanced tab. The History tab lets you view logs of threats and the actions taken against them while the Quarantine tab lets you see files that were moved to protect your system.
For most users, you will want to go to the Scan Settings tab to make sure that your system is protected as well as possible. On this tab you can select to scan for hidden files, quarantine potential threats and create a Windows restore point before anything is removed. These options can save you from trouble if you get infected.
Running Scans
Running scans is simple on Spyware Doctor. You can those to schedule scans to take place at a certain time or manually ran scans. To start a scan, click Start Scan on the program’s main menu. You’ll then see an options to perform an Intelli-Scan, a full scan or a custom scan. An Intelli-Scan looks for infections in running processes, startup files, browser data, the Windows host file, the registry and ActiveX objects. However, you may want to use a full scan so that you can detect any viruses that may be hidden in document or program folders and are not running in the memory at the moment. A custom scan will scan any items you choose and can be helpful when you only need to scan a specific directory or file. After you choose your preferred scanning method, select the check box next to Auto Fix so that any infections are automatically repaired and click “Scan Now” to scan your computer.
If you want to configure a scan to run automatically at a certain time of day, you can add scheduled scans. Click Settings on the left side of the program and click Scheduled Tasks to the right. Click Add and follow the wizard to select the type of scan you want to run, its frequency and a specific time range. Click Finish to add the scan to the scheduled tasks list.
With these tips you should be able to setup Spyware Doctor 2011 scans, manage your scans, and check for malicious activity to keep your computer safe.
References
Screenshot and references from Spyware Doctor 2011
Spyware Doctor 2011’s official product site: https://www.pctools.com/spyware-doctor/trial/d/2/


