With Windows 7, Microsoft’s Bitlocker encryption tool has been revised and is now easier to use.
How do I Install BitLocker on Windows 7?
BitLocker is an encryption tool available in Windows 7 Ultimate and Windows 7 Enterprise that allows you to retain control over the contents of a specific disk partition by using modern methods to make the files and folders on the disk secure.
Only you, with the correct key (saved on a dedicated chip on your computer) have access to the contents of the disk.
First available to Windows Vista users , BitLocker has undergone a bit of a change for Windows 7 and is now a much more useful product. One particular improvement is that unlike the previous version, you don’t need to install BitLocker on Windows 7 because it is already included in the operating system.
Configuring BitLocker for use is also easier in Windows 7.
How Does BitLocker Work?
BitLocker works by encrypting the contents of your chosen disk and then creating an encryption key. Without this key, access to the encrypted disk cannot be given. This is particularly useful for laptop owners who keep sensitive information on their computer. Should the device be stolen, removing the hard disk drive will reveal little (other than it is encrypted). If the thieves have the tools to break the encryption it will take them quite some time, and they should be regarded as more than pick-pockets.
The key can be found on your computer’s TPM chip. TPM stands for Trusted Party Module and is a hardware specification which securely generates and stores cryptographic keys used in encryption.
If your computer doesn’t have a TPM, however, then you will need a USB stick with which to store the key.
Enabling BitLocker USB Support
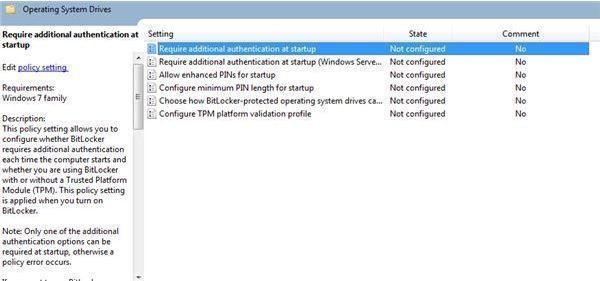
Curiously it isn’t possible to enable USB support for BitLocker via the Control Panel – instead you will need to do this via the Local Group Policy Editor . This is accessed by going to Start and entering gpedit.msc in the Search box.
Open the gpedit.msc program – the Local Group Police Editor – and find your way to: gpedit.msc > Computer Configuration > Administrative Templates > Windows Components > BitLocker Drive Encryption > Operating System Drives.
Right-click Require Additional Authentication at Startup and select Enable. You can then proceed with activating BitLocker on your computer. Make sure you have the intended USB stick – your portable encryption key – inserted before activating BitLocker.
How to Configure BitLocker on Windows 7
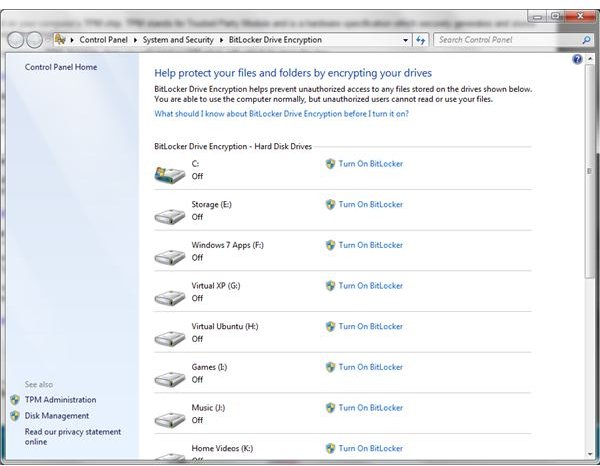
The rest of the process for using BitLocker is pretty straightforward – all you need to do is go to Start > Control Panel > System and Security > BitLocker Drive Encryption. If your PC or laptop has TPM, then you can use the TPM Administration controls to manage this.
Activating BitLocker on your computer means selecting the partition you wish to encrypt. This might be one or several, and is easily done by clicking Turn On BitLocker against the appropriate drive.
(Screenshots by author)


