
Think your files containing sensitive information are gone when you delete them? Think again … Protect your information by Shredding your files in Mac OS X.
Why Use A Mac OS X Shredder?
Technically savvy criminals are smarter than at any other time in history. We must do our best to stay one step ahead of them. This is not going to be a paranoid, everyone is out to get you so lock your doors (or in this case your PC) and never go outside article. In today’s modern computing environment however it is painfully easy for the typical PC user to protect their sensitive data and avoid the most common types of information theft.
You may be thinking, “if it’s so easy why isn’t everyone doing it already?” Well, most PC users are exercising some kind of caution with their sensitive data. Firewalls and anti-virus/malware programs being the most common steps users are taking. The same users who are protecting their data while it’s in their possession are also the same users who are forgetting about this data once they are done with the PC (or hard disk).
I recently had occasion to replace the single 500GB hard disk that was in the iMac that I purchased in 2007. This iMac had been my information hub for almost three years and the stock hard disk was starting to fail. No problem! I fire up my favorite internet browser, Google Chrome , surf over to my favorite online hardware vendor and order myself a 1TB replacement drive. A few days later I receive my replacement hard disk, install the hard disk into my iMac and restore my Mac OS X install from a time machine backup. I’m back in business and even got a little extra storage space in the end. This is where the story ends for most users but have you ever thought about what is going to happen to the hard disk that you replaced? Toss it? Use it as a paper weight or book end? Treat it like garbage … it’s a failed hard disk right?
If we take a little closer look at this situation we will realize that, like I said above, this hard disk was my information hub for almost three years. Imagine for one second how much personal information was stored on that hard disk over those three years. Now imagine it falls into the hands of someone with a little technical know-how and experience at data recovery. I’ll let you digest that for a minute …
… finished? If you’re like me and actually sat there and tried to imagine what kind of information might be recoverable from that hard disk, well lets just say we’re on the same page now. I know I promised this wasn’t going to be a paranoid security article and you may be asking yourself “who the heck is going to steal a broken hard disk!” and you’re right, this may be a fairly uncommon practice. When all is said and done though, no matter how small of a town you live in and no matter how well you know your neighbors, if you leave your doors unlocked eventually someone is going to break in and steal your stuff.
I Deleted My Data! Nobody Can Steal It!
Well, that’s not exactly true. If you are like most Mac OS X users you moved your file to the trash and later emptied the trash. This does not remove the file from the physical hard disk. It simply removes the ability of Mac OS X to find the file by removing the pointer to the file. The file or directory stays on the physical hard disk, in tact and fully recoverable until a time comes when your hard disk nears capacity and the file or folder is overwritten with new data. So, if you are like me and rarely run your main hard disk at full capacity, relying on external and online storage for your storage needs … You guessed it, that file or directory that you “deleted” may sit there for a long time.
How Do I Delete My Files for Good?
Luckily removing your files from a hard disk permanently and securely is a very easy process. There are several good freeware Mac OS X file shredders available today as well as Mac OS X having a built-in Secure Erase option. Securely erasing your sensitive data on Mac OS X is a painless process but it will take a bit of time depending on how securely you want to remove your data.
Built-In Mac OS X “Empty Trash Securely”
An option often overlooked by your average Mac OS X user, Empty Trash Securely is a great way to ensure that all files that pass through your Trash are securely erased. This makes the process of emptying the Trash take a lot more time but is well worth the time. This is a good option if you want all files you remove from your hard drive to be “shredded.”
Shredder by Steve Dekorte
Aptly named Shredder this shareware program does exactly what it was designed to do. Securely erase your files. You simply place the Shredder.app file in your dock (or any other easily accessible spot) and drag any files that contain sensitive information onto the Shredder icon. The program does the rest. All options are available in the shareware version of Shredder for Mac OS X except the ability to securely erase free space. I’ll show you how to do that natively in Mac OS X later in this article.
Shredder Dashboard Widget by Interdimension Media
Shredder for you Mac OS X dashboard is an easy to use widget that will shred any file you drag onto it. It has three settings; low, medium and high to meet the needs of a variety of users and is freeware. Setup a hotkey for your dashboard, grab the file you want to securely erase, hit your hotkey to open dashboard and drop the file onto the Shredder icon. That’s it, your data is gone.
How to get started. Secure File deletion.
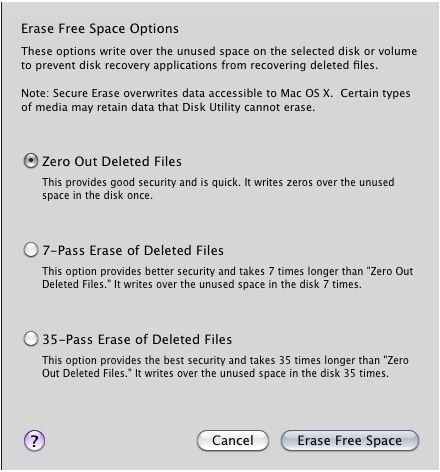
If you have never securely erased a file in your life and want to start now I do have a couple recommendations. The first thing I would do is to run disk utility in Mac OS X. You will find this program in your Applications > Utilities folder and it will give you the option to erase the free space on your disk. The steps to securely erase free space on your disk are:
- Open Disk Utility.
- Select your hard disk in the left hand pane.
- Click the Erase tab.
- Click the Erase Free Space button.
- Select the method you would like used for the secure erase.
- Click Erase Free Space and wait for the process to complete.
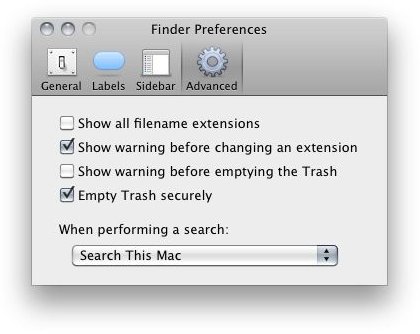
The second recommendation, once the free space on your hard disk has been securely erased, would be to turn on the Empty Trash Securely option in finder.
- Open a finder window.
- Click on Finder on the menubar.
- Click Preferences.
- Select Advanced.
- Place a check mark in the box titled “Empty Trash securely.”
With these two actions complete you are now running a much more secure environment. The free space on your drive has been securely erased removing any previously deleted files from the hard disk and you are now setup so that any file that passes through the Trash will be securely erased.
Secure File Deletion on a File to File Basis.
In many cases you may find the process of securely erasing the Trash cumbersome, especially if you delete a lot of large files where secure erase isn’t a high priority. In this case I would still recommend you complete the first suggestion above, erasing the free space on your hard disk. Once that is complete install either Shredder by Steve Dekorte or the Shredder dashboard widget and securely delete your files on a file to file basis. This process is still very secure assuming you always run files containing sensitive information through the shredder when you are done with them.
Hardware Disposal.
Whether you choose to securely delete all files that pass through your system or securely delete files on a file to file basis it is important that you develop proper habits when it comes to deleting files containing sensitive information. Even with these safeguards in place it is also highly recommended that you zero fill (at the very least) your hard disk before removing it from your system for disposal . If this is not possible due to hardware failure and you’ve followed these best practices you’re secure. If in doubt a ball-peen hammer does some serious damage to a hard disk.


