Wouldn’t it be better if you could connect your MacBook Pro to your TV so your friends and family could view videos and pictures you have shot with ease and comfort? Apple has made it much easier now. Read on to learn how you can connect your MacBook Pro to a TV.
What You Will Need
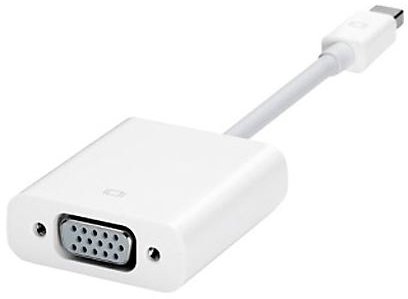
1. You need the Apple mini display to VGA or HDMI adapter. You need this to deal with video format and resolution conversion. You can buy an Apple branded adapter called “Mini DisplayPort to VGA” from Apple website , it costs around $30. If you use a HDMI TV then you need a Mini DisplayPort to HDMI Adapter , it will cost you $22.50.
A little about VGA and HDMI
The VGA standard is very old. It carries analog signals that are subject to cable reflections, crosstalk, or noise. HDMI, on the other hand, is a newer standard for transmitting digital signals and does not suffer from possible quality drops. HDMI offers higher resolutions, faster refresh rates, and deep colors. If you have a TV that supports HDMI, you may prefer to receive HDMI signals from your MacBook Pro to TV for richer video, faster gaming, and better looking movies.
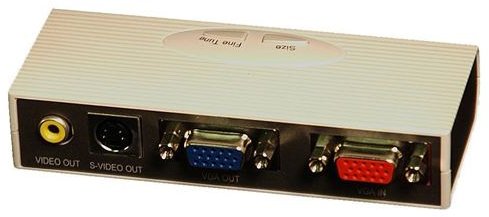
2. You need a way to convert VGA to TV Video. If you are going to use HDMI, you do not need anything other than “Mini DisplayPort to HDMI” adapter and possibly an extension cable to reach your TV. Automatic VGA to TV Video conversion can be done with “PC to Video EZ”, which can be purchased from the Grandtec website and which will cost you around $50.
Instructions for Connecting Your MacBook Pro to TV
Step 1: Look for ports on the left side of your MacBook Pro, and you will see the “Mini Display Port.” It will be the third port next to the ExpressCard slot. Attach the Mini DisplayPort to VGA or Mini DisplayPort to HDMI adapter to this port. If you are going to use HDMI then plug the end of your cable or extension cable into the HDMI port on your TV and skip to step 5.
Step 2: Take the VGA cable that came with the PC to Video EZ converter and plug one end of the cable to the “Mini DisplayPort to VGA” adapter and the other end of the cable into the “VGA IN” port on the PC to Video EZ converter. Tighten the screws on both ends of the VGA cable to make it secure.
Step 3: Plug one end of the composite video cable (which came with the PC to Video EZ) into the “Video Out” port on the PC to the Video EZ converter and plug the other end of the cable in the corresponding port on your TV.
Step 4: Now you need to give power supply to the PC to Video EZ converter. Use the supplied USB power cable and plug one end into an USB port on your MacBook and plug the other end into the PC to Video EZ converter.
Step 5: Turn on your TV and set the channel for display of video input. It is usually done by pressing the A/V button on the TV or the remote controller. The video input channels are usually labeled “Input” or “Line.” Now, turn on your MacBook Pro and login as normal. You will see that the display will now also be shown on your TV.
The above process is very easy, especially for those who are familiar with audio and video technologies. With these instructions, you can fulfill your desire to watch on your TV the video transmitted by your MacBook Pro.
Fine Tuning the PC to Video EZ Converter
There are a couple of buttons on top of the PC to Video EZ converter. You can use these to modify the output on your TV. The “Size” button lets you toggle between underscan and overscan modes. The underscan mode reveals content in full screen whereas in the overscan mode the content is expanded to the area that will be visible on most TVs. Press the “Fine Tune” button to adjust the image quality for TV. You can also play with your MacBook Pro’s display settings to improve the output quality.


