Finding yourself with duplicate iTunes tracks? Here is a simple method that will allow you to banish them in no time.
Where Do Duplicate Tracks Come From?
Every once in a while, you may find yourself with duplicate tracks in your iTunes library. Sometimes, this can happen because of an error with the iTunes software, but there are many other reasons you might find yourself with duplicate tracks clogging up your library. For instance, maybe you upgraded a particular song using iTunes Plus. Now the original protected file is listed as well as the new DRM free file. Or, you might have imported a CD you own, only to realize that you already purchased a few of those songs from the iTunes store. The good news is, there’s an easy way to remove duplicates from your iTunes library.
Isolating Duplicate Tracks
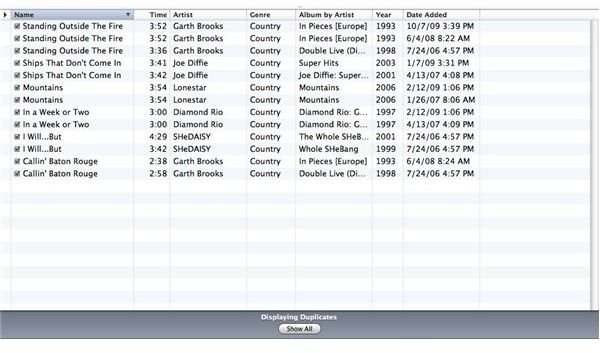
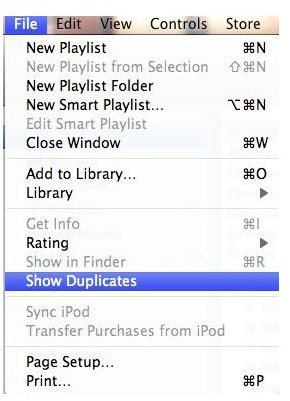
The first step in removing duplicate files from your iTunes library is to isolate the duplicates from among the rest of your iTunes library. For some people, this may be as simple as locating a few duplicate files from among your main music library. But, if like a lot of iTunes users, you find yourself with a massive library to sort through, there’s an easy shortcut to isolate duplicate tracks. Go to the file menu from within iTunes, scroll down to select “Show Duplicates” and click on it. Now, iTunes will group all those tracks that it thinks are duplicates together on one screen.
Determining Which Tracks Are Duplicates
The screen should look something like second the image below. Generally, iTunes will list tracks with the same title and artist as duplicates. This is where your work in removing duplicates from your iTunes library comes in. Carefully check each track, making sure that it is in fact a duplicate. You’ll want to separate the true copies from instances where you have multiple versions of the same song.
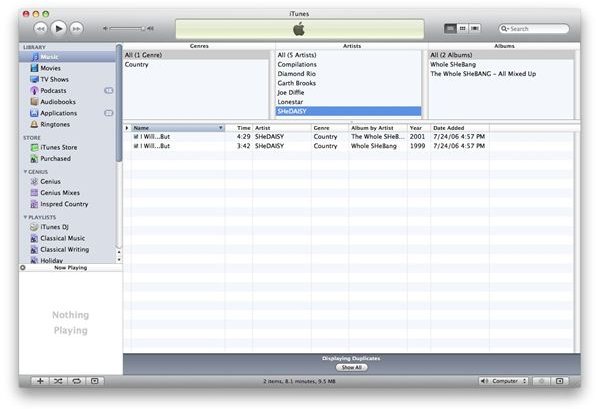
As an example, let’s take a look in image three below. You’ll notice that the two tracks listed share the same title and artist. But look closely at these tracks. The second track has a significantly longer run time than the first. Both songs also show different years of release, and appear on different albums. In this instance, we are not looking at duplicate tracks but rather two versions of the same song. We will not want to delete either of those.
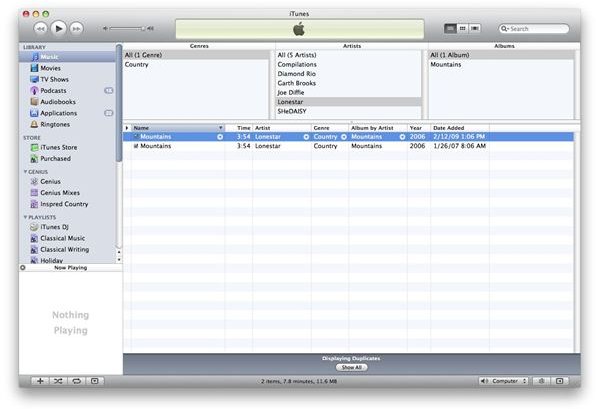
Take a look at image four, however. In this case, both tracks have the same runtime, release year, and album. The first track was added a couple of years after the second, though. Generally speaking, you’ll probably want to keep the newer version of any duplicate track. If you aren’t sure, go ahead and right-click on each track and select “Get Info” from the menu. From here, you can get detailed information about each track so you can determine which tracks to keep.
Deleting the Duplicate Tracks
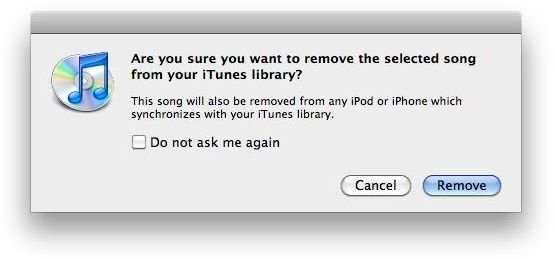
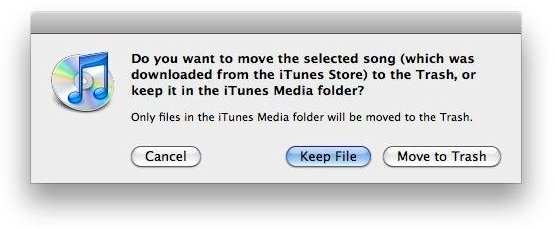
Once you’ve determined which track you want to delete, or moving the duplicate track is as simple as selecting the track and pressing your delete key. Unless you disable the functionality, at this point iTunes will ask you if you’re sure you want to delete the track from your library, as well as any synchronized devices (Image five). When you click remove, iTunes will ask if you would like to keep the file, or move it to the trash (Image six). In most cases with a duplicate file, you will want to move it to the trash for easy disposal.
Removing Duplicate Tracks in iTunes