
You can share your snapshots and favorite pictures from iPhoto to your Facebook account easily. Just download and install the free Facebook Exporter for iPhoto and follow this step-by-step tutorial.
Step-by-Step Tutorial on How to Upload Photos from iPhoto to Facebook
It’s easy to share your photos on Facebook using the iPhoto application in your Mac. Just follow these steps and you’ll be on your way to photo-sharing, social networking style.
1. Download the Facebook Exporter for iPhoto (or download from the Apple site ). Follow the installation process after the download is complete. Make sure that iPhoto is not running.
2. Start iPhoto and select the photos you wish to upload to Facebook. You can select several photos by pressing the command key (apple key) and clicking on the photos that you want to choose.

3. Once you have all the photos you wish to add to Facebook, select the FILE option, then select EXPORT. You will see the Facebook export utility, together with other export options.
4. Log in to Facebook using the Login button. Just use your Facebook login information.
5. Choose whether you wish to add your chosen photos to an existing album on Facebook or if you wish to add the photos to a new album. If you choose the new album option, you can assign the album a name, description, and location.
6. You can also click through each photo to add captions and tags. If you wish to tag the people in your photos, just click on their picture, then type their name. If they are already a Facebook contact, their name will appear as an option and you can click on the name to tag them. When you tag Facebook contacts in your photos, they will be notified automatically.
7. When you finish adding album information, captions, and tags, you can click on the Export button. If your upload is successful, you will get a message saying that your photos have been uploaded to Facebook. It will also give you the option to review the photos on Facebook.
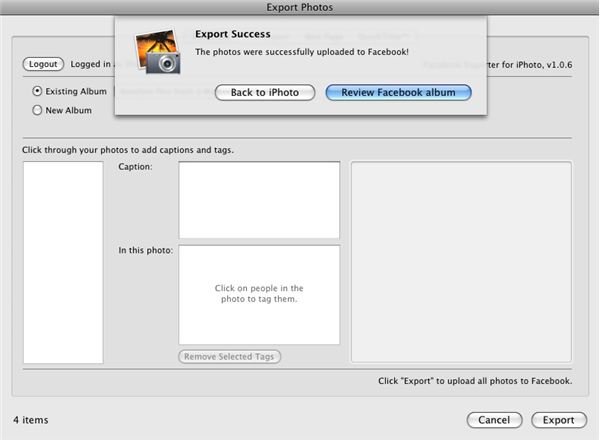
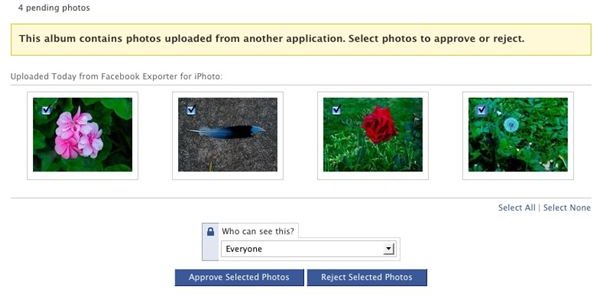
8. When you click on ‘Review Photos on Facebook’, a new window will open in your browser. You can then select the photos that you wish to get published on your Facebook account. You can also choose who will be able to view the photos that you’re approving (Everyone, Network and Friends, Only Friends, or Customized group). The default is ‘Everyone’. Then, click ‘Approve Selected Photos’.
Once your photos are approved, you can edit the photos, add more photos, and/or organize them. You also have the option to share your album and to post your album on your profile.
You will also find a link that looks something like this - https://www.facebook.com/album.php?aid=303810&id=728935463&l=975a5678c2 . This is the link that you can share with your friends by email or instant messaging, especially if you choose to share your photos publicly.
Also see:
How to Put Pictures on Facebook


