Running out of space on your AppleTV? The AppleTV debuted with a 40GB or 160GB internal hard drive. Below you will find a step by step tutorial detailing how to upgrade the internal hard drive of your AppleTV.
How to: Upgrade your AppleTVʼs HD
Why Would You Need To?
The AppleTV debuted with a 40GB and 160GB internal 2.5” PATA HD. For those of you with a moderately sized iTunes Library this poses quite a problem if you want to store your media locally on the AppleTVʼs small drive. You could stream your iTunes Library and compromise your networks throughput, but why do that when you can upgrade the internal drive and store everything locally?
Upgrading your AppleTVʼs HD is a two-part process and I have compiled instructions after much frustration dealing with all of the online tutorials.
Letʼs first discuss the items required for this upgrade.
Required Items:
- TORX 8 and 10 driver to remove the screws
- USB to 2.5” PATA/IDE adapter (2 or one depending on which method you use, See below).
- Basic understanding of the Terminal application
- Patience
Let’s Get Started!
Step 1: Removing the hard drive from inside the AppleTV
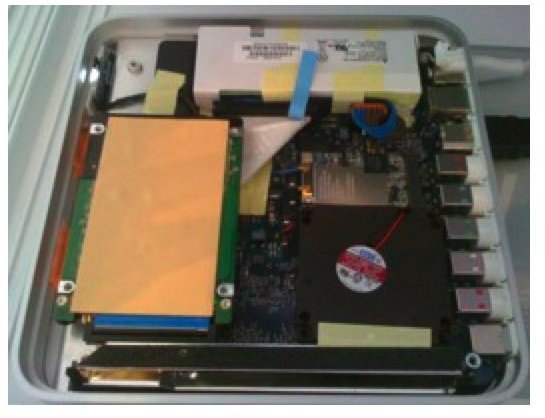
The first thing you need to do is slowly remove the rubber covering on the bottom of the AppleTV. I found this step to be a lot easier by simply peeling back the rubber juenough to access the screws. There is one screw in each corner and 4 screws that hold the 2.5” PATA drive to the bottom of the AppleTV.
Once you have removed all 8 screws itʼs time to prop up the bottom of the AppleTV and expose all of its internals. All thatʼs left now is to removed the HD from the PATA connector (click on an image to see it enlargened).
That was the short and easy part. Now for the real challenge.
Step 2: Migrating the partition structure on the old drive to the new drive.
The preparation of the new drive is challenging due to the partition structure on the AppleTV. If you connect the old drive in Disk Utility you will most likely see three Volumes; disk*s* (where the * will depend on your specific computer. Most likely it will be disk2s1. This is also the “Factory Restore” partition on your AppleTV); you will see OSBoot (which is the OS), and finally Media (which is obviously the reason you are upgrading this drive in the first place so you have more room for your locally stored media). What you donʼt see is the EFI partition.
However, if you open up Terminal and type in diskutil list you should get something like this:
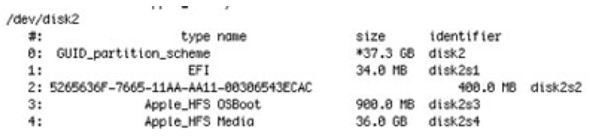
Depending on which OS you are using (10.4 or 10.5) the line with 5265636F-7665-11AA-AA11-00306543ECAC may also read Apple_Recovery. In fact, in Disk Utility, towards the bottom the Volume name should read Apple_Recovery.
So you just used your first Terminal command of many needed for this project. The diskutil list is very useful for breaking down where your drives are located (i.e. /dev/disk1 /dev/disk2). Going forward it is imperative that you choose the correct drive to perform your commands on. If you perform a command on any other drive you may accidentally erase some data.
Now that you can see the basic structure of the AppleTVʼs HD you must now make an exact copy of the information on this drive so that you can clone it to the new drive.
There are actually two options for this step, the short and the long. Below I will provide both options on the next page starting with the short.
The Short Method
This method requires two USB to PATA/IDE adapters. You will need to connect both the old and the new AppleTV hard drives to the computer to perform this step. Once you have both drives connected simply run your diskutil list command in order to see each driveʼs location on your Mac. Most likely one drive will be located at /dev/disk2 and the other will be at /dev/disk3. Now you must determine which one is the old drive and the new. This can be done by simply looking at the capacity of each drive.
Now for your second Terminal command. From the command prompt type:
dd if=/dev/disk2 count=1335 of=/dev/disk3 bs=1024k
this will copy all the contents of the HD located at /dev/disk2 onto the drive at /dev/disk3. Now this step may take some time and the Terminal doesnʼt provide any sort of status bar so it is important to let this command finish without interruption. When this command is complete you should see something like this:

The Long Method
This method only requires that you have one USB to PATA connector. Unlike the step above where you copy the old driveʼs contents directly to the new drive, without the second PATA connector you must copy the driveʼs contents to your computer and then copy it to the new drive making the long method about twice as long as the short.
The benefits of copying the contents of the old drive to your computer is that you will now have a complete backup of the AppleTVʼs recovery and OS partitions. Things to keep in mind is that you have enough free space available on your drive for all the contents on the AppleTVʼs HD. Once you have connected the old AppleTV drive use the following command to copy the contents to your computer:
dd if=/dev/disk2 of=/Users/User_Name/Desktop/AppleTV.img
bs=1024k
Once again you will not receive any status bar in the Terminal window and must wait until the task completes. Once this task completes you will see the following in the Terminal window:
Also, you will now have a file named AppleTV.img residing on your desktop. If you notice the command I used above included a path to your usernameʼs Desktop(/Users/User_Name/Desktop/AppleTV.img). You will have to use your actual username in the User_Name field.
This method really is long! Continued on the next page…
Now you have the contents of the old drive on your computer and will need to reverse the process in order to copy the contents to the new AppleTV drive. First you will want to eject and disconnect the old drive and connect the new one. Another useful command for quickly ejecting your drive is diskutil eject /dev/disk2
Once the new drive is connected, type in the diskutil list command so you have the exact location of this drive. Once that is determined type the following:
dd if=/Users/User_Name/Desktop/AppleTV.img count=1335 of=/dev/
disk2 bs=1024k
This will start the process of copying the old driveʼs contents to the AppleTVʼs new HD. Once again when this task completes you should see the following in the Terminal window:

So now you have an exact copy of the old AppleTV drive on the new drive, but what about the size of the Media partition? Didnʼt it just copy over the same amount of spacing leaving countless space unused on the new drive? It sure did.
The next steps will guide you through increasing the partition on the new drive. For the following steps it is imperative that you unmount the the drive before running any of the following commands. In order to unmount a drive you must use the following command:
diskutil unmountDisk /dev/disk*
Now that the disk is unmounted we can remove the current Media partition in order to resize it later so type in the following command:
gpt remove -i 4 disk2
taking extra precaution that you are not removing the wrong partition. The above command will remove the fourth partition on disk2 when you type in: diskutil list
Now that you have removed the old Media partition you must determine how large to make the new one. So once again unmount the drive by typing:
diskutil unmountDisk /dev/disk*
once you have unmounted the drive type in:
gpt show disk*
which will provide the following information:

If you look at the line above the Sec GPT table you will see two numbers under the start and size columns; 3141672 and 74998455. These two numbers represent where the empty space on your drive starts and how much space there is. Make sure that you write down these two numbers because we will be needing them shortly. Once again, unmount the drive by typing:
diskutil unmountDisk /dev/disk*
Now that the drive is unmounted you will need to create the new partition using the information attained above. Type the following in Terminal:
gpt add -b 3141672 -i 4 -s 74998455 -t hfs /dev/disk*
The last and final step is to ensure that the drive is formatted correctly so unmount the drive:
diskutil unmountDisk /dev/disk*
and type in:
diskutil eraseVolume “Journaled HFS+” Media /dev/disk*s4
You have now successfully copied all the contents from the AppleTVʼs old drive over to the new drive and increased the partition for your new Media volume. Now letʼs put some finishing touches on this project so we can make sure there are no hiccups.
Next, we need to make sure that Spotlight hasnʼt marked our AppleTV drive so type in:
ls -a /Volumes/Media
and
ls -a /Volumes/OSBoot
and look for an invisible file named .Spotlight-V100.
If you see this file type the following to remove it from your drive:
sudo rm -rf /Volumes/Media/.Spotlight-V100
and
sudo rm -rf /Volumes/OSBoot/.Spotlight-V100
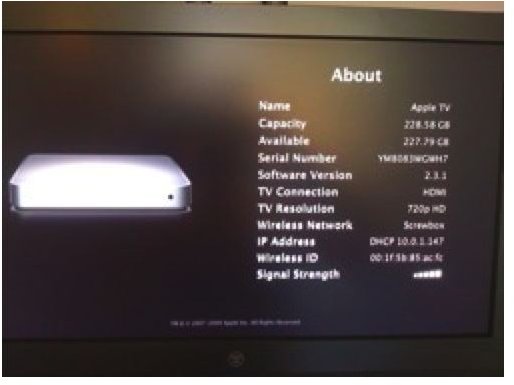
Finally, completely eject your drive by typing diskutil eject disk* and put it into the AppleTV. Once the AppleTV finishes booting visit the About menu to verify the extra capacity, you can also check this by connecting your AppleTV to a network and looking at its Summary in iTunes.
* Disclosure: The information provided in this tutorial is not support by Apple, Inc. You could irrevocably damage the information on your AppleTV’s hard drive. Please take precaution.


