You can use Apple Mail to protect you from Spam; learn the options in this three-part series.
Junk E-Mail Filter
Apple’s Mail has a few tricks up its sleeve for protecting you from spam. One is the Junk E-Mail Filter, which can be used to train Mail to decipher between legitimate mail and spam. Another is an option to create message rules. Mail also provides a Bounce Sender command that sends a junk message back to the sender, coded as if it had reached a non-working address. Spammers hate that! I’ll talk about these three things in detail in this three part series. If you use Apple’s Mail, follow along and incorporate these utilities.
Creating Rules
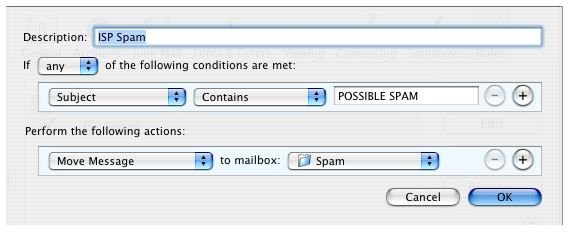
You can create rules to tell Mail what to do with specific messages. For instance, if your ISP warns you of spam by adding something to the Subject line (like mine does), you can create a message rule to send any message with that warning to a folder you’ve created. You can then look in that folder occasionally to make sure nothing important has been accidentally placed there. [See Image 1]. Notice that the subject line of many of these messages has *****POSSIBLE SPAM***** added to it. That means that my ISP has caught this mail and tagged it as spam before it ever got to me. Now that’s what I’m talkin’ about!
You can also create message rules that filter incoming e-mail into folders if they are from a specific person (like your spouse, boss, or secretary), when the e-mail is from someone in your address book (or not), when the message is flagged as junk e-mail, when the message is to a specific person, and more.
Tip: Consider creating a rule that looks for the word “unsubscribe” in the body of the e-mail. Most spam has this word in it. Because the word “unsubscribe” is usually part of a live link back to the spammer, and not a graphic, the rule will pick up most of these spam messages.
To create a new folder and a specific folder rule to send e-mail to it:
- Open Mail.
-
Choose View>Columns and verify that Mailbox is selected.
Advertisement -
In the Mailbox pane, control + click the In box and select New.
-
Select a location from the choices. Choices will vary. Selecting a choice not already in the Mailbox pane will cause it to be added. Name the new folder. Click OK.
Advertisement -
Choose Mail>Preferences>Rules.
-
Select Add Rule.
Advertisement
-
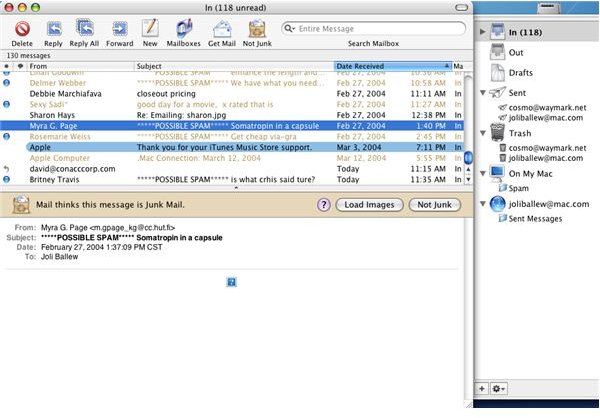
Use the options in the Rules dialog box to configure the rule; use the triangles to see the choices. Look how I’ve configured this rule to send anything that contains POSSIBLE SPAM in the subject line to the Spam folder I created earlier. [See Image 2]
-
Click OK to apply the rule. Close the Rules window.
Advertisement
Keep in mind that you don’t just have to work on filtering spam; you can also filter any other type of messages. You can send messages from e-lists to a specific folder so you can read them at the end of the day, you can send messages from your spouse to a specific folder to read on your lunch break, or you can send e-mail that contains the letters FW: to a specific folder called Junk or Jokes. It’s all about getting rid of clutter.
More Articles
Article Series Links
Part I: Creating Rules to Control Spam
Part II: Using the Junk E-Mail Filter
Part III: Using Bounce Sender
Other Articles You May Enjoy
Apple Mail: Create Folders and Subfolders to Organize Email You Want to Keep
Maintain Your Mac: How to Organize and Clean Up Email
.
Images