Just bought a printer for your Macintosh and having trouble installing it or struggling with deleting an already installed printer? Read on to find out how to add and delete a printer in Mac OS X.
Add A Printer
In Mac OS X, when you want to print a document with the Print command, a dialog box appears on the screen. The dialog box will list the printers you can use to print your document. Mac OS X includes software for many models of printers. When you connect a printer to your Mac computer, it tries to automatically recognize and install the appropriate software for it.
If your printer is not shown in the Printer pop-up menu, it probably means that Mac OS X does not have software for this particular printer. It might also mean your printer is not connected properly .
Check your connection, and if it looks good you’ll need to manually install the appropriate driver to make your printer functional. Look for the driver in any CD that came with the printer or check the website of your printer’s manufacturer (Note: To search the printer’s driver on the website, you will need your printer‘s model number). Once you have found the required driver, install it on your Mac. Note that only users with administrative rights can install the software.
Even if you are not prompted, it is a good rule of thumb to restart the computer after installing printer drivers.
Once restarted, look for your printer in the Printer menu again. If it is still now shown in the list, make sure that the printer is properly connected to your computer and turned on. Then do the following:
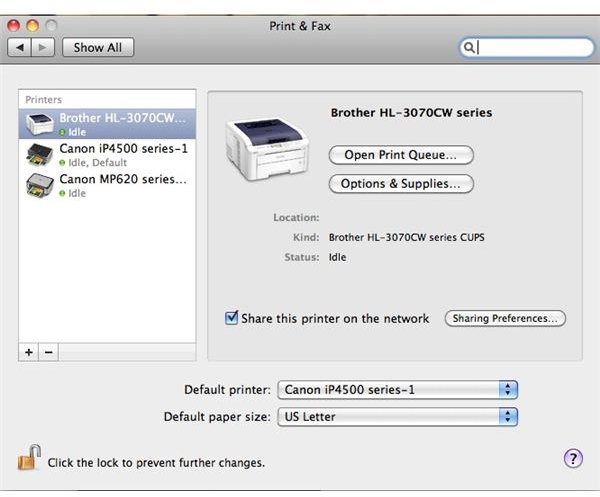
1. Go to the Apple Menu and choose System Preferences. Choose the Print and Fax option.
2. Click the “+” button under the printer list.
3. FThis will open a new window showing the devices connected to your computer.
4. From the printer list, select your printer by its name and model.
5. At the bottom of the screen you will have to choose a driver for the printer. If the correct driver is installed the computer usually chooses it for you. If not you will have to pick one from the list.
6. Click “Add” and your printer is ready to go.
Delete A Printer
On occasion you might want to delete a printer off a list. You might have multiple listings for the same printer, or you got a new printer and want to slim your list down. To delete a printer in Mac OS X, follow these steps:
-
From the Apple Menu in the upper left-hand side of the screen, select System Preferences.
-
In the System Preferences panel, click on the Print and Fax icon.
Advertisement -
In the Print and Fax preferences pane, you will see a printer list at the left-hand side of the screen. Select the printer you wish to delete.
-
After selecting the printer, click on the “-“button, below the printer list to delete the printer.
Advertisement -
Mac will show a dialog box with a warning, asking your confirmation to delete the printer. To confirm delete, click on OK.
The printer you selected is now deleted from your printer list.
For printing issues in Mac OS X, please also read Troubleshooting Mac OS X Printing Issues
Resources
Article is based on the author’s prior experience.
Screen capture is taken by the author.


