Finder windows make it easy to locate the items you want. With the Applications folder, your Users folder, and the Desktop folder all in one place, you can not only find the things you want quickly, but you can use the Finder to your advantage to help you stay organized.
The Finder Windows
Every Finder window has a row of buttons, icons, and navigation options across the top and a toolbar along the left side. A single click takes you where you want to go in almost all instances. However, if you use the Dock or the menu bar to navigate your Mac religiously, you might not be so impressed with what’s available from the Finder. In fact, it may seem as if it’s just too big and unwieldy to serve its intended purpose. If that’s the case, there are options to hide or shrink the Finder window.
If you like the Finder window and use it often, hiding and shrinking might not be your main concern. If the Finder is your window to the world of Mac, you’ll be more productive if you add, rearrange, or remove icons; add folders to the toolbar; set advanced preferences; and customize everything “Finder.” It can be personalized to your heart’s content. With that in mind, let’s see how you can become more productive by tweaking the Finder.
Move and Shrink
Moving, shrinking, enlarging, repositioning–all of these basic tasks are performed with a simple mouse click, keystroke, or basic click-and-drag of the mouse. Here are some tips and tricks for making the Finder more user-friendly:
· Shrink or enlarge the entire Finder window by dragging from the bottom right corner.
· View the contents as a list or as columns using the View menu options or the icons on the Finder itself.
· Hide the sidebar and the toolbar by clicking the small, white oval in the top right corner of the Finder window. You can also choose View>Hide Toolbar. (The sidebar displays the icon and text name—e.g., the Applications folder’s icon and the word “Applications”—but you can drag the bar between the sidebar and Finder window if you want to see only the icons and not the text. This will save you a little horizontal space while still making that information available.)
· Using View>Show View Options, change the text size to 10 pt. and remove columns for size and kind and any other data you don’t need.
· Use the separators between the panes (when in list or column view) to resize a specific pane’s size.
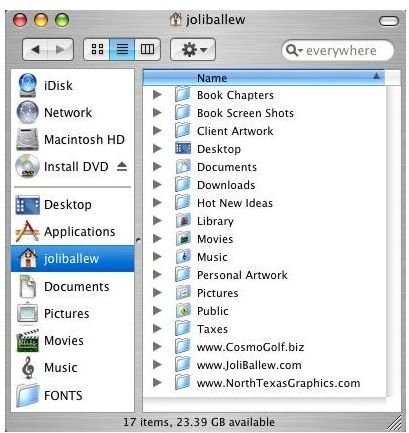
Take a look at one of my Finder windows. [See Image 1] I used the View option, List, 11 pt. text size. I removed the columns labeled Date Modified, Date Created, Size, Kind, Version, Comments, and Label and resized the window by dragging. I left the toolbar on the left for easy access to other areas of the hard disk. Now that the window is smaller, I have more desktop space for working and viewing desktop icons.
Images
Add, Rearrange, or Remove Icons
Personalizing the icons available from the Finder menu allows you to add your most-used tools right to the Finder. The default icons that run across the top of the Finder window include Back and Forward, Action, and View. You can add a number of other icons if you desire, and you can choose to add them as text, as an icon only, or as both. [See Image 2]
Want to personalize the Finder like this? Here’s how:
-
Open the Finder.
Advertisement -
Choose View>Customize Toolbar.
-
Drag any icon from the dialog box to the top of the Finder window. Get Info is an especially useful addition, as is iDisk if you have it.
Advertisement -
Click Done.
Tip: If you’re concerned about the Finder and desktop real estate, configure the newly added tools as Text Only.
You can also drag other items to the Finder window; they don’t have to be available from just the Customize Toolbar options. Items you can add include files, folders, programs, or anything, really. Just as you would add items to the Dock for easy access, you can add them here for easy access too. If you prefer to hide the Dock and use the Finder, consider these additions to make the Finder more effective:
· Open the Finder’s Applications folder and drag iPhoto, iMovie, iDVD, or any other program to the Finder interface.
· Open the Finder’s Network folder, open a workgroup folder, and drag the icon for a computer on the network to the Finder. You’ll have easy access next time you need to access the shared documents on that computer.
· Open the Finder’s Documents folder and drag the subfolder you use most often to the Finder interface.
· Highlight a Web page in Safari and drag it to the desktop. Open the Finder and drag this new Internet location file to the Finder window.
Tip: To remove any item you’ve added to the Finder, choose View>Customize Toolbar, and then drag the items away from the Finder.
Finally, with the icons or text (or both) added to the Finder window, open View>Customize Toolbar, and then drag the items to situate them as you please. Click Done when finished. Check out this Finder window. [See Image 3] I love this because I’m more comfortable with the Finder than the Dock, which I can now auto-hide, and then I’ll simply use the Command+Tab key combination to move between open applications and the Finder windows!
Images


Add Folders to Bottom Half of the Sidebar
You can add folders to the bottom half of the sidebar finder by dragging the folders there. This doesn’t move the folders–it only creates a new way to access them. For instance, if you have a subfolder that you access regularly inside the Documents folder and you want to access that folder from the left side of the Finder window, simply drag it there. Removing it is as simple as dragging it away from that area.
References
- The author took these screen shots on an older Mac running Leopard. It is the author’s experience that personalizing the Mac to suit one’s own needs helps the user work better and more efficiently.


