Calibrating the battery and display on your MacBook is something that a lot of people never do and often overlook. However, the process for both is very simple and can bring much more optimization to the way your laptop runs.
Calibrating The Battery
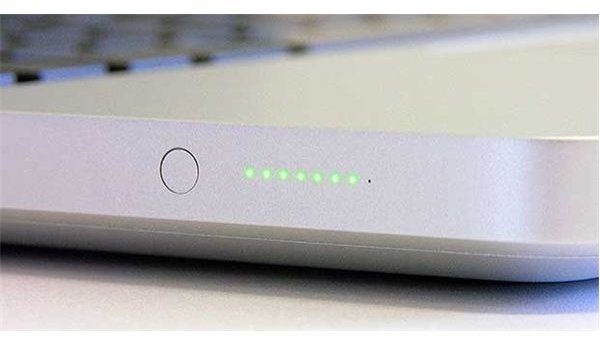
Why calibrate the battery? By default, whenever you purchase a new laptop from Apple you will notice that the battery does have some charge on it to allow you to easily set up your computer right away. But, the battery is never fully charged thus it is not synched with your computer. If you take a look at the batteries in MacBooks you will notice that on the older versions (black/white polycarbonate) there is an actual button you can push that will give you a reading of the charge on the battery. In the newer unibody models, the indicator is located on the side of the MacBook next to the ports. There is a chip built into the batteries that allow Mac batteries to give you this reading.
When you calibrate the battery, it parallels the actual battery to the screen reading that you get when you click the battery icon in OS X. Without calibration, the battery will give off a very inaccurate reading that may fluctuate weirdly.
Calibrating the MacBook battery is a very simple process. To start with, you are going to want to make sure that your computer is not connected to the charger. Use the MacBook or leave it powered on until the battery gets low enough to the point that the computer automatically puts itself in sleep mode. You want to get the battery to the lowest point possible. After you have done this, connect your MacBook to the charger and let it charge. The most important thing about this step is that you do not disconnect the power from the laptop until the laptop has reached 100% full charge. That’s all there is too it. Now, even when you disconnect from the charger, your laptop will give you an accurate reading.
Calibrating The Display
Like the battery, Apple laptop displays by default are not optimized right out of the box. In some cases the complete opposite is true. You may power on your computer and find that the display looks very poorly and colors are hued and tinted. This is when you are going to want to calibrate the display. This is also a very simple process.
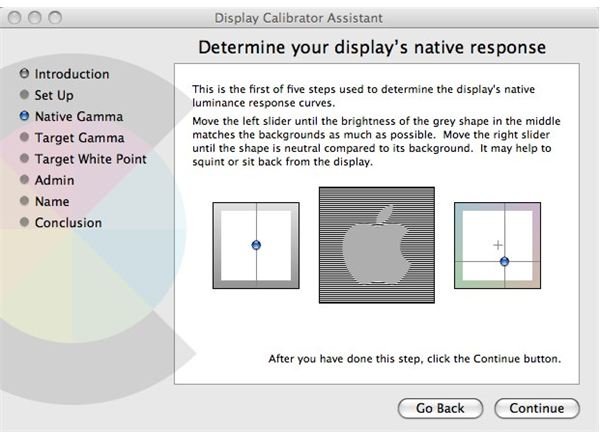
First, you are going to want to navigate to your System Preferences menu. It can be found in the dock (the icon with gears), or can be accesed through the commands: Finder > Applications > System Preferences. From this menu, click the display icon located in the second row “hardware”. This will bring you to a window that has two tabs (display and color). Click the color tab. After you have done this you will see your display in the left selection menu. It will be labeled something like “MacBook display”. Click to select it, then choose calibrate. This will open the Apple display calibrating assistant and colorsync utility. Put a checkmark in the option box for “Expert Mode” and click continue. In the next couple of steps the assistant will show you a box with an apple logo located in it. For the two sliders, it will give you instructions on how to calibrate. For the most part, all you have to do is blend the Apple logo with the background as much as possible.
After you have completed the first steps, it will ask you to set the native gama. It is best to leave this slider alone at default Mac gamma. The last step is to set the white point. Again, it is best to use the pre-configured white point. You should now have synced both your battery and your display and any changes should be noticeable immediately.


