Banners for parties and events can easily be created in Microsoft Word for Mac, either using templates available online from Microsoft or by creating your own banner from scratch, complete with decorative borders!
There are many brilliant things that you can do with Microsoft Word.
For instance, you might compile a magazine or leaflet, or you might type up recipes. You can use Word for typing up reports and reviews, for creating invoices and lists and for mailing labels.
Most notably, you can use Microsoft Word to write a novel.
But banner printing, with Microsoft Word for Mac? Just how on earth could anyone create a party banner – perhaps three feet wide – with a word-processing application that typically only prints to an A4 or letter format printer?
Well, unsurprisingly, it is possible to adjust and tweak Microsoft Word to print to pretty much any scale. While this might have an impact on the way you use your printer (and your ink budget) creating a banner and resizing it for printing on a large scale is remarkably simple in Microsoft Word: Mac 2011!
How Do I Create a Banner in Word?
When you first launch Microsoft Word: Mac 2011 , you will see a selection of various templates offered in the Word Document Gallery. These templates might be for calendars, invitations, menus or pretty much anything that you can imagine; there is a pretty big selection of items listed for you to choose from, so the search tool should come in handy in most cases.
However, if you’re looking for a banner template you will be disappointed. While banner calendars and business cards are listed in the templates index there is no large scale party style banner.
So how do you create a banner?
Begin by opening a standard blank Word document, and begin by altering the orientation of the page. This is done via Layout > Page Setup > Orientation; select Landscape from the drop-down menu.
Next, you will need to set the dimensions for the page. This can be done via Layout > Page Setup > Size¸ and you should make sure that you have the right paper size selected for your printer.
Decorating Your Microsoft Word: Mac Banner
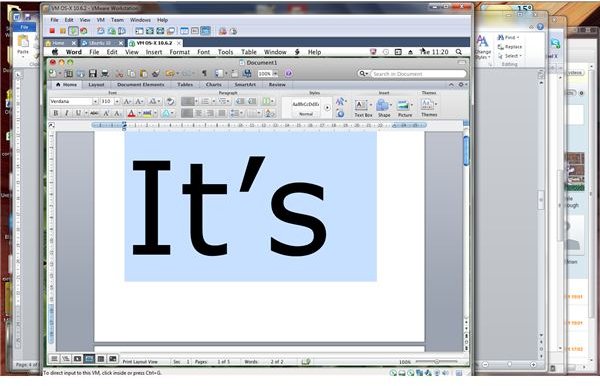
The next step is to begin creating your banner, adding the text and decorative elements that you want to include on it. You should be using the Home > Font tools for this, and for a really impressive banner that stands out you will need to be setting the font size to be pretty large.
For instance, the banner seen here was created by making the font size as large as possible while staying within the boundaries of the page and using the Font Colour button to make the second word red. You can get a good idea of how many sheets of paper are being used and how the banner will look by holding COMMAND and adjusting the mouse roller or using the Zoom slider in the lower right-hand corner of the window.
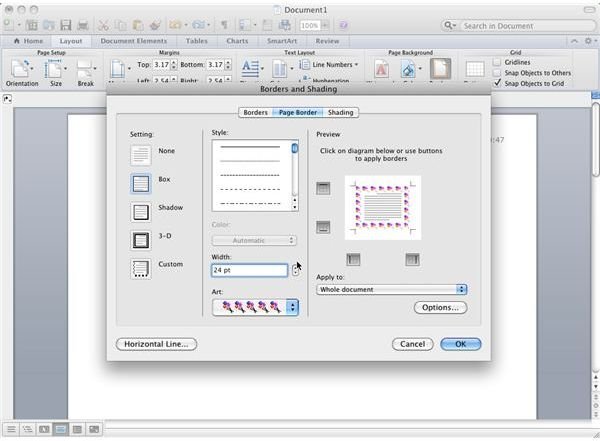
Meanwhile the decorative border was created with the Layout > Page Background > Border tool. On the Page Border screen, the Art drop down menu offers many different border images that can be added, and these can be sized using the Width control. The border can be added by clicking OK, and the banner – in this case across three pages – will be ready to print!
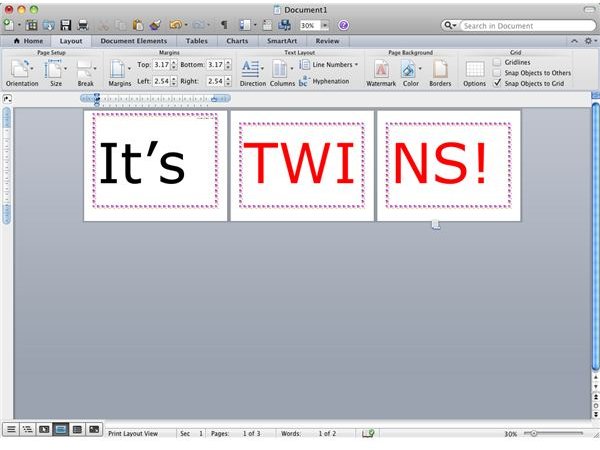
You will probably notice that there is a border around each page, but this shouldn’t be a problem – once printed out, you will want to tape together the sheets that comprise the banner, and in doing so will need to overlap each sheet, thus hiding the borders.
All you need to do once printed and taped together is pin the banner up!
References
- Author’s own experience.
- Screenshots provided by author.
References
- Author’s own experience.
- Screenshots provided by author.


