As people discover more and more the benefits of using a computer, they also begin to discover the limitations. One such limitation is the need to convert many files into other files. Here is a quick guide on converting those pesky .AVI files to a more usable .MOV.
An Introduction: Why You’ll Need to do This
I cannot even begin to tell you how troublesome .AVI files have become for me. I do a lot of video editing online, and whenever I download a Youtube video to use in one of my videos, they always end up in .AVI format. This is ridiculously frustrating on so many levels, because essentially no Mac video editor works well with these files, including things like iMovie and Final Cut.
So what’s a poor, young man to do with all of these unusable files? Well, convert them of course! Thankfully, with the birth of the internet has come a wave of free ways to do this, the easiest being a nice program called “MPEG Streamclip”. Here’s how to convert AVI files to Quicktime using it.
Step 1) Download MPEG Streamclip
So, in order to use a program that requires downloading, the first logical thing to do is to, well, download it. You can look at the end of this article for the download link, but once you get there you’ll need to choose which version of the program you want to get. It shouldn’t be too hard to decide, but if you get confused I’d recommend you just go with the latest version that’s compatible with Mac.
Step 2) Deal with the DMG
The downloaded MPEG Streamclip will come in a format called .DMG, which is a fancy way of saying it’s compressed for use in Mac OS X. “Okay, great.” you say to me with utter disinterest, “What exactly do I do with it, then?”
I let out a heaping sigh.
Just double click on it and follow the on screen instructions.
Step 3) Open MPEG Streamclip and Load In Your File
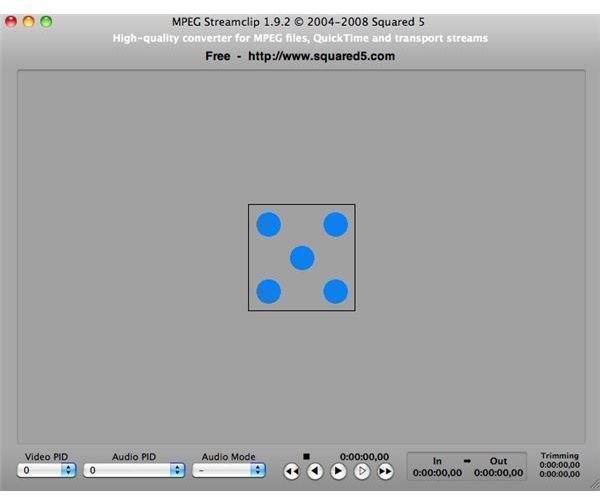
So you’ve managed to make it through the incredibly difficult installation process of MPEG Streamclip (everybody loves a little sarcasm, right?) in one piece, and you’re wondering exactly how you use the darned thing. Well, after you open it up, you should see a pretty user unfriendly layout with a lot of buttons and things that you don’t understand, as well as a square with five circles in it in the center of the window. If you don’t see these things, consider redownloading the program or reopening it more carefully.
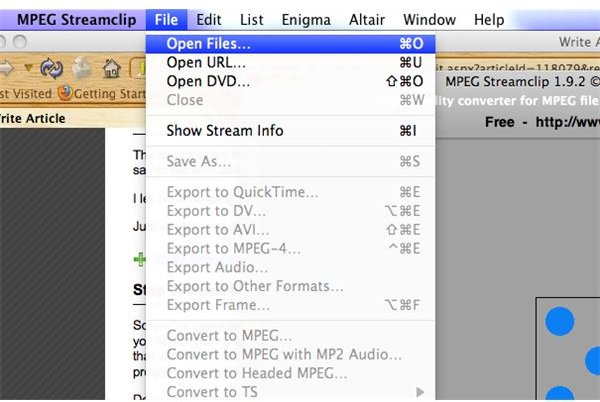
Despite the overly complex nature of the layout, however, you really don’t need to know all that much. Take a moment to get your bearings, set your preferences, and make sure everything is in working order and you didn’t destroy your computer in the process of installing this very nifty program, and then head on up to that ever-present “File” menu. Scroll down to “Open Files”, click it, and then navigate to the proper .AVI file you downloaded or imported, click on it, and then wait a few moments. If you did everything right, you should see your file appear within the main window. If not, try again.
Step 3b) Make Sure Everything Is Okay
Just a quick sidenote here to make sure you didn’t have any import problems: You may want to play through your movie file in its entirety to make sure there was no added distortion due to the presence of an otherworldly being or import problems.
Step 4) Ready… Set… Export!
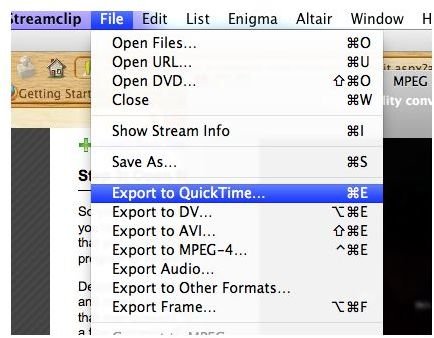
After you’ve made sure things are cool, head back to that good ol’ “File” menu at the top and scroll down to the list item titled “Export to Quicktime”. As you can see, there are many other options for you as well, including .AVI, DV, and MPEG-4, so you didn’t download a program that only has one use. Feel free to click the “Export to Quicktime” option at your leisure, but be prepared; this is where things get a little complicated, so pay attention to the next part of the guide.
Step 5) Don’t Get Confused
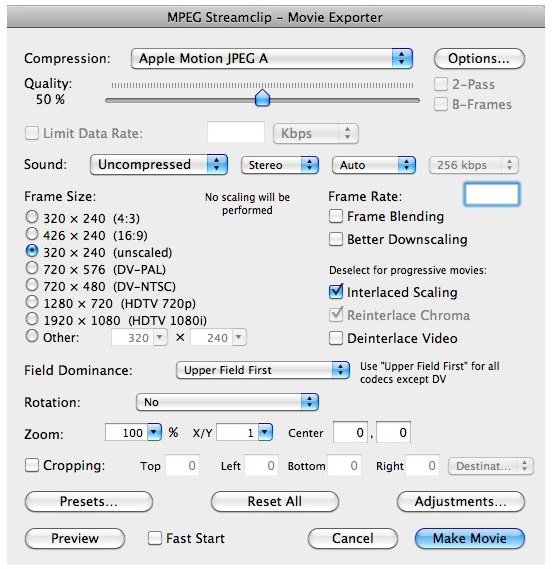
After you click the “Export” button, you will be presented with a very big, very complicated list of options and modifyers that - if you’re like me - you have absolutely no understanding of. This is totally fine, but you will have to bear with me as I explain some of the more important ones:
Frame Size: This is the actual physical size of your movie. The bigger the numbers in the parenthesis, the higher quality the movie your export is, but be wary, because this also means a larger file size.
Compression: This is the style of compression that MPEG Streamclip will use for your movie, and for the most part you won’t notice much of a difference between the options. I would recommend you just keep it set to whatever the default is.
Quality: While this one is pretty self explanatory, it is also pretty important. Slide the little slider further to the right, and you’ll get a higher quality of video (as well as a larger file size). Slide it to the left, and the opposite happens.
Frame Rate: If there is no frame rate (measured in frames per second) written in by default, generally anything above 12 will work for your eyes. If you export at 12 and it’s not good enough for you, feel free to up it as you see fit.
Step 6) Export and Finish
Once all of your settings are done being messed with, you should be set to export. Just click the “Export” button, wait for the process bar to finish, and then check out your converted file! You can also convert multiple files at a time, but you can’t convert them to different formats all at once; that has to be done separately. MPEG Streamclip isn’t the only movie converter on Mac , but it’s one of the best!
If you have any further questions, comment away! Otherwise, that’s essentially how to convert AVI files to Quicktime! Happy converting!
References
All images are screenshots taken by the author.
All information comes directly from author knowledge and use of the aforementioned program.


