
Quicken is a pretty handy application if you’re bad at handing money, but its uses aren’t just limited to keeping track of your finances and bank accounts; it can also print checks. Here’s how to get checks ready for printing with Quicken for Mac.
What is it?
Especially since the creation of the app store, the amount of applications available for you to use with your Mac is staggering. Literally hundreds of thousands of software titles are available for download, not the least of which is something called “Quicken ”. The idea behind Quicken is pretty simple: Speed up the process of keeping track of your finances, allow you to carefully organize your expenses, and prevent you from getting hit with unnecessary overdraft fees and other charges. Sounds like something everyone could use!
But beyond all of that lies quite a few other functions, and one of the most talked about ones is Quicken’s ability to print checks for you. If you’ve been wondering exactly how to do that, you need not wait any longer.
Step 1) Open Quicken, Get Your Information
The first thing you’ll need to do if you want to print checks with Quicken is to, of course, open up the program and find the information you want to print. Now, while this guide will focus on printing checks specifically, you can also print the various reports, budgets, or forms that may be cluttering up the workspace in Quicken.
Anyway, once you’ve opened up your checks for printing, make sure all the information on them is correct and then proceed to step 2.
Step 2) Choose ‘Print Checks’
Sounds like a pretty easy step, right? Well, it is, but maybe not as easy as you think. Instead of just choosing the regular “Print” option as you would if you were printing another type of document (pay reports, budgets, etc), you need to navigate your way to the specific “Print Checks” option, located within the file menu right near the “Print Option”.
If you have trouble finding the “File Menu”, look in the top right of your screen for the word “File” and then click on it. The list displayed below should contain the options I went over.
Step 3) Select Your Printing Options
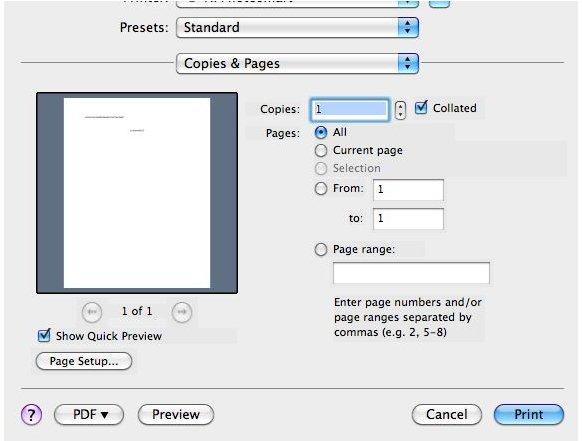
Arguably the longest step to this whole guide is one that really doesn’t have all that much to do with Quicken at all! After you select the “Print Checks” option as outlined in step 2, the window that contains all of your various options should appear, and if you’re a veteran printer, you should have no problem navigating the menus, drop down lists, and selections presented to you. If, however, you don’t print things and still have trouble figuring all of this out, here’s a quick run down:
Print Quality: Print quality, as it sounds, determines the amount of ink that each letter or line you’re printing will take. The higher the quality, the more ink is used, and thus the darker and more professional your work will look. If you’re printing these checks for a professional purpose, it is recommended that you use higher quality settings (though, perhaps not the highest), but if you’re using them for personal tracking or between friends, you could stand to use “Fast Normal” or “Fast Draft”.
Pages: If you’re printing a few pages of checks, the default setting under the “Pages” section should be enough for you. If, however, you have multiple pages of checks in the viewing window, but you only want to print a select few of them, you’ll want to change these settings. By default, it will print all the pages you have opened, but by using the “Page Range” option, you can select individual pages (separate them by commas), or do a range of pages, such as 2-6, as indicated by a hyphen. You can also choose the “current page” option to print just the checks displayed on the current page.
Copies: The last setting you’ll probably have to worry about (anything else can just be left at default) is the “Copies” setting, which can be used to print multiple copies of your checks for distribution to various people, companies, or whoever else would need them. Simply change the number in the written field to match how many copies you want. (Note: Copies is not the same as pages. If you’re printing 3 pages and you write in that you want 2 copies, you will get 6 total pages)
Step 4) Print
If you’re satisfied with your settings, choose “Print” and then wait for your printer to complete the task. Make sure you have enough paper and ink to complete what you want to print, of course! Nobody likes some half-used sheets of paper that are therefore useless.
Now, it is worth noting that occasionally, your printer will not print the checks printing with Quicken for Mac, and when this happens, you’ll want to troubleshoot the device to try and make it work again. Printing checks is no small task, and you want to make sure it works whenever you need it to!
References
Information Reference:
Author Knowledge of Printers and Printing Devices
Image Reference:
Screenshot taken by the author


